Category: Global
AI’s Mild Ride: RoadBotics Puts AI on Pothole Patrol
National Pothole Day is Jan. 15. Its timing is no accident.
All over the Northern hemisphere, potholes are at their suspension-wrecking, spine-shaking worst this month.
Thanks to AI, one startup is working all year long to alleviate this menace. Benjamin Schmidt, president and co-founder of RoadBotics, is using the tech to pave the way to better roads.
His startup is identifying areas at risk of potholes, so city governments can improve roads before damage worsens.
Schmidt spoke with AI Podcast host Noah Kravitz about how RoadBotics is working with over 160 governments across the world to collect and analyze video data to improve preventative maintenance.
Key Points From This Episode:
- Using smartphones placed against car windshields, RoadBotics collects and analyzes video data to assign each road a score, which local governments can use to inform infrastructure decisions.
- RoadBotics protects privacy by blurring people, cars and other sensitive data so only roads are analyzed.
- Early this year, RoadBotics will be release an app so anyone can use smartphones to collect data and submit to their neural network to help improve analysis.
Tweetables:
“The sooner you can detect [surface distresses], the sooner you can put a cheaper intervention in now that really just saves the life of the road.” — Benjamin Schmidt [5:00]
“RoadBotics was founded at exactly the right moment with the right tech, the right hardware. So we’re now in this sweet spot where we can actually deploy a solution” — Benjamin Schmidt [6:46]
You Might Also Like
How Deep Learning Will Reshape Our Cities
Lynn Richards, president and CEO of the Congress for New Urbanism, and Charles Marohn, president and co-founder of Strong Towns, weigh in on the benefits of using AI to design cities, and simulating designs in VR prior to construction.
How AI Will Revolutionize Driving
Danny Shapiro, senior director of automotive at NVIDIA, explains the capabilities necessary for autonomous driving, from object detection to AI to high performance computing.
Where Is Deep Learning Going Next?
Bryan Catanzaro, head of applied deep learning research at NVIDIA, explains his journey in AI from UC Berkeley, to Baidu, to NVIDIA. He’s striving for AI that works so seamlessly that users don’t even notice it, and he explains how GPUs are helping to make that happen.
Featured image credit: Santeri Viinamäki, some rights reserved.
The post AI’s Mild Ride: RoadBotics Puts AI on Pothole Patrol appeared first on The Official NVIDIA Blog.
Cinnamon AI saves 70% on ML model training costs with Amazon SageMaker Managed Spot Training
Developers are constantly training and re-training machine learning (ML) models so they can continuously improve model predictions. Depending on the dataset size, model training jobs can take anywhere from a few minutes to multiple hours or days. ML development can be a complex, expensive, and iterative process. Being compute intensive, keeping compute costs low for ML development is vital and a key enabler to achieving scale.
Amazon SageMaker is a fully managed service to build, train, tune, and deploy ML models at scale. Amazon SageMaker Managed Spot Training enables you to save up to 90% in training costs by using Amazon EC2 Spot Instances for training.
EC2 Spot Instances are a great way to optimize compute costs for ML training workloads, they use spare Amazon EC2 capacity which is available for up to a 90% discount over On-Demand Instances. When there is a spike in requests for a particular On-Demand instance type in a specific availability zone (AZ), AWS can reclaim the Spot Instances with a two-minute notification.
This post describes how Cinnamon AI reduced their ML training costs by 70% and increased the number of daily training jobs by 40% without increasing their budgets by using Amazon SageMaker Managed Spot Training.
Amazon SageMaker Managed Spot Training
Managed Spot Training uses EC2 Spot Instances to run training jobs instead of On-Demand Instances. With Managed Spot Training, Amazon SageMaker manages the Spot capacity and handles interruptions. In case of a Spot interruption, Managed Spot Training pauses the training job and reliably resumes as Spot capacity becomes available. As a result, Managed Spot Training is best suited for model training jobs with flexible starting times and run durations. You can configure your training job to use checkpoints. When enabled, Amazon SageMaker copies checkpoint data from a local path to Amazon S3 and resumes interrupted training jobs from the last checkpoint instead of restarting. Managed Spot Training eliminates the need for you to build additional tooling to poll for Spot capacity or manage interruptions. You can use Managed Spot Training when training models built using the popular ML frameworks, Amazon SageMaker built-in algorithms, and custom-built models.
To enable the feature, choose Enable managed spot training on the Amazon SageMaker console. See the following screenshot.
If you are using Amazon SageMaker SDK, set train_use_spot_instances to true in the Estimator constructor. You can also specify a stopping condition that controls how long Amazon SageMaker waits for Spot Instances to become available.
Cinnamon AI saves 70% on model training costs
With the massive opportunity that cognitive and artificial intelligence (AI) systems present, many companies are developing AI-powered products to build intelligent services. One such innovator is Cinnamon AI, a Japan-based startup with a mission to “extend human potential by eliminating repetitive tasks” through their AI service offerings.
Cinnamon AI’s flagship product, Flax Scanner, is a document reader that uses natural language processing (NLP) algorithms to automate data extraction from unstructured business documents such as invoices, receipts, insurance claims, and financial statements. It converts these documents into database-ready files. The goal is to eliminate the need for humans to read such documents to extract the required data, thus saving businesses millions of hours in time and reducing their operational costs. This service also works on hand-written documents and with Japanese characters.
Cinnamon AI has also developed two other ML-powered services called Rossa Voice and Aurora. Rossa Voice is a high-precision, real-time voice recognition service that has applications around voice fraud detection and to transcribe records at call centers. And Aurora is a service that automatically extracts necessary information from long sentences in documents. You can use this service to find important information from specifications and contract documents.
Cinnamon AI had a goal to reduce their ML development costs, so they decided to consolidate their disparate development environments into a single platform and then continuously optimize on costs. They chose AWS to develop their ML services on because of AWS’s breadth of services, cost effective pricing options, granular security controls, and technical support. As a first step, Cinnamon AI migrated all their ML workloads from on-premises environments and other cloud providers onto AWS. Next, the team optimized their EC2 usage and started using Amazon SageMaker to train their ML models. More recently, they started using the Managed Spot Training feature to use Spot Instances for training, which helped them optimize their cost profile significantly.
“The Managed Spot Training feature of Amazon SageMaker has had a profound impact on our AWS cost savings. Our AWS EC2 costs reduced by up to 70% after using Managed Spot Training,” said Tetsuya Saito, General Manager of Infrastructure and Information Security Office at Cinnamon AI. “In addition, Managed Spot Training does not require complicated methods and can be used simply from the SageMaker SDK.”
The following graph shows Cinnamon AI’s model training cost savings journey over six months. In June 2019, after moving their ML workloads onto AWS, they started using EC2 On-Demand Instances for model training. You can use this as a point of reference from a training cost perspective. Over the next few months, they optimized their EC2 On-Demand usage mainly through instance right sizing and using GPU instances (P2, P3) for large training jobs. They also adopted Amazon SageMaker for model training with On-Demand Instances and reduced their training costs by approximately 20%. Furthermore, they saw substantial cost savings of 70% by using Managed Spot Training to use Spot Instances for model training in November 2019. Their cost optimization effort also resulted in their ability to increase the number of daily model training jobs by 40%, while maintaining a reduced cost profile.
Cinnamon AI’s Model Development Environment
As Cinnamon AI is developing multiple ML-powered products and services, their data types vary based on the application and include 2D images, audio, and text with dataset sizes ranging from 100 MB to 40 GB. They predominantly use custom deep learning models and their frameworks of choice are TensorFlow, PyTorch, and Keras. They use GPU instances for time-consuming neural network training jobs, with run times ranging from a few hours to days, and use CPU instances for smaller model training experiments.
The following architecture depicts Cinnamon AI’s ML environment and workflow at a high level.
The AI researchers develop code on their workstations and then synchronize it to a shared always-on EC2 server (On-Demand instance). This instance is used to call Amazon SageMaker local mode to run, test, and debug their scripts and models on small datasets. After the executed code is tested, it is packaged into a Docker image and stored in Amazon ECR. This enables researchers to share their work across teams and to pull the required Docker image from ECR on their respective Amazon SageMaker training instances. Also, on the EC2 server, the researchers can use the Amazon SageMaker Python SDK to initialize an Amazon SageMaker Estimator and then launch training jobs in Amazon SageMaker.
Almost all of Cinnamon AI’s training jobs run on Spot Instances in Amazon SageMaker via Managed Spot Training, with checkpointing enabled to save the state of the models. Amazon SageMaker saves the checkpoints to Amazon S3 while the training is in progress, and they can use them to resume training in events of Spot interruptions. In addition to S3, Cinnamon AI uses Amazon FSx for Lustre to feed data to Amazon SageMaker for training ML models. Using Amazon FSx for Lustre has reduced the data loading time to the SageMaker training instance compared to directly loading the data from S3. They can access the data in S3 and Amazon FSx for Lustre by both the EC2 instance and the SageMaker training instance. Amazon SageMaker publishes training metrics to Amazon CloudWatch, which Cinnamon AI researchers use to monitor their training jobs.
Conclusion
Managed Spot Training is a great way to optimize model training costs for jobs with flexible starting times and run durations. The Cinnamon AI team has successfully taken advantage of the cost-saving strategies with Amazon SageMaker and has increased the number of daily experiments and reduced training costs by 70%. If you are not using Spot Instances for model training, try out Managed Spot Training. For more information, see Managed Spot Training: Save Up to 90% On Your Amazon SageMaker Training Jobs. You can get started with Amazon SageMaker here.
About the Authors
 Sundar Ranganathan is a Principal Business Development Manager on the EC2 team focusing on EC2 Spot for AI/ML in addition to Big Data, Containers, and DevOps workloads. His experience includes leadership roles in product management and product development at NetApp, Micron Technology, Qualcomm, and Mentor Graphics.
 Yoshitaka Haribara, Ph.D., is a Startup Solutions Architect in Japan focusing on machine learning workloads. He helped Cinnamon AI to migrate their workload on to Amazon SageMaker.
Additional contributions by by Shoko Utsunomiya, a Senior Solution Architect at AWS.
Building machine learning workflows with AWS Data Exchange and Amazon SageMaker
Thanks to cloud services such as Amazon SageMaker and AWS Data Exchange, machine learning (ML) is now easier than ever. This post explains how to build a model that predicts restaurant grades of NYC restaurants using AWS Data Exchange and Amazon SageMaker. We use a dataset of 23,372 restaurant inspection grades and scores from AWS Data Exchange alongside Amazon SageMaker to train and deploy a model using the Linear Learner Algorithm.
Background
ML workflows are an iterative process that require many decisions to be made such as whether or not training data is needed, what attributes to capture, what algorithms to use, and where to deploy a trained model. All of these decisions effect the outcome of a learning system. Once a problem is defined, you must choose from four distinct types of learning systems. Some learning systems depend entirely on training data where others require no training data at all, but rather a well-defined environment and action space. When an algorithm relies on training data, the quality and sensitivity of the final model depends heavily on the characteristics of the training set. It is here that many enter the tedious loop of trying to find the right balance of features that will result in a well-balanced and accurate model. An overview of each learning system can be seen below:
- Supervised – In supervised learning the training set includes labels so the algorithm knows the correct label given a set of attributes. For example, the attributes could be the color and weight of a fish where the label is the type of fish. Eventually the model learns how to assign the correct or most probable label. A typical supervised learning task is classification, which is the task of assigning inputs such as text or images to one of several predefined categories. Examples include detecting spam email messages based upon the message header and content, categorizing cells as malignant or benign based upon the results of MRI scans, and classifying galaxies based upon their shapes (Tan et al. 2006). The algorithms used in this category typically consist of k-nearest neighbors, linear regression, logistic regression, support vector machines, and neural networks.
- Unsupervised – Unsupervised learning uses algorithms that discover relationships in unlabeled data. The algorithms must explore the data and find the relationships based on the known features. Some of the common algorithms used within unsupervised learning include clustering (K-means, DBSCAN, and hierarchical cluster analysis) where you are grouping similar data points, anomaly detection where you are trying to find outliers, as well as association rule learning where you are trying to discover the correlation between features (Aurélien 2019). In practice, this could be seen by clustering cities based on crime rates to find out which cities are alike or clustering products at a grocery store based on customer age to discover patterns.
- Semi-supervised – Semi-supervised learning uses training data that consists of both labeled and unlabeled data. The algorithms are often a combination of both unsupervised and supervised algorithms. If you were to have a dataset with unlabeled data the first step would be to label the data. Once the dataset has been labeled, you can train your algorithm with traditional supervised learning techniques to map your features to known labels. Photo-hosting services often use this workflow by using your skills to label an unknown face. Once the face is known another algorithm can scan all your photos to identify the now known face.
- Reinforcement – Reinforcement learning (RL) differs from the previous learning systems because it doesn’t have to learn from training data. Instead, the model learns from its own experience in the context of a well-defined environment. The learning system is called an agent and that agent can observe the environment, select and perform actions based on a policy, and get rewards in return. The agent eventually learns to maximize its reward over time based on its previous experience. For more information or to get some clarity about RL, see the documentation on Amazon SageMaker RL.
Steps to build the restaurant grade prediction model
When beginning an ML project, it is important to think about the whole process and not just the final product. In this project, we go through the following steps:
- Define the problem you want to solve. In this case, we want to make better informed choices on where to eat in NYC based on cleanliness.
- Find a dataset to train your model. We want a dataset that contains restaurant inspection grades and scores in NYC.
- Review the data. We want to make sure the data we need is present and that there is enough to train the model.
- Prepare and clean the dataset for training in Amazon SageMaker. We want to only include the needed data such as borough and food category and ensure the correct format is used.
- Select a model for multi-class classification. In our case we are training with the Linear Learner Algorithm.
- Deploy the model to Amazon SageMaker. With the model deployed to Amazon SageMaker we can invoke the endpoint to get predictions.
Data is the foundation of ML; the quality of the final model depends on the quality of the data used for training. In our workflow, half of the steps are related to data collection and preparation. This theme can be seen in most ML projects and is often the most challenging part. Additionally, you have to think about the characteristics of your data to prevent an overly sensitive or perhaps a not sensitive enough model. Furthermore, not all data is internal. You may have to use either free or paid third-party data to enrich internal datasets and improve the quality of the model, but finding, licensing, and consuming this third-party data has been a challenge for years. Fortunately, you now have AWS Data Exchange.
Using AWS Data Exchange
AWS Data Exchange can simplify the data collection process by making it easy to find, subscribe to, and use third-party data in the cloud. You can browse over 1,500 data products from more than 90 qualified data providers in the AWS Marketplace. Previously, there was the need for access to more data to drive your analytics, train ML models, and make data-driven decisions, but now with AWS Data Exchange, you have all of that in one place. For more information, see AWS Data Exchange – Find, Subscribe To, and Use Data Products.
AWS Data Exchange makes it easy to get started with ML. You can jump-start your projects using one or a combination of the hundreds of datasets available. You can also enrich your internal data with external third-party data. All the datasets are available using a single cloud-native API that delivers your data directly to Amazon S3, which we will see in our workflow. This saves you and your team valuable time and resources, which you can now use for more value-added activities. With this combination, you can take data from AWS Data Exchange and feed it into Amazon SageMaker to train and deploy your models.
Using Amazon SageMaker
Amazon SageMaker is a fully managed service that enables you to quickly and easily build, train, and deploy ML models. You can take the NYC restaurant data from AWS Data Exchange and use the features of Amazon SageMaker to train and deploy a model. You will be using fully managed instances that run Jupyter notebooks to explore and preprocess the training data. These notebooks are pre-loaded with CUDA and cuDNN drivers for popular deep learning platforms, Anaconda packages, and libraries for TensorFlow, Apache MXNet, and PyTorch.
You will also be using supervised algorithms such as the linear learner algorithm to train the model. Finally, the model is deployed to an Amazon SageMaker endpoint to begin servicing requests and predicting restaurant grades. By combining the power of AWS Data Exchange with Amazon SageMaker, you have a robust set of tools to start solving the most challenging ML problems, and you are perfectly positioned to start building multi-class classifiers.
Solution overview
The solution in this post produces a multi-class classifier that can predict the grade of restaurants in New York City based on borough and food category. The following diagram shows the complete architecture.

First, take the data from AWS Data Exchange and place it into an S3 bucket. Point an AWS Glue crawler at it to create a Data Catalog of the data. With the Data Catalog in place, use Amazon Athena to query, clean, and format the data for training. When the data has transformed, load the training set back into S3. Finally, create a Jupyter notebook in Amazon SageMaker to train, deploy, and invoke your predictor.
Storing data in S3
Getting training data is often a time-consuming and challenging part of an ML project. In this case, you need to make sure that you can actually find a large enough dataset that has inspection information for restaurants in NYC, and that it contains the right attributes. Fortunately, with AWS Data Exchange you can start searching the product catalog for data. In this case, you are interested in the quality of restaurants in New York City, so enter New York Restaurant Data in the search bar and filter for free datasets. There is a product from Intellect Design Arena, Inc. offered for free, titled NY City Restaurant Data with inspection grade & score (Trial).
After you subscribe to the dataset, you need to find a way to expose the data to other AWS services. To accomplish this, export the data to S3 by choosing your subscription, your dataset, and a revision, and exporting to S3. When the data is in S3, you can download the file and look at the data to see what features are captured. The following screenshot shows the revision page which allows you to export your data using the “Export to Amazon S3” button.

You can now download the file and look at the contents to understand how much data there is and what attributes are captured. For this example, you are only concerned with three attributes: the borough (labeled BORO), cuisine description, and the grade. A new file is created that only contains the data relevant to this use case and loaded back into S3. With the data in S3, other AWS services can quickly and securely access the data. The following screenshot captures an example of what your S3 bucket might look like once your folders and data have been loaded.
Create a Data Catalog with AWS Glue crawlers
The data in its current form is not formatted correctly for training in Amazon SageMaker, so you need to build an Extract, Transform, Load (ETL) pipeline to get this dataset into the proper format. Later in the pipeline, you use Athena to query this data and generate a formatted training set, but currently the data is just a CSV file in a bucket and we need a way to interact with the data. You can use AWS Glue crawlers to scan your data and generate a Data Catalog that enables Athena to query the data within S3. For more information, see Defining Crawlers. After the AWS Glue crawler runs, you now have a Data Catalog that Athena can use to query data. The details of your data are captured and can be seen by clicking on the newly created Data Catalog. The following screenshot shows the Data Catalog interface, which contains all the information pertaining to your data.

Querying data in Athena and creating a training set
Now that you have a dataset in S3 and the data catalog from the AWS Glue crawler, you can use Athena to start querying and formatting the data. You can use the integrated query editor to generate SQL queries that allow you to explore and transform the data. For this example, you created a SQL query to generate the following training set. This is to simplify the training process because you are moving from text-based attributes to numerically based attributes. When using the linear learner algorithm for multi-class classification, it is a requirement that the class labels be numerical values from 0 to N-1, where N is the number of possible classes. After you run the query in Athena, you can download the results and place the new dataset into S3. You are now ready to begin training a model in Amazon SageMaker. See the following code:
The SQL query creates a numerical representation of the attributes and class labels, which can be seen in the following table.
| boro_label | cat_label | class_label | |
| 1 | 5 | 8 | 0 |
| 2 | 5 | 8 | 0 |
| 3 | 5 | 8 | 0 |
| 4 | 5 | 8 | 0 |
| 5 | 5 | 8 | 0 |
| 6 | 5 | 8 | 0 |
| 7 | 5 | 8 | 0 |
| 8 | 5 | 8 | 0 |
| 9 | 5 | 8 | 0 |
| 10 | 5 | 8 | 0 |
| 11 | 5 | 8 | 0 |
| 12 | 5 | 8 | 0 |
| 13 | 5 | 8 | 0 |
| 14 | 5 | 8 | 0 |
| 15 | 5 | 8 | 0 |
Training and deploying a model in Amazon SageMaker
Now that you have clean data, you will use Amazon SageMaker to build, train, and deploy your model. First, create a Jupyter notebook in Amazon SageMaker to start writing and executing your code. You then import your data from S3 into your Jupyter notebook environment and proceed to train the model. To train the model, use the linear learner algorithm that comes included in Amazon SageMaker. The linear learner algorithm provides a solution for both classification and regression problems, but in this post, you are focusing on classification. The following Python code shows the steps to load, format, and train your model:
After the training job is complete, you can deploy the model onto an instance. This provides you with an endpoint that listens for prediction requests. See the following Python code:
Invoking an Amazon SageMaker endpoint
Now that you have a trained model deployed, you are ready to start invoking the endpoint to get predictions. The endpoint provides a score for each class type and a predicted label based on the highest score. You now have an endpoint that you can integrate into your application. The following Python code is an example of invoking the endpoint in an Amazon SageMaker notebook:
After the endpoint is invoked, a response is provided and formatted into a readable prediction. See the following code:
Cleaning up
To prevent any ongoing billing, you should clean up your resources. Start with AWS Data Exchange. If you subscribed to the dataset used in this example, set the subscription to terminate at the end of the one-month trial period. Delete any S3 buckets that are storing data used in this example. Delete the AWS Glue Data Catalog that you created as a result of the AWS Glue crawler. Also, delete your Amazon SageMaker notebook instance and the endpoint that you created from deploying your model.
Summary
This post provided an example workflow that uses AWS Data Exchange and Amazon SageMaker to build, train, and deploy a multi-class classifier. You can use AWS Data Exchange to jump-start your ML projects with third-party data, and use Amazon SageMaker to create solutions for your ML tasks with built-in tools and algorithms. If you are in the early stages of your ML project or are looking for a way to improve your already existing datasets, check out AWS Data Exchange. You could save yourself hours of data wrangling.
References
- Géron Aurélien. Hands-on Machine Learning with Scikit-Learn, Keras, and TensorFlow: Concepts, Tools, and Techniques to Build Intelligent Systems. OReilly, 2019.
- Tan, Pang-Ning, et al. Introduction to Data Mining. Pearson, 2006.
About the author
 Ben Fields is a Solutions Architect for Strategic Accounts based out of Seattle, Washington. His interests and experience include AI/ML, containers, and big data. You can often find him out climbing at the nearest climbing gym, playing ice hockey at the closest rink, or enjoying the warmth of home with a good game.
New Online Course Gets IT Up to Speed on AI
Enterprise use of AI has grown 270 percent over the past four years, according to a 2019 survey of CIOs by Gartner.
To stay competitive in the face of this rapid adoption, organizations need to build data center infrastructure that is scalable and flexible enough to meet quickly evolving and expanding AI workloads.
IT plays a critical role in this. IT professionals across data center management, development operations (devops), security compliance and data governance need to be set up for success.
To help, the NVIDIA Deep Learning Institute has released an online, self-paced Introduction to AI in the Data Center course designed for IT professionals. (Enroll today — the course is free through Jan. 31 with code DLI_IT_BLOG_PROMO.)
The course explores AI concepts and terminology, NVIDIA’s AI software architecture and how to implement and scale AI workloads in the data center.
In this focused four-hour course, IT professionals will understand how AI is transforming industry and how to deploy GPU accelerated computing in the data center to facilitate this capability in their own organization. Plus, participants will earn a digital badge of completion to support their professional growth.
For enterprises considering how to get started with the right resources and training to support their needs, this course will get your IT teams started on the right foot. At a high level, the course covers:
- GPU Computing in the Data Center
- Introduction to Artificial Intelligence
- Introduction to GPUs
- GPU Software Ecosystem
- Server-Level Considerations
- Rack-Level Considerations
- Data Center-Level Considerations
The Deep Learning Institute offers hands-on training in AI, accelerated computing and accelerated data science. Developers, data scientists, researchers, students, and now IT professionals can enroll in DLI courses to get the practical experience they need to learn how to deploy AI in their work. To date, the DLI has trained more than 200,000 people.
Enroll in the “Introduction to AI in the Data Center” course for free with code DLI_IT_BLOG_PROMO before Jan. 31.
To learn more about NVIDIA technology, read about our data center and AI solutions. Plus, join us in March at NVIDIA’s GPU Technology Conference in Silicon Valley for hands-on training, expert-led talks, and opportunities to network with others in the industry.
The post New Online Course Gets IT Up to Speed on AI appeared first on The Official NVIDIA Blog.
6 AI features Microsoft added to Office in 2019
The post 6 AI features Microsoft added to Office in 2019 appeared first on The AI Blog.
AI Meets 5G at the Edge: The Innovation Center at MWC 2020 in Barcelona
AI is alive at the edge of the network, where it’s already transforming everything from car makers to supermarkets. And we’re just getting started.
NVIDIA’s AI Edge Innovation Center, a first for this year’s Mobile World Congress (MWC) in Barcelona, will put attendees at the intersection of AI, 5G and edge computing. There, they can hear about best practices for AI at the edge and get an update on how NVIDIA GPUs are paving the way to better, smarter 5G services.
It’s a story that’s moving fast.
AI was born in the cloud to process the vast amounts of data needed for jobs like recommending new products and optimizing news feeds. But most enterprises interact with their customers and products in the physical world at the edge of the network — in stores, warehouses and smart cities.
The need to sense, infer and act in real time as conditions change is driving the next wave of AI adoption at the edge. That’s why a growing list of forward-thinking companies are building their own AI capabilities using the NVIDIA EGX edge-computing platform.
Walmart, for example, built a smart supermarket it calls its Intelligent Retail Lab. Jakarta uses AI in a smart city application to manage its vehicle registration program. BMW and Procter & Gamble automate inspection of their products in smart factories. They all use NVIDIA EGX along with our Metropolis application framework for video and data analytics.
For conversational AI, the NVIDIA Jarvis developer kit enables voice assistants geared to run on embedded GPUs in smart cars or other systems. WeChat, the world’s most popular smartphone app, accelerates conversational AI using NVIDIA TensorRT software for inference.
All these software stacks ride on our CUDA-X libraries, tools, and technologies that run on an installed base of more than 500 million NVIDIA GPUs.
Carriers Make the Call
At MWC Los Angeles this year, NVIDIA founder and CEO Jensen Huang announced Aerial, software that rides on the EGX platform to let telecommunications companies harness the power of GPU acceleration.

With Aerial, carriers can both increase the spectral efficiency of their virtualized 5G radio-access networks and offer new AI services for smart cities, smart factories, cloud gaming and more — all on the same computing platform.
In Barcelona, NVIDIA and partners including Ericsson will give an update on how Aerial will reshape the mobile edge network.
Verizon is already using NVIDIA GPUs at the edge to deliver real-time ray tracing for AR/VR applications over 5G networks.
It’s one of several ways telecom applications can be taken to the next level with GPU acceleration. Imagine having the ability to process complex AI jobs on the nearest base station with the speed and ease of making a cellular call.
Your Dance Card for Barcelona
For a few days in February, we will turn our innovation center — located at Fira de Barcelona, Hall 4 — into a virtual university on AI with 5G at the edge. Attendees will get a world-class deep dive on this strategic technology mashup and how companies are leveraging it to monetize 5G.
Sessions start Monday morning, Feb. 24, and include AI customer case studies in retail, manufacturing and smart cities. Afternoon talks will explore consumer applications such as cloud gaming, 5G-enabled cloud AR/VR and AI in live sports.
We’ve partnered with the organizers of MWC on applied AI sessions on Tuesday, Feb. 25. These presentations will cover topics like federated learning, an emerging technique for collaborating on the development and training of AI models while protecting data privacy.
Wednesday’s schedule features three roundtables where attendees can meet executives working at the intersection of AI, 5G and edge computing. The week also includes two instructor-led sessions from the NVIDIA Deep Learning Institute that trains developers on best practices.
See Demos, Take a Meeting
For a hands-on experience, check out our lineup of demos based on the NVIDIA EGX platform. These will highlight applications such as object detection in a retail setting, ways to unsnarl traffic congestion in a smart city and our cloud-gaming service GeForce Now.
To learn more about the capabilities of AI, 5G and edge computing, check out the full agenda and book an appointment here.
The post AI Meets 5G at the Edge: The Innovation Center at MWC 2020 in Barcelona appeared first on The Official NVIDIA Blog.
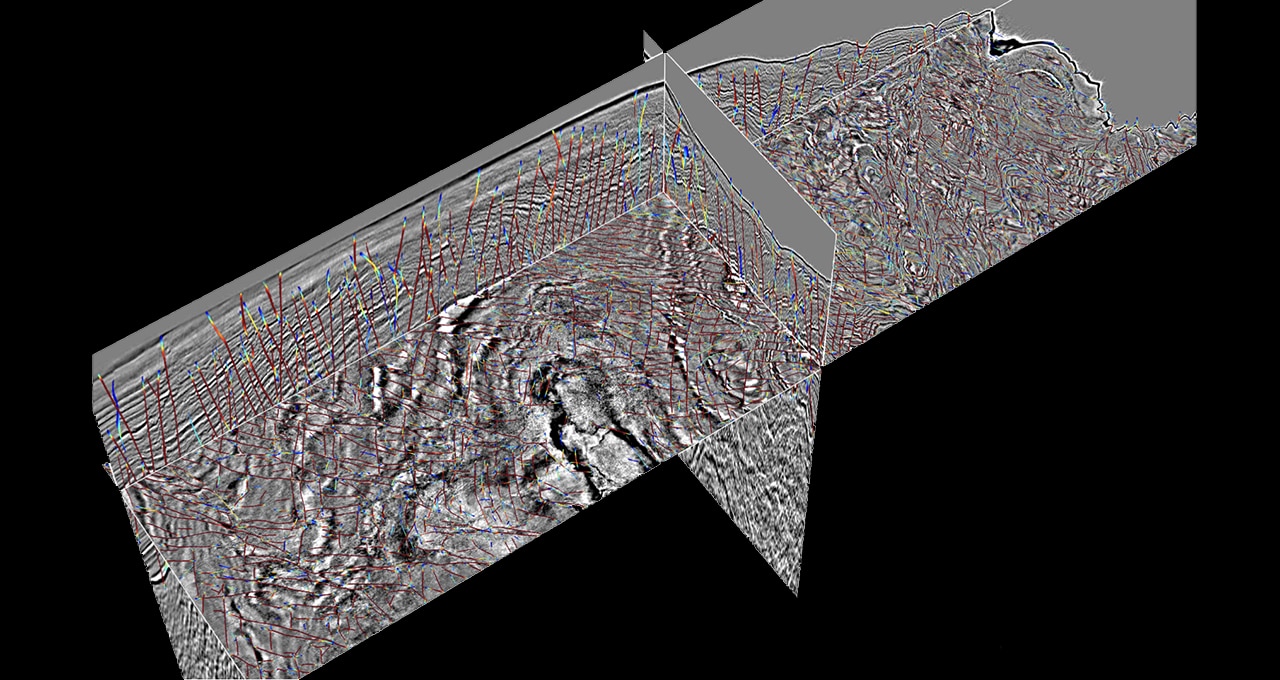
Deep Learning Shakes Up Geologists’ Tools to Study Seismic Fault Systems
Fifteen years after a magnitude 9.1 earthquake and tsunami struck off the coast of Indonesia, killing more than 200,000 people in over a dozen countries, geologists are still working to understand the complex fault systems that run through Earth’s crust.
While major faults are easy for geologists to spot, these large features are connected to other, smaller faults and fractures in the rock. Identifying these smaller faults is painstaking, requiring weeks to study individual slices from a 3D image.
Researchers at the University of Texas at Austin are shaking up the process with deep learning models that identify geologic fault systems from 3D seismic images, saving scientists time and resources. The developers used NVIDIA GPUs and synthetic data to train neural networks that spot small, subtle faults typically missed by human interpreters.
Examining fault systems helps scientists to determine which seismic features are older than others and to study regions of interest like continental margins, where a continental plate meets an oceanic one.
Seismic analyses are also used in the energy sector to plan drilling and rigging activities to extract oil and natural gas, as well as the opposite process of carbon sequestration — injecting carbon dioxide back into the ground to mitigate the effects of climate change.
“Deep learning isn’t just a little bit more accurate — it’s on a whole different level both in accuracy and efficiency.” – Sergey Fomel
“Sometimes you want to drill into the fractures, and sometimes you want to stay away from them,” said Sergey Fomel, geological sciences professor at UT Austin. “But in either case, you need to know where they are.”
Tracing Cracks in Earth’s Upper Crust
Seismic fault systems are so complex that researchers analyzing real-world data by hand miss some of the finer cracks and fissures connected to a major fault. As a result, a deep learning model trained on human-annotated datasets will also miss these smaller fractures.
To get around this limitation, the researchers created synthetic data of seismic faults. Using synthetic data meant the scientists already knew the location of each major and minor fault in the dataset. This ground-truth baseline enabled them to train an AI model that surpasses the accuracy of manual labeling.
The team’s deep learning model parses 3D volumetric data to determine the probability that there’s a fault at every pixel within the image. Geologists can then go through the regions the neural network has flagged as having a high probability of faults present to conduct their analyses.
“Geologists help explain what happened throughout the history of geologic time,” he said. “They still need to analyze the AI model’s results to create the story, but we want to relieve them from the labor of trying to pick these features out manually. It’s not the best use of geologists’ time.”
Fomel said it can take up to a month to analyze by hand fault systems that take just seconds to process with the team’s CNN-based model, using an NVIDIA GPU for inference. Previous automated methods took hours and were much less accurate.
“Deep learning isn’t just a little bit more accurate — it’s on a whole different level both in accuracy and efficiency,” Fomel said. “It’s a game changer in terms of automatic interpretation.”
The researchers trained their neural networks on the Texas Advanced Computing Center’s Maverick2 system, powered by NVIDIA GPUs. Their deep learning models were built using the PyTorch and TensorFlow deep learning frameworks, as well as the Madagascar software package for geophysical data analysis.
Besides faults, these algorithms can be used to detect other features geologists examine, including salt bodies, sedimentary layers and channels. The researchers are also designing neural networks to calculate relative geologic time from seismic data — a measure that gives scientists detailed information about geologic structures.
The post Deep Learning Shakes Up Geologists’ Tools to Study Seismic Fault Systems appeared first on The Official NVIDIA Blog.
Saved by the Spell: Serkan Piantino’s Company Makes AI for Everyone
Spell, founded by Serkan Piantino, is making machine learning as easy as ABC.
Piantino, CEO of the New York-based startup and former director of engineering for Facebook AI Research, explained to AI Podcast host Noah Kravitz how he’s bringing compute power to those that don’t have easy access to GPU clusters.
Spell provides access to hardware as well as a software interface that accelerates execution. Piantino reported that a wide variety of industries has shown interest in Spell, from healthcare to retail, as well as researchers and academia.
Key Points From This Episode
- Spell’s basic tool is a command line, which has users type “spell run” before code that they previously would’ve run locally. Spell will then snapshot the code, find any necessary data and move that computation onto relevant hardware in the cloud.
- Spell’s platform provides a collaborative workspace in which clients within an organization can work together on their Jupyter Notebooks and Labs.
- Users can choose what type of GPU they require for their machine learning experiment, and Spell will run it on the corresponding hardware in the cloud.
Tweetables
“You know there’s some upfront cost to running an experiment, but if you get that cost down low enough, it disappears mentally” — Serkan Piantino [11:52]
“Providing access to hardware and making things easier — giving everybody the same sort of beautiful compute cluster that giant research organizations work on — was a really powerful idea” — Serkan Piantino [18:36]
You Might Also Like
NVIDIA Chief Scientist Bill Dally on How GPUs Ignited AI, and Where His Team’s Headed Next
Deep learning icon and NVIDIA Chief Scientist Bill Dally reflects on his career in AI and offers insight into the AI revolution made possible by GPU-driven deep learning. He shares his predictions on where AI is going next: more powerful algorithms for inference, and neutral networks that can train on less data.
Speed Reader: Evolution AI Accelerates Data Processing with AI
Across industries, employees spend valuable time processing mountains of paperwork. Evolution AI, a U.K. startup and NVIDIA Inception member, has developed an AI platform that extracts and understands information rapidly. Evolution AI Chief Scientist Martin Goodson explains the variety of problems that the company can solve.
Striking a Chord: Anthem Helps Patients Navigate Healthcare with Ease
Health insurance company Anthem helps patients personalize and better understand their healthcare information through AI. Rajeev Ronanki, senior vice president and chief digital officer at Anthem, explains how the company gives users the opportunity to schedule video consultations and book doctor’s appointments virtually.
Tune in to the AI Podcast
Get the AI Podcast through iTunes, Google Podcasts, Google Play, Castbox, DoggCatcher, Overcast, PlayerFM, Pocket Casts, Podbay, PodBean, PodCruncher, PodKicker, Soundcloud, Spotify, Stitcher and TuneIn.


![]()
Make Our Podcast Better
Have a few minutes to spare? Fill out this short listener survey. Your answers will help us make a better podcast.
The post Saved by the Spell: Serkan Piantino’s Company Makes AI for Everyone appeared first on The Official NVIDIA Blog.
Building a custom classifier using Amazon Comprehend
Amazon Comprehend is a natural language processing (NLP) service that uses machine learning (ML) to find insights and relationships in texts. Amazon Comprehend identifies the language of the text; extracts key phrases, places, people, brands, or events; and understands how positive or negative the text is. For more information about everything Amazon Comprehend can do, see Amazon Comprehend Features.
You may need out-of-the-box NLP capabilities tied to your needs without having to lead a research phase. This would allow you to recognize entity types and perform document classifications that are unique to your business, such as recognizing industry-specific terms and triaging customer feedback into different categories.
Amazon Comprehend is a perfect match for these use cases. In November 2018, Amazon Comprehend added the ability for you to train it to recognize custom entities and perform custom classification. For more information, see Build Your Own Natural Language Models on AWS (no ML experience required).
This post demonstrates how to build a custom text classifier that can assign a specific label to a given text. No prior ML knowledge is required.
| About this blog post | |
| Time to complete | 1 hour for the reduced dataset ; 2 hours for the full dataset |
| Cost to complete | ~ $50 for the reduced dataset ; ~ $150 for the full dataset These include training, inference and model management, see Amazon Comprehend pricing for more details. |
| Learning level | Advanced (300) |
| AWS services | Amazon Comprehend Amazon S3 AWS Cloud9 |
Prerequisites
To complete this walkthrough, you need an AWS account and access to create resources in AWS IAM, Amazon S3, Amazon Comprehend, and AWS Cloud9 within that account.
This post uses the Yahoo answers corpus cited in the paper Text Understanding from Scratch by Xiang Zhang and Yann LeCun. This dataset is available on the AWS Open Data Registry.
You can also use your own dataset. It is recommended that you train your model with up to 1,000 training documents for each label, and that when you select your labels, suggest labels that are clear and don’t overlap in meaning. For more information, see Training a Custom Classifier.
Solution overview
The walkthrough includes the following steps:
- Preparing your environment
- Creating an S3 bucket
- Setting up IAM
- Preparing data
- Training the custom classifier
- Gathering results
For more information about how to build a custom entity recognizer to extract information such as people and organization names, locations, time expressions, numerical values from a document, see Build a custom entity recognizer using Amazon Comprehend.
Preparing your environment
In this post, you use the AWS CLI as much as possible to speed up the experiment.
AWS Cloud9 is a cloud-based integrated development environment (IDE) that lets you write, run, and debug your code with a browser. It includes a code editor, debugger, and terminal. AWS Cloud9 comes pre-packaged with essential tools for popular programming languages and the AWS CLI pre-installed, so you don’t need to install files or configure your laptop for this workshop.
Your AWS Cloud9 environment has access to the same AWS resources as the user with which you logged in to the AWS Management Console.
To prepare your environment, complete the following steps:
- On the console, under Services, choose AWS Cloud9.
- Choose Create environment.
- For Name, enter
CustomClassifier. - Choose Next step.
- Under Environment settings, change the instance type to t2.large.
- Leave other settings at their defaults.
- Choose Next step.
- Review the environment settings and choose Create environment.
It can take up to a few minutes for your environment to be provisioned and prepared. When the environment is ready, your IDE opens to a welcome screen, which contains a terminal prompt.
You can run AWS CLI commands in this prompt the same as you would on your local computer.
- To verify that your user is logged in, enter the following command:
You get the following output which indicates your account and user information:
- Record the account ID to use in the next step.
Keep your AWS Cloud9 IDE opened in a tab throughout this walkthrough.
Creating an S3 bucket
Use the account ID from the previous step to create a globally unique bucket name, such as 123456789012-customclassifier. Enter the following command in your AWS Cloud9 terminal prompt:
The output shows the name of the bucket you created:
Setting up IAM
To authorize Amazon Comprehend to perform bucket reads and writes during the training or during the inference, you must grant Amazon Comprehend access to the S3 bucket that you created. You are creating a data access role in your account to trust the Amazon Comprehend service principal.
To set up IAM, complete the following steps:
- On the console, under Services, choose IAM.
- Choose Roles.
- Choose Create role.
- Select AWS service as the type of trusted entity.
- Choose Comprehend as the service that uses this role.
- Choose Next: Permissions.
The Policy named ComprehendDataAccessRolePolicy is automatically attached.
- Choose Next: Review
- For Role name, enter
ComprehendBucketAccessRole. - Choose Create role.
- Record the Role ARN.
You use this ARN when you launch the training of your custom classifier.
Preparing data
In this step, you download the corpus and prepare the data to match Amazon Comprehend’s expected formats for both training and inference. This post provides a script to help you achieve the data preparation for your dataset.
Alternatively, for even more convenience, you can download the prepared data by entering the following two command lines:
If you follow the preceding step, skip the next steps and go directly to the upload part at the end of this section.
If you want to go through the dataset preparation for this walkthrough, or if you are using your own data follow the next steps:
Enter the following command in your AWS Cloud9 terminal prompt to download it from the AWS Open Data registry:
You see a progress bar and then the following output:
Uncompress it with the following command:
You should delete the archive because you are limited in available space in your AWS Cloud9 environment. Use the following command:
You get a folder yahoo_answers_csv, which contains the following four files:
- classes.txt
- readme.txt
- test.csv
- train.csv
The files train.csv and test.csv contain the training samples as comma-separated values. There are four columns in them, corresponding to class index (1 to 10), question title, question content, and best answer. The text fields are escaped using double quotes (“), and any internal double quote is escaped by two double quotes (“”). New lines are escaped by a backslash followed with an “n” character, that is “n”.
The following code is the overview of file content:
The file classes.txt contains the available labels.
The train.csv file contains 1,400,000 lines and test.csv contains 60,000 lines. Amazon Comprehend uses between 10–20% of the documents submitted for training to test the custom classifier.
The following command indicates that the data is evenly distributed:
You should train your model with up to 1,000 training documents for each label and no more than 1,000,000 documents.
With 20% of 1,000,000 used for testing, that is still plenty of data to train your custom classifier.
Use a shortened version of train.csv to train your custom Amazon Comprehend model, and use test.csv to perform your validation and see how well your custom model performs.
For training, the file format must conform to the following requirements:
- File must contain one label and one text per line – 2 columns
- No header
- Format UTF-8, carriage return “n”.
Labels must be uppercase, can be multi-token, have white space, consist of multiple words connected by underscores or hyphens, or may even contain a comma, as long as it is correctly escaped.
The following table contains the formatted labels proposed for the training.
| Index | Original | For training |
| 1 | Society & Culture | SOCIETY_AND_CULTURE |
| 2 | Science & Mathematics | SCIENCE_AND_MATHEMATICS |
| 3 | Health | HEALTH |
| 4 | Education & Reference | EDUCATION_AND_REFERENCE |
| 5 | Computers & Internet | COMPUTERS_AND_INTERNET |
| 6 | Sports | SPORTS |
| 7 | Business & Finance | BUSINESS_AND_FINANCE |
| 8 | Entertainment & Music | ENTERTAINMENT_AND_MUSIC |
| 9 | Family & Relationships | FAMILY_AND_RELATIONSHIPS |
| 10 | Politics & Government | POLITICS_AND_GOVERNMENT |
When you want your custom Amazon Comprehend model to determine which label corresponds to a given text in an asynchronous way, the file format must conform to the following requirements:
- File must contain one text per line
- No header
- Format UTF-8, carriage return “n”.
This post includes a script to speed up the data preparation. Enter the following command to copy the script to your local AWS Cloud9 environment:
To launch data preparation, enter the following commands:
This script is tied to the Yahoo corpus and uses the pandas library to format the training and testing datasets to match your Amazon Comprehend expectations. You may adapt it to your own dataset or change the number of items in the training dataset and validation dataset.
When the script is finished (it should run for approximately 11 minutes on a t2.large instance for the full dataset, and in under 5 minutes for the reduced dataset), you have the following new files in your environment:
- comprehend-train.csv
- comprehend-test.csv
Upload the prepared data (either the one you downloaded or the one you prepared) to the bucket you created with the following commands:
Training the custom classifier
You are ready to launch the custom text classifier training. Enter the following command, and replace the role ARN and bucket name with your own:
You get the following output that names the custom classifier ARN:
It is an asynchronous call. You can then track the training progress with the following command:
You get the following output:
When the training is finished, you get the following output:
The training duration may vary; in this case, the training took approximately one hour for the full dataset (20 minutes for the reduced dataset).
The output for the training on the full dataset shows that your model has a recall of 0.72—in other words, it correctly identifies 72% of given labels.
The following screenshot shows the view from the console (Comprehend > Custom Classification > yahoo-answers).

Gathering results
You can now launch an inference job to test how the classifier performs. Enter the following commands:
You get the following output:
Just as you did for the training progress tracking, because the inference is asynchronous, you can check the progress of the newly launched job with the following command:
You get the following output:
When it is completed, JobStatus changes to COMPLETED. This takes approximately a few minutes to complete.
Download the results using OutputDataConfig.S3Uri path with the following command:
When you uncompress the output (tar xvzf output.tar.gz), you get a .jsonl file. Each line represents the result of the requested classification for the corresponding line of the document you submitted.
For example, the following code is one line from the predictions:
This means that your custom model predicted with a 96.8% confidence score that the following text was related to the “Entertainment and music” label.
Each line of results also provides the second and third possible labels. You might use these different scores to build your application upon applying each label with a score superior to 40% or changing the model if no single score is above 70%.
Summary
With the full dataset for training and validation, in less than two hours, you used Amazon Comprehend to learn 10 custom categories—and achieved a 72% recall on the test—and to apply that custom model to 60,000 documents.
Try custom categories now from the Amazon Comprehend console. For more information, see Custom Classification. You can discover other Amazon Comprehend features and get inspiration from other AWS blog posts about how to use Amazon Comprehend beyond classification.
Amazon Comprehend can help you power your application with NLP capabilities in almost no time. Happy experimentation!
About the Author
 Hervé Nivon is a Solutions Architect who helps startup customers grow their business on AWS. Before joining AWS, Hervé was the CTO of a company generating business insights for enterprises from commercial unmanned aerial vehicle imagery. Hervé has also served as a consultant at Accenture.