An introduction to reinforcement learning with AWS RoboMaker
Robotics often involves training complex sequences of behaviors. For example, consider a robot designed to follow or track another object. Although the goal is easy to describe (the closer the robot is to the object, the better), creating the logic that accomplishes the task is much more difficult. Reinforcement learning (RL), an emerging Machine Learning technique, can help develop solutions for exactly these kinds of problems.
This post is an introduction to RL and it explains how we used AWS RoboMaker to develop an application that trains a TurtleBot Waffle Pi to track and move toward a TurtleBot Burger. The AWS RoboMaker sample application, object tracker, uses the Intel Reinforcement Learning Coach and OpenAI’s Gym libraries. The Coach library is an easy-to-use RL framework written in Python. It was used to train the model that the TurtleBot uses for autonomous driving. OpenAI’s Gym is a toolkit that was used to develop and design RL agents that make autonomous decisions.
If you want to try using the sample object tracker application, see How to train a robot using reinforcement learning.
RL overview
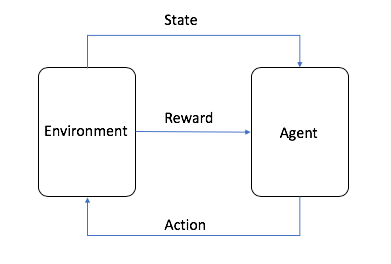
In RL, training has two components:
- An agent, which decides which actions the robot should take
- The environment, which combines the action with the robot’s dynamics and physics of the world to determine the robot’s next state
In a nut shell, the agent uses a model to decide on an action. For the robot’s current state, the model maps possible actions to guesses of how good each action might be (in reinforcement learning, this is known as a reward). Initially, the model has no idea which actions are best, and its guesses are usually wrong. As the agent learns to maximize the potential rewards it can receive, the model improves and its guesses about which actions are good improve. The following graphic shows how this works.
In the sample object tracker application, RL works like this:
- With the robot in some starting position, the agent guesses the best action to take.
- The environment calculates the new state and a reward. The reward lets the agent know how good its last action was.
- The agent and environment interact, deciding on new actions and calculating new states. The agent accumulates rewards for its good actions and punishments for its bad actions.
- When one round of training ends, the robot has a total reward that tells it how well it did overall.
- By taking many actions, the agent slowly learns which actions are better (have a greater reward), and favors those actions when making decisions.
Building an RL application with AWS RoboMaker
Now let’s look at the object tracker source code to see how the application is implemented. We recommend looking at the code as you read. If you haven’t already run the sample application, you can download the code from Github repo.
Training the robot
The application has the following main components:
- Simulation workspace – This workspace contains the code that defines the RL agent and environment.
- Robot workspace – After training the RL model, the robot workspace is built and the model is deployed to a real robot.
- Robot Operation System (ROS) – The development framework for robot applications. ROS provides a simple abstraction for interacting with the robot’s camera and motors.
- Gazebo – A simulator that takes the robot’s state and action and calculates its next state. Gazebo also simulates the camera images that is fed into the RL agent.
- Intel Coach library – A Python RL framework that was used to train the model that the TurtleBot uses to drive itself.
- Open AI Gym – A toolkit used to develop and design the RL agent that makes autonomous decisions about turning, speed control, and so on.
- TensorFlow – A machine learning library written by Google that stores and trains the model that the agent uses to make decisions.
In the development environment, navigate to the simulation_ws folder. The code in the simulation workspace trains the RL model. The Python file called single_machine_training_worker.py is the application entry point. In this file, environment variables, such as MARKOV_PRESET_FILE, are passed to the application to execute. The application begins by creating a new TensorFlow model and storing it in an Amazon Simple Storage Service (Amazon S3) bucket. If there’s already a trained model in Amazon S3, the application uses that model instead. That way, it doesn’t have to start from scratch every time you restart training. All of these parameters are then passed to create a graph manager object. The graph manager is responsible for training the model. Finally, training starts when the improve method of the graph manager object is called.
The object_tracker.py file contains the hyperparameters for configuring the RL environment. The application uses a learning strategy known as ClippedPPO (Proximal Policy Optimization). PPO is an algorithm recommended by Open AI as a good starting point for RL. It has fewer parameters to tune than other RL algorithms, but still provides good overall performance. OpenAI Gym is also configured in this file with the custom-level RoboMaker-ObjectTraker-v0, as follows:
The TurtleBot3ObjectTrackerAndFollowerDiscreteEnv class contains the other elements needed to perform RL, such as instructions on how to reset the environment when the robot completes a round of training, the reward function, and the set of actions that the robot can take.
You might have noticed that the application uses an image captured by the camera as the state. For this reason, the real world should be as similar as possible to the simulated world in Gazebo for optimal performance. For example, the current simulated world is dark gray. When the trained model is deployed to a physical TurtleBot Waffle Pi, it should operate in a similar environment. If you want to train in a simulation environment that is closer to the real world, such as your room, you can add more details. For example, you can take pictures of the walls in your room and import them as textures to match the real world as much as possible.
In this application, the Waffle Pi uses its camera to move around. For every action it takes, it takes an image from its camera as the current state for everyone action it takes. The code is defined in the infer_reward_state(self) method of the TurtleBot3ObjectTrackerAndFollowerEnv class.
Remember that the goal is for the TurtleBot Waffle Pi to reach the stationary TurtleBot Burger. For each correct step that the TurtleBot Waffle Pi takes towards the stationary TurtleBot Burger, it should receive a large reward. The reward calculation code is defined in the infer_reward_state(self) method of the TurtleBot3ObjectTrackerAndFollowerEnv class. If the current distance between the TurtleBots is less than it was in the last state, the TurtleBot Waffle Pi is moving closer to the stationary TurtleBot Burger, so it gets a reward. The closer the TurtleBot Waffle Pi gets to the goal, the greater the reward. If the distance is longer than 5 meters, the TurtleBot Waffle Pi is too far from the stationary TurtleBot Burger, and the agent ends the episode and starts a new one.
You can try to optimize the logic of the reward function code so that the agent can train faster and more accurately. For example, you can try giving a negative reward if the Waffle Pi moves further from the stationary TurtleBot compared to its last state. You can also try to use computer vision techniques, such as object detection, to find the stationary TurtleBot and then calculate the distance for further optimization.
The actions that the robot can take are defined in the TurtleBot3ObjectTrackerAndFollowerDiscreteEnv class at the end of the object_tracker_env.py file. The actions are labeled from 0 to 4, and each action is one steering and throttle command for the TurtleBot. For example, when the action is 0, the TurtleBot should turn left at a speed of 0.1 meters per second.
Using the trained model
Remember that the code trains the model in TensorFlow. When deploying to the TurtleBot Waffle Pi, it has to be able to download the TensorFlow model stored in Amazon S3 and load it on the Waffle Pi itself. The robot_ws workspace is used for deploying the model to the Waffle Pi. The download_model Python file in the robot_ws workspace downloads the trained model from Amazon S3. Code in the inference_worker Python file loads the model into a TensorFlow session and instructs the Waffle Pi to take actions (steering, throttle) based on the images fed from its camera.
Running the application
ROS uses launch files to start applications. The local_training.launch file contains details about all of the nodes (processes) that you want to start when you launch the application. The node element instructs the ROS runtime to launch the shell script run_local_rl_agent.sh at startup.
In the run_local_rl_agent.sh script, ROS executes the single_machine_training_worker Python script.
The roboMakerSettings.json file is specific to AWS RoboMaker. It defines which AWS resources and rules to use to start the application. For example, the file specified for the launchFile parameter in the simulation configuration that the ROS framework launches at runtime.
Environment variables can be passed in the settings file. For example, the MARKOV_PRESET_FILE environment variable is where the main application code resides. The application is loaded at runtime using this variable. One handy feature of the roboMakerSettings.json file is that it allows you to create and configure workflows to automatically build, bundle, and run a simulation job for the application. This saves you from performing the steps manually when you need to make a change.
Summary
We hope this blog helps you understand how the sample object tracker application works, and how easy it is to develop and deploy complex machine learning techniques, such as RL, in AWS RoboMaker. If you want to try using the sample object tracker application, see How to train a robot using reinforcement learning.
About the Author
 Tristan Li is a Solutions Architect with Amazon Web Services. He works with enterprise customers in the US, helping them adopt cloud technology to build scalable and secure solutions on AWS.
 Wayne Davis is an Enterprise Solutions Architect for Amazon Web Services. Over the last 24 months he has been helping customers to come up to speed on cloud technologies as fast as possible.
 Robert Meagher is a software development engineer for AWS RoboMaker. He enjoys designing and tinkering with robotics systems, both in and out of the office.