
Blog

Learn About Our Meetup

5000+ Members

MEETUPS

LEARN, CONNECT, SHARE

Join our meetup, learn, connect, share, and get to know your Toronto AI community. 

JOB POSTINGS

INDEED POSTINGS

Browse through the latest deep learning, ai, machine learning postings from Indeed for the GTA.

CONTACT

CONNECT WITH US

Are you looking to sponsor space, be a speaker, or volunteer, feel free to give us a shout.

Category: Global

Racing tips from AWS DeepRacer League winners in Stockholm, and AWS DeepRacer TV!

The AWS DeepRacer League is the world’s first global autonomous racing league. There are races at 21 AWS Summits globally and select Amazon events, as well as monthly virtual races happening online and open for racing. No matter where you are in the world or your skill level, you can join the league. Get a chance to win AWS DeepRacer cars and the top prize of an all-expenses-paid trip to re:Invent 2019, to compete in the AWS DeepRacer Championship Cup.

Become an AWS DeepRacer racer

The competition is heating up as the Summit Circuit hit the halfway mark in Sweden this week. It was another exciting day of racing at the AWS Summit Stockholm, where all three of our podium finishers came to the summit to compete in the league.

In third place was Charlie, who also raced in the league at the AWS Summit in London on May 8. He secured a top 10 finish, which wins him an AWS DeepRacer car, but wanted to come to Stockholm to try once more to win. In London, he was just 0.8 of a second from the top spot, with a time of 9.7 seconds. With a little more training on his model, he managed to clinch third place in Stockholm with a time of 9.5 seconds. Although he did not win on his second attempt, Charlie is now at the top of the overall summit leaderboard. If the results stay the same, he will get his ticket to re:Invent 2019. Now he’s a pro at the league, so listen to how Charlie approached building his model.

Amy (@cloudreach) was the second-place finisher and the second female to stand on the podium this season, in her second summit race. Like Charlie, earlier this month she competed in London, where her teammate Raul also took second place. Between races, she worked hard on her model and improved her time significantly from 33.2 seconds in London, to 9.25 in Stockholm.

Although she didn’t win, taking part in more than one race has scored her a place on the overall summit leaderboard, giving her another shot at winning a ticket to compete at re:Invent 2019. Learn more about points and prizes to find out how. Here’s a little insight from Amy and one of her teammates on strategy!

In first place was Jouini Luoma, with a time of 8.73 seconds. He works for Cybercom, as a data scientist and AWS DeepRacer racer. Yes, upon his return from sabbatical, his company gave him this new and coveted title! Jouini’s strategy was to build a few models in advance of the race and test each of them out on the track to see how they performed.

He was first in line at 8AM, with six models that he had been training in the AWS DeepRacer console since its launch on April 29. Each was tuned in different ways to give him the best chance to win. His advice? “Keep it simple; do not over complicate it.”

Take a step inside the league with AWS DeepRacer TV

As with all the winners so far, Jouni found success by experimenting with several strategies to apply to his code, to give him the best chance to win. Developers of all skill levels are building their machine learning expertise, and you can now follow your favorites along the way, with the launch of AWS DeepRacer TV.

Episode 1 follows the competition to Amsterdam, featuring Carolinea, Norbert, Kasper, Jesper, and many more developers, all hoping to qualify for a chance to win the Championship Cup at AWS re:Invent 2019. Watch as developers train their models, develop strategies, and discover the potential of machine learning in a fun and competitive environment. Also featured in this episode is the topic of convergence, which is a critical step in the model building process to be ready to race. AWS DeepRacer subject matter expert, Blaine Sundrud, explains more about this topic and some of the basics of competing in the league.

More tips from our experts

The AWS DeepRacer experts are here to help developers through their journey in the league. Sunil Mallya, principal solutions architect at AWS, and also one of the data scientists behind AWS DeepRacer, recently tweeted a tool that helps those who are coming across some common challenges. The logbook analysis tool helps you debug models for a chance to improve lap times and win—both in the virtual and in-person races.

Keep racing, improving models, and scoring points

Points mean prizes! The virtual races are open to all from anywhere in the world. They provide you with multiple chances to win tickets to re:Invent 2019—and you can get started for free, with up to 10 hours of training.

The London Loop race is close to finishing, and a new track opens up on June 1. Fuel up on some racing tips in the developer documentation and be on the lookout for more advice from AWS experts as we head to Chicago and re:MARS for the next in-person AWS DeepRacer events.


About the Author

Alexandra Bush is a Senior Product Marketing Manager for AWS AI. She is passionate about how technology impacts the world around us and enjoys being able to help make it accessible to all. Out of the office she loves to run, travel and stay active in the outdoors with family and friends.


Moving Camera, Moving People: A Deep Learning Approach to Depth Prediction

The human visual system has a remarkable ability to make sense of our 3D world from its 2D projection. Even in complex environments with multiple moving objects, people are able to maintain a feasible interpretation of the objects’ geometry and depth ordering. The field of computer vision has long studied how to achieve similar capabilities by computationally reconstructing a scene’s geometry from 2D image data, but robust reconstruction remains difficult in many cases.

A particularly challenging case occurs when both the camera and the objects in the scene are freely moving. This confuses traditional 3D reconstruction algorithms that are based on triangulation, which assumes that the same object can be observed from at least two different viewpoints, at the same time. Satisfying this assumption requires either a multi-camera array (like Google’s Jump), or a scene that remains stationary as the single camera moves through it. As a result, most existing methods either filter out moving objects (assigning them “zero” depth values), or ignore them (resulting in incorrect depth values).

Left: The traditional stereo setup assumes that at least two viewpoints capture the scene at the same time. Right: We consider the setup where both camera and subject are moving.

In “Learning the Depths of Moving People by Watching Frozen People”, we tackle this fundamental challenge by applying a deep learning-based approach that can generate depth maps from an ordinary video, where both the camera and subjects are freely moving. The model avoids direct 3D triangulation by learning priors on human pose and shape from data. While there is a recent surge in using machine learning for depth prediction, this work is the first to tailor a learning-based approach to the case of simultaneous camera and human motion. In this work, we focus specifically on humans because they are an interesting target for augmented reality and 3D video effects.

Our model predicts the depth map (right; brighter=closer to the camera) from a regular video (left), where both the people in the scene and the camera are freely moving.

Sourcing the Training Data
We train our depth-prediction model in a supervised manner, which requires videos of natural scenes, captured by moving cameras, along with accurate depth maps. The key question is where to get such data. Generating data synthetically requires realistic modeling and rendering of a wide range of scenes and natural human actions, which is challenging. Further, a model trained on such data may have difficulty generalizing to real scenes. Another approach might be to record real scenes with an RGBD sensor (e.g., Microsoft’s Kinect), but depth sensors are typically limited to indoor environments and have their own set of 3D reconstruction issues.

Instead, we make use of an existing source of data for supervision: YouTube videos in which people imitate mannequins by freezing in a wide variety of natural poses, while a hand-held camera tours the scene. Because the entire scene is stationary (only the camera is moving), triangulation-based methods–like multi-view-stereo (MVS)–work, and we can get accurate depth maps for the entire scene including the people in it. We gathered approximately 2000 such videos, spanning a wide range of realistic scenes with people naturally posing in different group configurations.

Videos of people imitating mannequins while a camera tours the scene, which we used for training. We use traditional MVS algorithms to estimate depth, which serves as supervision during training of our depth-prediction model.

Inferring the Depth of Moving People
The Mannequin Challenge videos provide depth supervision for moving camera and “frozen” people, but our goal is to handle videos with a moving camera and moving people. We need to structure the input to the network in order to bridge that gap.

A possible approach is to infer depth separately for each frame of the video (i.e., the input to the model is just a single frame). While such a model already improves over state-of-the-art single image methods for depth prediction, we can improve the results further by considering information from multiple frames. For example, motion parallax, i.e., the relative apparent motion of static objects between two different viewpoints, provides strong depth cues. To benefit from such information, we compute the 2D optical flow between each input frame and another frame in the video, which represents the pixel displacement between the two frames. This flow field depends on both the scene’s depth and the relative position of the camera. However, because the camera positions are known, we can remove their dependency from the flow field, which results in an initial depth map. This initial depth is valid only for static scene regions. To handle moving people at test time, we apply a human-segmentation network to mask out human regions in the initial depth map. The full input to our network then includes: the RGB image, the human mask, and the masked depth map from parallax.

Depth prediction network: The input to the model includes an RGB image (Frame t), a mask of the human region, and an initial depth for the non-human regions, computed from motion parallax (optical flow) between the input frame and another frame in the video. The model outputs a full depth map for Frame t. Supervision for training is provided by the depth map, computed by MVS.

The network’s job is to “inpaint” the depth values for the regions with people, and refine the depth elsewhere. Intuitively, because humans have consistent shape and physical dimensions, the network can internally learn such priors by observing many training examples. Once trained, our model can handle natural videos with arbitrary camera and human motion.

Below are some examples of our depth-prediction model results based on videos, with comparison to recent state-of-the-art learning based methods.

Comparison of depth prediction models to a video clip with moving cameras and people. Top: Learning based monocular depth prediction methods (DORN; Chen et al.). Bottom: Learning based stereo method (DeMoN), and our result.

3D Video Effects Using Our Depth Maps
Our predicted depth maps can be used to produce a range of 3D-aware video effects. One such effect is synthetic defocus. Below is an example, produced from an ordinary video using our depth map.

Bokeh video effect produced using our estimated depth maps. Video courtesy of Wind Walk Travel Videos.

Other possible applications for our depth maps include generating a stereo video from a monocular one, and inserting synthetic CG objects into the scene. Depth maps also provide the ability to fill in holes and disoccluded regions with the content exposed in other frames of the video. In the following example, we have synthetically wiggled the camera at several frames and filled in the regions behind the actor with pixels from other frames of the video.

Acknowledgements
The research described in this post was done by Zhengqi Li, Tali Dekel, Forrester Cole, Richard Tucker, Noah Snavely, Ce Liu and Bill Freeman. We would like to thank Miki Rubinstein for his valuable feedback.

GPU Computing 101: Why University Educators Are Pulling NVIDIA Teaching Kits into Their Classrooms

Along with the usual elements of university curriculums — lectures, assignments, lab exercises — there’s a new tool that educators are increasingly leaning into: NVIDIA Teaching Kits.

University educators around the world are tapping into these kits, which include downloadable teaching materials and online courses that provide the foundation to understand and build hands-on expertise in areas like deep learning, accelerated computing and robotics.

The kits are offered by the NVIDIA Deep Learning Institute, a hands-on training program in AI, accelerated computing, and data science to help technologists solve challenging problems.

Co-developed with university faculty, NVIDIA Teaching Kits provide content to enhance a university curriculum, including lecture slides, videos, hands-on labs, online DLI certificate courses, e-books and GPU cloud resources.

Accelerated Computing at University of California, Riverside

Daniel Wong, an assistant professor of electrical and computer engineering at the University of California, Riverside, used the Accelerated Computing Teaching Kit for two GPU-centric computer science courses — a graduate course and an undergrad course on “GPU Computing and Programming.”

“The teaching kit presented a very well structured way to teach GPU programming, especially given the way many of our students come from very diverse backgrounds,” Wong said.

Wong’s undergrad course took place over 10 weeks with an enrollment of about three dozen students and is currently in its second offering. The kit was central in teaching the basics of CUDA, such as CUDA threading models, parallel patterns, common optimizations and other important parallel programming primitives, Wong said.

“Students know that the material we present is state of the art and up to date so it gives them confidence in the material and drew a lot of excitement,” he said.

The course built up to a final project with students accelerating an application of their choice, such as implementations and performance comparison of CNNs in cuDNN, TensorFlow, Keras, facial recognition on NVIDIA Jetson boards, and fluid dynamics and visualization. In addition, several of Wong’s undergraduate students have gone on to pursue GPU-related undergraduate research.

Deep Learning at University Hospital Erlangen

At the Institute of Neuropathology of the University Hospital Erlangen in Germany, a deep learning morphology research group applies deep learning algorithms to various problems around histopathologic brain tumors.

The university’s medical students have little background in computer science, so principal investigator Samir Jabari uses the NVIDIA Teaching Kit as part of sessions he conducts every few weeks on the field of computer vision.

Through lecture slides on convolutional neural networks and lab assignments, the teaching kit helps provide insights into the field of computer vision and its specific challenges toward histopathology.

Robotics at Georgia State University

Georgia State University’s Computer Science department used the Robotics Teaching Kit in its “Introduction to Robotics” course, first introduced in spring 2018.

The course grouped two to three students per kit to engage them in learning basic sensor interaction and path-planning experiments. At the end of the class, students presented projects during the department’s biannual poster and demonstration day.

The course was a hit. When first taught, it registered 32 students. The upcoming fall course has already received 60 registration requests — nearly double the registration capacity.

Beyond the classroom, Georgia State faculty and students are using NVIDIA Teaching Kits to facilitate projects in the greater community in interdisciplinary areas such as environmental sensing and cybersecurity.

“This kind of in-class hardware kit-based teaching is new to the department,” said Ashwin Ashok, assistant professor of computer science at Georgia State. “These kits have really gained a lot of traction for potential uses in courses as well as research at Georgia State.”

The post GPU Computing 101: Why University Educators Are Pulling NVIDIA Teaching Kits into Their Classrooms appeared first on The Official NVIDIA Blog.

Intel Highlighted Why NVIDIA Tensor Core GPUs Are Great for Inference

It’s not every day that one of the world’s leading tech companies highlights the benefits of your products.

Intel did just that last week, comparing the inference performance of two of their most expensive CPUs to NVIDIA GPUs.

To achieve the performance of a single mainstream NVIDIA V100 GPU, Intel combined two power-hungry, highest-end CPUs with an estimated price of $50,000-$100,000, according to Anandtech. Intel’s performance comparison also highlighted the clear advantage of NVIDIA T4 GPUs, which are built for inference. When compared to a single highest-end CPU, they’re not only faster but also 7x more energy-efficient and an order of magnitude more cost-efficient.

Inference performance is crucial, as AI-powered services are growing exponentially. And Intel’s latest Cascade Lake CPUs include new instructions that improve inference, making them the best CPUs for inference. However, it’s hardly competitive with NVIDIA deep learning-optimized Tensor Core GPUs.

Inference (also known as prediction), in simple terms, is the “pattern recognition” that a neural network does after being trained. It’s where AI models provide intelligent capabilities in applications, like detecting fraud in financial transactions, conversing in natural language to search the internet, and predictive analytics to fix manufacturing breakdowns before they even happen.

While most AI inference today happens on CPUs, NVIDIA Tensor Core GPUs are rapidly being adopted across the full range of AI models. Tensor Core, a breakthrough innovation has transformed NVIDIA GPUs to highly efficient and versatile AI processors. Tensor Cores do multi-precision calculations at high rates to provide optimal precision for diverse AI models and have automatic support in popular AI frameworks.

It’s why a growing list of consumer internet companies — Microsoft, Paypal, Pinterest, Snap and Twitter among them — are adopting GPUs for inference.

Compelling Value of Tensor Core GPUs for Computer Vision

First introduced with the NVIDIA Volta architecture, Tensor Core GPUs are now in their second generation with NVIDIA Turing. Tensor Cores perform extremely efficient computations for AI for a full range of precision — from 16-bit floating point with 32-bit accumulate to 8-bit and even 4-bit integer operations with 32-bit accumulate.

They’re designed to accelerate both AI training and inference, and are easily enabled using automatic mixed precision features in the TensorFlow and PyTorch frameworks. Developers can achieve 3x training speedups by adding just two lines of code to their TensorFlow projects.

On computer vision, as the table below shows, when comparing the same number of processors, the NVIDIA T4 is faster, 7x more power-efficient and far more affordable. NVIDIA V100, designed for AI training, is 2x faster and 2x more energy efficient than CPUs on inference.

Table 1: Inference on ResNet-50.

  Two-Socket
Intel Xeon 9282
NVIDIA V100
(Volta)
NVIDIA T4
(Turing)
ResNet-50 Inference (images/sec) 7,878 7,844 4,944
# of Processors 2 1 1
Total Processor TDP 800 W 350 W 70 W
Energy Efficiency (Taking TDP) 10 img/ sec/W 22 img/ sec/W 71 img/ sec/W
Performance per Processor (images/sec) 3,939 7,844 4,944
GPU Performance Advantage 1.0 (baseline) 2.0x 1.3x
GPU Energy-Efficiency Advantage 1.0 (baseline) 2.3x 7.2x

Source: Intel Xeon performance; NVIDIA GPU performance

Compelling Value of Tensor Core GPUs for Understanding Natural Language

AI has been moving at a frenetic pace. This rapid progress is fueled by teams of AI researchers and data scientists who continue to innovate and create highly accurate and exponentially more complex AI models.

Over four years ago, computer vision was among the first applications where AI from Microsoft was able to perform at superhuman accuracy using models like ResNet-50. Today’s advanced models perform even more complex tasks like understanding language and speech at superhuman accuracy. BERT, a highly complex AI model open-sourced by Google last year, can now understand prose and answer questions with superhuman accuracy.

A measure of the complexity of AI models is the number of parameters they have. Parameters in an AI model are the variables that store information the model has learned. While ResNet-50 has 25 million parameters, BERT has 340 million, a 13x increase.

On an advanced model like BERT, a single NVIDIA T4 GPU is 56x faster than a dual-socket CPU server and 240x more power-efficient.

Table 2: Inference on BERT. Workload: Fine-Tune Inference on BERT Large dataset.

  Dual Intel Xeon
Gold 6240
NVIDIA T4
(Turing)
BERT Inference,
Question-Answering (sentences/sec)
2 118
Processor TDP 300 W (150 Wx2) 70 W
Energy Efficiency (using TDP) 0.007 sentences/ sec/W 1.7 sentences/ sec/W
GPU Performance Advantage 1.0 (baseline) 59x
GPU Energy-Efficiency Advantage 1.0 (baseline) 240x

CPU server: Dual-socket Xeon Gold 6240@2.6GHz; 384GB system RAM; FP32 precision; with Intel’s TF Docker container v. 1.13.1. Note: Batch-size 4 results yielded the best CPU score.

GPU results: T4: Dual-socket Xeon Gold 6240@2.6GHz; 384GB system RAM; mixed precision; CUDA 10.1.105; NCCL 2.4.3, cuDNN 7.5.0.56, cuBLAS 10.1.105; NVIDIA driver 418.67; on TensorFlow using automatic mixed precision and XLA compiler; batch-size 4 and sequence length 128 used for all platforms tested. 

Compelling Value of Tensor Core GPUs for Recommender Systems

Another key usage of AI is in recommendation systems, which are used to provide relevant content recommendations on video sharing sites, news feeds on social sites and product recommendations on e-commerce sites.

Neural collaborative filtering, or NCF, is a recommender system that uses the prior interactions of users with items to provide recommendations. When running inference on the NCF model that is a part of the MLPerf 0.5 training benchmark, NVIDIA T4 brings 12x more performance and 24x higher energy efficiency than CPUs.

Table 3: Inference on NCF.

  Single Intel Xeon
Gold 6140
NVIDIA T4
(Turing)
Recommender Inference Throughput (MovieLens)(thousands of samples/sec) 2,860 27,800
Processor TDP 150 W 70 W
Energy Efficiency (using TDP) 19 samples/ sec/W 397 samples/ sec/W
GPU Performance Advantage 1.0 (baseline) 10x
GPU Energy-Efficiency Advantage 1.0 (baseline) 20x

CPU server: Single-socket Xeon Gold 6240@2.6GHz; 384GB system RAM; Used Intel Benchmark for NCF on TensorFlow with Intel’s TF Docker container version 1.13.1; FP32 precision. Note: Single-socket CPU config used for CPU tests as it yielded a better score than dual-socket.

GPU results: T4: Single-socket Xeon Gold 6140@2.3GHz; 384GB system RAM; CUDA 10.1.105; NCCL 2.4.3, cuDNN 7.5.0.56, cuBLAS 10.1.105; NVIDIA driver 418.40.04; on TensorFlow using automatic mixed precision and XLA compiler; batch-size: 2,048 for CPU, 1,048,576 for T4; precision: FP32 for CPU, mixed precision for T4. 

Unified Platform for AI Training and Inference

The use of AI models in applications is an iterative process designed to continuously improve their performance. Data scientist teams constantly update their models with new data and algorithms to improve accuracy. These models are then updated in applications by developers.

Updates can happen monthly, weekly and even on a daily basis. Having a single platform for both AI training and inference can dramatically simplify and accelerate this process of deploying and updating AI in applications.

NVIDIA’s data center GPU computing platform leads the industry in performance by a large margin for AI training, as demonstrated by the standard AI benchmark, MLPerf. And the NVIDIA platform provides compelling value for inference, as the data presented here attests. That value increases with the growing complexity and progress of modern AI.

To help fuel the rapid progress in AI, NVIDIA has deep engagements with the ecosystem and constantly optimizes software, including key frameworks like TensorFlow, Pytorch and MxNet as well as inference software like TensorRT and TensorRT Inference Server.

NVIDIA also regularly publishes pre-trained AI models for inference and model scripts for training models using your own data. All of this software is freely made available as containers, ready to download and run from NGC, NVIDIA’s hub for GPU-accelerated software.

Get the full story about our comprehensive AI platform.

The post Intel Highlighted Why NVIDIA Tensor Core GPUs Are Great for Inference appeared first on The Official NVIDIA Blog.

ACR AI-LAB and NVIDIA Make AI in Hospitals Easy on IT, Accessible to Every Radiologist

For radiology to benefit from AI, there needs to be easy, consistent and scalable ways for hospital IT departments to implement the technology. It’s a return to a service-oriented architecture, where logical components are separated and can each scale individually, and an efficient use of the additional compute power these tools require.

AI is coming from dozens of vendors as well as internal innovation groups, and needs a place within the hospital network to thrive. That’s why NVIDIA and the American College of Radiology (ACR) have published a Hospital AI Reference Architecture Framework. It helps hospitals easily get started with AI initiatives.

A Cookbook to Make AI Easy

The Hospital AI Reference Architecture Framework was published at yesterday’s annual ACR meeting for public comment. This follows the recent launch of the ACR AI-LAB, which aims to standardize and democratize AI in radiology. The ACR AI-LAB uses infrastructure such as NVIDIA GPUs and the NVIDIA Clara AI toolkit, as well as GE Healthcare’s Edison platform, which helps bring AI from research into FDA-cleared smart devices.

The Hospital AI Reference Architecture Framework outlines how hospitals and researchers can easily get started with AI initiatives. It includes descriptions of the steps required to build and deploy AI systems, and provides guidance on the infrastructure needed for each step.

Hospital AI Architecture Framework

To drive an effective AI program within a healthcare institution, there must first be an understanding of the workflows involved, compute needs and data required. It comes from a foundation of enabling better insights from patient data with easy-to deploy compute at the edge.

Using a transfer client, seed models can be downloaded from a centralized model store. A clinical champion uses an annotation tool to locally create data that can be used for fine-tuning the seed model or training a new model. Then, using the training system with the annotated data, a localized model is instantiated. Finally, an inference engine is used to conduct validation and ultimately inference on data within the institution.

These four workflows sit atop AI compute infrastructure, which can be accelerated with NVIDIA GPU technology for best performance, alongside storage for models and annotated studies. These workflows tie back into other hospital systems such as PACS, where medical images are archived.

Three Magic Ingredients: Hospital Data, Clinical AI Workflows, AI Computing

Healthcare institutions don’t have to build the systems to deploy AI tools themselves.

This scalable architecture is designed to support and provide computing power to solutions from different sources. GE Healthcare’s Edison platform now uses NVIDIA’s TRT-IS inference capabilities to help AI run in an optimized way within GPU-powered software and medical devices. This integration makes it easier to deliver AI from multiple vendors into clinical workflows — and is the first example of the AI-LAB’s efforts to help hospitals adopt solutions from different vendors.

Together, Edison with TRT-IS offers a ready-made device inferencing platform that is optimized for GPU-compliant AI, so models built anywhere can be deployed in an existing healthcare workflow.

Hospitals and researchers are empowered to embrace AI technologies without building their own standalone technology or yielding their data to the cloud, which has privacy implications.

The post ACR AI-LAB and NVIDIA Make AI in Hospitals Easy on IT, Accessible to Every Radiologist appeared first on The Official NVIDIA Blog.

By the Book: AI Making Millions of Ancient Japanese Texts More Accessible

Natural disasters aren’t just threats to people and buildings, they can also erase history — by destroying rare archival documents. As a safeguard, scholars in Japan are digitizing the country’s centuries-old paper records, typically by taking a scan or photo of each page.

But while this method preserves the content in digital form, it doesn’t mean researchers will be able to read it. Millions of physical books and documents were written in an obsolete script called Kuzushiji, legible to fewer than 10 percent of Japanese humanities professors.

“We end up with billions of images which will take researchers hundreds of years to look through,” said Tarin Clanuwat, researcher at Japan’s ROIS-DS Center for Open Data in the Humanities. “There is no easy way to access the information contained inside those images yet.”

Extracting the words on each page into machine-readable, searchable form takes an extra step: transcription, which can be done either by hand or through a computer vision method called optical character recognition, or OCR.

Clanuwat and her colleagues are developing a deep learning OCR system to transcribe Kuzushiji writing — used for most Japanese texts from the 8th century to the start of the 20th — into modern Kanji characters.

Clanuwat said GPUs are essential for both training and inference of the AI.

“Doing it without GPUs would have been inconceivable,” she said. “GPU not only helps speed up the work, but it makes this research possible.”

Parsing a Forgotten Script

Before the standardization of the Japanese language in 1900 and the advent of modern printing, Kuzushiji was widely used for books and other documents. Though millions of historical texts were written in the cursive script, just a few experts can read it today.

Only a tiny fraction of Kuzushiji texts have been converted to modern scripts — and it’s time-consuming and expensive for an expert to transcribe books by hand. With an AI-powered OCR system, Clanuwat hopes a larger body of work can be made readable and searchable by scholars.

She collaborated on the OCR system with Asanobu Kitamoto from her research organization and Japan’s National Institute of Informatics, and Alex Lamb of the Montreal Institute for Learning Algorithms. Their paper was accepted in 2018 to the Machine Learning for Creativity and Design workshop at the prestigious NeurIPS conference.

Using a labeled dataset of 17th to 19th century books from the National Institute of Japanese Literature, the researchers trained their deep learning model on NVIDIA GPUs, including the TITAN Xp. Training the model took about a week, Clanuwat said, but “would be impossible” to train on CPU.

Kuzushiji has thousands of characters, with many occurring so rarely in datasets that it is difficult for deep learning models to recognize them. Still, the average accuracy of the researchers’ KuroNet document recognition model is 85 percent — outperforming prior models.

The newest version of the neural network can recognize more than 2,000 characters. For easier documents with fewer than 300 character types, accuracy jumps to about 95 percent, Clanuwat said. “One of the hardest documents in our dataset is a dictionary, because it contains many rare and unusual words.”

One challenge the researchers faced was finding training data representative of the long history of Kuzushiji. The script changed over the hundreds of years it was used, while the training data came from the more recent Edo period.

Clanuwat hopes the deep learning model could expand access to Japanese classical literature, historical documents and climatology records to a wider audience.

The post By the Book: AI Making Millions of Ancient Japanese Texts More Accessible appeared first on The Official NVIDIA Blog.

Exploring data warehouse tables with machine learning and Amazon SageMaker notebooks

Are you a data scientist with data warehouse tables that you’d like to explore in your machine learning (ML) environment? If so, read on.

In this post, I show you how to perform exploratory analysis on large datasets stored in your data warehouse and cataloged in your AWS Glue Data Catalog from your Amazon SageMaker notebook. I detail how to identify and explore a dataset in the corporate data warehouse from your Jupyter notebook running on Amazon SageMaker. I demonstrate how to extract the interesting information from Amazon Redshift into Amazon EMR and transform it further there. Then, you can continue analyzing and visualizing your data in your notebook, all in a seamless experience.

This post builds on the following prior posts—you may find it helpful to review them first.

Amazon SageMaker overview

Amazon SageMaker is a fully managed ML service. With Amazon SageMaker, data scientists and developers can quickly and easily build and train ML models, and then directly deploy them into a production-ready hosted environment. Amazon SageMaker provides an integrated Jupyter authoring environment for data scientists to perform initial data exploration, analysis, and model building.

The challenge is locating the datasets of interest. If the data is in the data warehouse, you extract the relevant subset of information and load it into your Jupyter notebook for more detailed exploration or modeling. As individual datasets get larger and more numerous, extracting all potentially interesting datasets, loading them into your notebook, and merging them there ceases to be practical and slows productivity. This kind of data combination and exploration can take up to 80% of a data scientist’s time. Increasing productivity here is critical to accelerating the completion of your ML projects.

An increasing number of corporations are using Amazon Redshift as their data warehouse. Amazon Redshift allows you to run complex analytic queries against petabytes of structured data, using sophisticated query optimization, columnar storage on high-performance local disks, and massively parallel query execution. These capabilities make it a magnet for the kind of data that is also of interest to data scientists. However, to perform ML tasks, the data must be extracted into an ML platform so data scientists can operate on it. The capabilities of Amazon Redshift can be used to join and filter the data as needed, then extracting only the relevant data into the ML platform for ML-specific transformation.

Frequently, large corporations also use AWS Glue to manage their data lake. AWS Glue is a fully managed ETL (extract, transform, and load) service. It makes it simple and cost-effective to categorize your data, clean it, enrich it, and move it reliably between various data stores. AWS Glue contains a central metadata repository known as the AWS Glue Data Catalog, which makes the enriched and categorized data in the data lake available for search and querying. You can use the metadata in the Data Catalog to identify the names, locations, content, and characteristics of datasets of interest.

Even after joining and filtering the data in Amazon Redshift, the remaining data may still be too large for your notebook to store and run ML operations on. Operating on extremely large datasets is a task for which Apache Spark on EMR is ideally suited.

Spark is a cluster-computing framework with built-in modules supporting analytics from a variety of languages, including Python, Java, and Scala. Spark on EMR’s ability to scale is a good fit for the large datasets frequently found in corporate data lakes. If the datasets are already defined in your AWS Glue Data Catalog, it becomes easier still to access them, by using the Data Catalog as an external Apache Hive Metastore in EMR. In Spark, you can perform complex transformations that go well beyond the capabilities of SQL. That makes it a good platform for further processing or massaging your data; for example, using the full capabilities of Python and Spark MLlib.

When using the setup described in this post, you use Amazon Redshift to join and filter the source data. Then, you iteratively transform the resulting reduced (but possibly still large) datasets, using EMR for heavyweight processing. You can do this while using your Amazon SageMaker notebook to explore and visualize subsets of the data relevant to the task at hand. The various tasks (joining and filtering; complex transformation; and visualization) have each been farmed out to a service intimately suited to that task.

Solution overview

The first section of the solution walks through querying the AWS Glue Data Catalog to find the database of interest and reviewing the tables and their definitions. The table declarations identify the data location—in this case, Amazon Redshift. The AWS Glue Data Catalog also provides the needed information to build the Amazon Redshift connection string for use in retrieving the data.

The second part of the solution is reading the data into EMR. It applies if the size of the data that you’re extracting from Amazon Redshift is large enough that reading it directly into your notebook is no longer practical. The power of a cluster-compute service, such as EMR, provides the needed scalability.

If the following are true, there is a much simpler solution. For more information, see the Amazon Redshift access demo sample notebook provided with the Amazon SageMaker samples.

  • You know the Amazon Redshift cluster that contains the data of interest.
  • You know the Amazon Redshift connection information.
  • The data you’re extracting and exploring is at a scale amenable to a JDBC connection.

The solution is implemented using four AWS services and some open source components:

  • An Amazon SageMaker notebook instance, which provides zero-setup hosted Jupyter notebook IDEs for data exploration, cleaning, and preprocessing. This notebook instance runs:
    • Jupyter notebooks
    • SparkMagic: A set of tools for interactively working with remote Spark clusters through Livy in Jupyter The SparkMagic project includes a set of magics for interactively running Spark code in multiple languages. Magics are predefined functions that execute supplied commands. The project also includes some kernels that you can use to turn Jupyter into an integrated Spark environment.
  • An EMR cluster, running Apache Spark, and:
    • Apache Livy: a service that enables easy interaction with Spark on an EMR cluster over a REST interface. Livy enables the use of Spark for interactive web/mobile applications — in this case, from your Jupyter notebook.
    • The AWS Glue Data Catalog, which acts as the central metadata repository. Here it’s used as your external Hive Metastore for big data applications running on EMR.
    • Amazon Redshift, as your data warehouse.
  • The EMR cluster with Spark reads from Amazon Redshift using a Databricks-provided package, Redshift Data Source for Apache Spark.

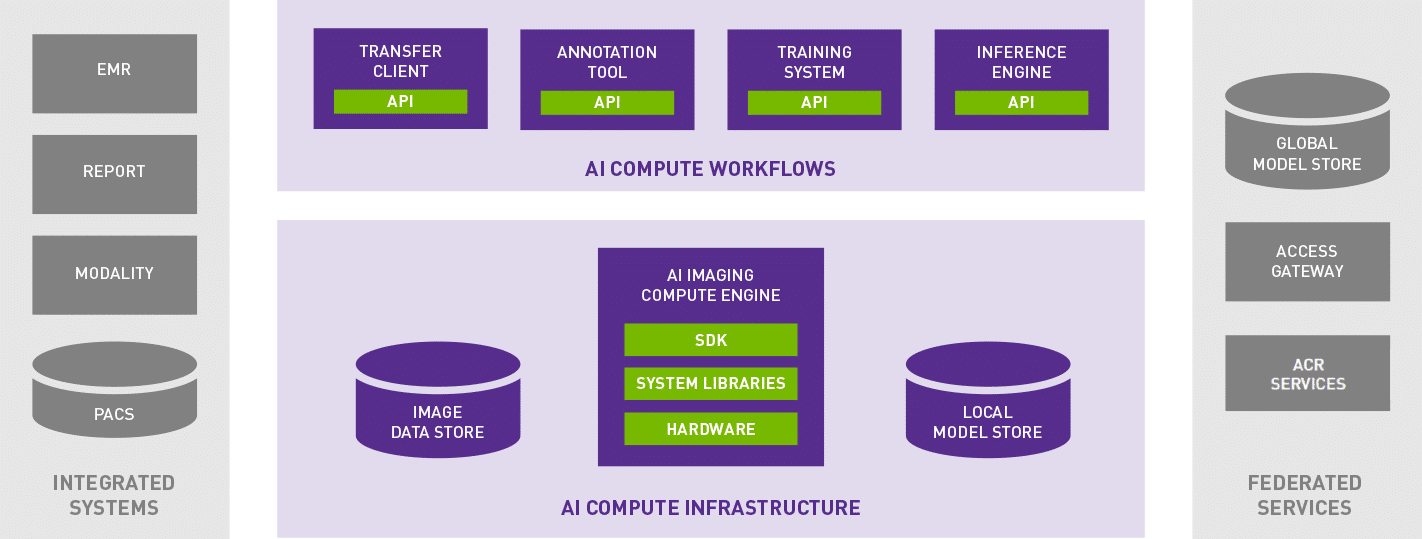
In this post, all these components interact as shown in the following diagram.

You get access to datasets living on Amazon S3 and defined in the AWS Glue Data Catalog with the following steps:

  1. You work in your Jupyter SparkMagic notebook in Amazon SageMaker. Within the notebook, you issue commands to the EMR cluster. You can use PySpark commands, or you can use SQL magics to issue HiveQL commands.
  2. The commands to the EMR cluster are received by Livy, which is running on the cluster.
  3. Livy passes the commands to Spark, which is also running on the EMR cluster.
  4. Spark accesses its Hive Metastore to identify the location, DDL, and properties of the cataloged dataset. In this case, the Hive metastore has been set to the Data Catalog.
  5. You define and run a boto3 function (get_redshift_data, provided below) to retrieve the connection information from the Data Catalog, and issue the command to Amazon Redshift to read the table. The spark-redshift package unloads the table into a temporary S3 file, then loads it into Spark.
  6. After performing your desired manipulations in Spark, EMR returns the data to your notebook as a dataframe for additional analysis and visualization.

In the sections that follow, you perform these steps on a sample set of tables:

  1. Use the provided AWS CloudFormation stack to create the Amazon SageMaker notebook instance; EMR cluster with Livy and Spark; and the Amazon Redshift driver. Specify AWS Glue as the cluster’s Hive Metastore; and select an Amazon Redshift cluster. The stack also sets up an AWS Glue connection to the Amazon Redshift cluster, and a crawler to crawl Amazon Redshift.
  2. Set up some sample data in Amazon Redshift.
  3. Execute the AWS Glue crawler to access Amazon Redshift and populate metadata about the tables it contains into the Data Catalog.
  4. From your Jupyter notebook on Amazon SageMaker:
    1. Use the Data Catalog information to locate the tables of interest, and extract the connection information for Amazon Redshift.
    2. Read the tables from Amazon Redshift, pulling the data into Spark. You can filter or aggregate the Amazon Redshift data as needed during the unload operation.
    3. Further transform the data in Spark, transforming it into the desired output.
    4. Pull the reduced dataset into your notebook, and perform some rudimentary ML on it.

Set up the solution infrastructure

First, you launch a predefined AWS CloudFormation stack to set up the infrastructure components. The AWS CloudFormation stack sets up the following resources:

  • An EMR cluster with Livy and Spark, using the AWS Glue Data Catalog as the external Hive compatible Metastore. In addition, it configures Livy to use the same Metastore as the EMR cluster.
  • An S3 bucket.
  • An Amazon SageMaker notebook instance, along with associated components:
    • An IAM role for use by the notebook instance. The IAM role has the managed role AmazonSageMakerFullAccess, plus access to the S3 bucket created above.
    • A security group, used for the notebook instance.
    • An Amazon SageMaker lifecycle configuration that configures Livy to access the EMR cluster launched by the stack, and copies in a predefined Jupyter notebook with the sample code.
  • An Amazon Redshift cluster, in its own security group. Ports are opened to allow EMR, Amazon SageMaker, and the AWS Glue crawler to access it.
  • An AWS Glue database, an AWS Glue connection specifying the Amazon Redshift cluster as the target, and an AWS Glue crawler to crawl the connection.

To see this solution in operation in us-west-2, launch the stack from the following button. The total solution costs around $1.00 per hour to run. Remember to delete the AWS CloudFormation stack when you’ve finished with the solution to avoid additional charges.

  1. Choose Launch Stack and choose Next.
  2. Update the following parameters for your environment:
    • Amazon Redshift password—Must contain at least one uppercase letter, one lowercase letter, and one number.
    • VPCId—Must have internet access and an Amazon S3 VPC endpoint. You can use the default VPC created in your account. In the Amazon VPC dashboard, choose Endpoints. Check that the chosen VPC has the following endpoint: com.amazonaws.us-west-2.s3. If not, create one.
    • VPCSubnet—Must have internet access, to allow needed software components to be installed.
    • Availability Zone—Must match the chosen subnet.

    The Availability Zone information and S3 VPC endpoint are used by the AWS Glue crawler to access Amazon Redshift.

  3. Leave the default values for the other parameters. Changing the AWS Glue database name requires changes to the Amazon SageMaker notebook that you run in a later step. The following screenshot shows the default parameters.
  4. Choose Next.
  5. Select I acknowledge that AWS CloudFormation might create IAM resources with custom names, and I acknowledge that AWS CloudFormation might require the following capability: CAPABILITY_AUTO_EXPAND.
  6. Choose Create.

Wait for the AWS CloudFormation master stack and its nested stacks to reach a status of CREATE_COMPLETE. It can take up to 45 minutes to deploy.

On the master stack, check the Outputs tab for the resources created. You use the key-value data in the next steps. The following screenshot shows the resources that I created but your values will differ.

Add sample data to Amazon Redshift

Using the RedshiftClusterEndpoint from your CloudFormation outputs, the master user name (masteruser), the password you specified in the AWS CloudFormation stack, and the Redshift database of ‘dev’, connect to your Amazon Redshift cluster using your favorite SQL client. Use one of the following methods:

The sample data to use comes from Step 6: Load Sample Data from Amazon S3. This data contains the ticket sales for events in several categories, along with information about the categories “liked” by the purchasers. Later, you use this data to calculate the correlation between liking a category and attending events (and then further exploration as desired).

Run the table creation commands followed by the COPY commands. Insert the RedshiftIamCopyRoleArn IAM role created by AWS CloudFormation in the COPY commands. At the end of this sequence, the sample data is in Amazon Redshift, in the public schema. Explore the data in the table, using SQL. You explore the same data again in later steps. You now have an Amazon Redshift data warehouse with several normalized tables containing data related to event ticket sales.

Try the following query. Later, you use this same query (minus the limit) from Amazon SageMaker to retrieve data from Amazon Redshift into EMR and Spark. It also helps confirm that you’ve loaded the data into Amazon Redshift correctly.

SELECT distinct u.userid, u.city, u.state, 
u.likebroadway, u.likeclassical, u.likeconcerts, u.likejazz, u.likemusicals, u.likeopera, u.likerock, u.likesports, u.liketheatre, u.likevegas, 
d.caldate, d.day, d.month, d.year, d.week, d.holiday,
s.pricepaid, s.qtysold, -- s.salesid, s.listid, s.saletime, s.sellerid, s.commission
e.eventname, -- e.venueid, e.catid, e.eventid, 
c.catgroup, c.catname,
v.venuecity, v.venuename, v.venuestate, v.venueseats
FROM  users u, sales s, event e, venue v, date d, category c
WHERE u.userid = s.buyerid and s.dateid = e.dateid and s.eventid = e.eventid and e.venueid = v.venueid 
    and e.dateid = d.dateid and e.catid = c.catid
LIMIT 100;

The ‘like’ fields contain nulls. Convert these to ‘false’ here, to simplify later processing.

SELECT distinct u.userid, u.city, u.state , 
NVL(u.likebroadway, false) as likebroadway, NVL(u.likeclassical, false) as likeclassical, NVL(u.likeconcerts, false) as likeconcerts, 
NVL(u.likejazz, false) as likejazz, NVL(u.likemusicals, false) as likemusicals, NVL(u.likeopera, false) as likeopera, NVL(u.likerock, false) as likerock,
NVL(u.likesports, false) as likesports, NVL(u.liketheatre, false) as liketheatre, NVL(u.likevegas, false) as likevegas, 
d.caldate, d.day, d.month, d.year, d.week, d.holiday,
s.pricepaid, s.qtysold, -- s.salesid, s.listid, s.saletime, s.sellerid, s.commission
e.eventname, -- e.venueid, e.catid, e.eventid, 
c.catgroup, c.catname,
v.venuecity, v.venuename, v.venuestate, v.venueseats
FROM  users u, sales s, event e, venue v, date d, category c
WHERE u.userid = s.buyerid and s.dateid = e.dateid and s.eventid = e.eventid and e.venueid = v.venueid 
    and e.dateid = d.dateid and e.catid = c.catid
LIMIT 100;

Use an AWS Glue crawler to add tables to the Data Catalog

Now that there’s sample data in the Amazon Redshift cluster, the next step is to make the Amazon Redshift tables visible in the AWS Glue Data Catalog. The AWS CloudFormation template set up the components for you: an AWS Glue database, a connection to Amazon Redshift, and a crawler. Now you run the crawler, which reads Amazon Redshift’s catalog and populate the Data Catalog with that information.

First, test that the AWS Glue connection can connect to Amazon Redshift:

  1. In the AWS Glue console, in the left navigation pane, choose Connections.
  2. Select the connection GlueRedshiftConnection, and choose Test Connection.
  3. When asked for an IAM role, choose the GlueRedshiftService role created by the AWS CloudFormation template.
  4. Wait while AWS Glue tests the connection. If it successfully does so, you see the message GlueRedshiftConnection connected successfully to your instance. If it does not, the most likely cause is that the subnet, VPC, and Availability Zone did not match. Or, it could be that the subnet is missing an S3 endpoint or internet access.

Next, retrieve metadata from Amazon Redshift about the tables that exist in the Amazon Redshift database noted in the AWS CloudFormation template parameters. To do so, run the AWS Glue crawler that the AWS CloudFormation template created:

  1. In the AWS Glue console, choose Crawlers in the left-hand navigation bar.
  2. Select GlueRedshiftCrawler in the crawler list, and choose Run Crawler. If asked for an IAM role, choose the GlueRedshiftService role created by the AWS CloudFormation template.
  3. Wait as the crawler runs. It should complete in two or three minutes. You see the status change to Starting, then Running, Stopping, and finally Ready.
  4. When the crawler status is Ready, check the column under Tables Added. You should see that seven tables have been added.

To review the tables the crawler added, use the following steps:

  1. Choose Databases and select the database named glueredsage. This database was created by the AWS CloudFormation stack.
  2. Choose Tables in glueredsage.

You should see the tables that you created in Amazon Redshift listed, as shown in the screenshot that follows. The AWS Glue table name is made up of the database (dev), the schema (public), and the actual table name from Amazon Redshift (for example, date). The AWS Glue classification is Amazon Redshift.

You access this metadata from your Jupyter notebook in the next step.

Access data defined in AWS Glue Data Catalog from the notebook

In this section, you locate the Amazon Redshift data of interest in the AWS Glue Data Catalog and get the data from Amazon Redshift, from an Amazon SageMaker notebook.

  1. In the Amazon SageMaker console, in the left navigation pane, choose Notebook instances.
  2. Next to the notebook started by your AWS CloudFormation stack, choose Open Jupyter.

You see a page similar to the screenshot that follows. The Amazon SageMaker lifecycle configuration in the CF stack automatically uploaded the notebook Using_SageMaker_Notebooks_to_access_Redshift_via_Glue.ipynb to your Jupyter dashboard.

Open the notebook. The kernel type is “SparkMagic (PySpark)”. Alternatively, you can browse the static results of a prior run in HTML format. The following links take you to the relevant section in this version.

Begin executing the cells in the notebook, following the instructions there. The instructions there walk you through:

  • Accessing the Spark cluster from your local notebook via Livy, and issuing a simple Pyspark statement from your local notebook to show how you can use Pyspark in this environment.
  • Listing the databases in your AWS Glue Data Catalog, and showing the tables in the AWS Glue database, glueredsage, that you set up previously via the AWS CloudFormation template.Here, you use a couple of Python helper functions to access the Data Catalog from your local notebook. You can identify the tables of interest from the Data Catalog, and see that they’re stored in Amazon Redshift. This is your clue that you must connect to Amazon Redshift to read this data.
  • Retrieving Amazon Redshift connection information from the Data Catalog for the tables of interest.
  • Retrieving the data relevant to your planned research problem from a series of Amazon Redshift tables into Spark EMR using two methods: retrieving the full table, or, by executing a SQL that joins and filters the data.First, you retrieve a small Amazon Redshift table containing some metadata — the categories of events. Then, you perform a complex query that pulls back a flattened dataset containing data about which eventgoers in which cities like what types of events (Broadway, Jazz, classical, etc.). Irrelevant data is not retrieved for further analysis. The data comes back as a Spark data frame, on which you can perform additional analysis.
  • Using the resulting (potentially large) dataframe on EMR to first perform some ML functions in Spark: converting several columns into one-hot vector representations and calculating correlations between them. The dataframe of correlations is much smaller, and is practical to process on your local notebook.
  • Lastly, working with the processed data frame in your local notebook instance. Here you visualize the (much smaller) results of your correlations locally.

Here’s the result of your initial analysis, showing the correlation between event attendance versus categories of events liked:

You can see that, based on these ticket purchases and event attendances, the likes and event categories are only weakly correlated (max correlation is 0.02). Though the correlations are weak, relatively speaking:

  • Liking theatre is positively correlated with attending musicals.
  • Liking opera is positively correlated with attending plays.
  • Liking rock is negatively correlated with attending musicals.
  • Liking Broadway is negatively correlated with attending plays (surprisingly!).

Debugging your connection

If your notebook does not connect to your EMR cluster, review the following information to see where the problem lies.

Amazon SageMaker notebook instances can use a lifecycle configuration. With a lifecycle configuration, you can provide a Bash script to be run whenever an Amazon SageMaker notebook instance is created, or when it is restarted after having been stopped. The AWS CloudFormation template uses a creation-time script to configure the Livy configuration on the notebook instance with the address of the EMR master instance created earlier. The most common sources of connection difficulties are as follows:

  • Not having the correct settings in livy.conf.
  • Not having the correct ports open on the security groups between the EMR cluster and the notebook instance.

When the notebook instance is created or started, the results of running the lifecycle config are captured in an Amazon CloudWatch Logs log group called /aws/sagemaker/NotebookInstances. This log group has a stream for <notebook-instance-name>/LifecycleConfigOnCreate script results, and another for <notebook-instance-name>/LifeCycleConfigOnStart (shown below for a notebook instance of “test-scripts2”). These streams contain log messages from the lifecycle script executions, and you can see if any errors occurred.

Next, check the Livy configuration and EMR access on the notebook instance. In the Jupyter files dashboard, choose New, Terminal. This opens a shell for you on the notebook instance.

The Livy config file is stored in: /home/ec2-user/SageMaker/.sparkmagic/config.json. Check to make sure that your EMR cluster IP address has replaced the original http://localhost:8998 address in three places in the file.

If you are receiving errors during data retrieval from Amazon Redshift, check whether the request is getting to Amazon Redshift.

  1. In the Amazon Redshift console, choose Clusters and select the cluster started by the AWS CloudFormation template.
  2. Choose Queries.
  3. Your request should be in the list of the SQL queries that the Amazon Redshift cluster has executed. If it isn’t, check that the connection to Amazon Redshift is working, and you’ve used the correct IAM copy role, userid, and password.

A last place to check is the temporary S3 directory that you specified in the copy statement. You should see a folder placed there with the data that was unloaded from Amazon Redshift.

Extending the solution and using in production

The example provided uses a simple dataset and SQL to allow you to more easily focus on the connections between the components. However, the real power of the solution comes from accessing the full capabilities of your Amazon Redshift data warehouse and the data within. You can use far more complex SQL queries—with joins, aggregations, and filters—to manipulate, transform, and reduce the data within Amazon Redshift. Then, pull back the subsets of interest into Amazon SageMaker for more detailed exploration.

This section touches on three additional questions:

  • What about merging Amazon Redshift data with data in S3?
  • What about moving from the data-exploration phase into training your ML model, and then to production?
  • How do you replicate this solution?

Using Redshift Spectrum in this solution

During this data-exploration phase, you may find that some additional data exists on S3 that is useful in combination with the data housed on Amazon Redshift. It’s straightforward to merge the two, using the power of Amazon Redshift Spectrum. Amazon Redshift Spectrum directly queries data in S3, using the same SQL syntax of Amazon Redshift. You can also run queries that span both the frequently accessed data stored locally in Amazon Redshift and your full datasets stored cost-effectively in S3.

To use this capability in from your Amazon SageMaker notebook:

  1. First, follow the instructions for Cataloging Tables with a Crawler to add your S3 datasets to your AWS Glue Data Catalog.
  2. Then, follow the instructions in Creating External Schemas for Amazon Redshift Spectrum to add an existing external schema to Amazon Redshift. You need the permissions described in Policies to Grant Minimum Permissions.

After the external schema is defined in Amazon Redshift, you can use SQL to read the S3 files from Amazon Redshift. You can also seamlessly join, aggregate, and filter the S3 files with Amazon Redshift tables.

In exactly the same way, you can use SQL from within the notebook to read the combined S3 and Amazon Redshift data into Spark/EMR. From there, read it into your notebook, using the functions already defined.

Moving from exploration to training and production

The pipeline described here—reading directly from Amazon Redshift—is optimized for the data-exploration phase of your ML project. During this phase, you’re likely iterating quickly across different datasets, seeing which data and which combinations are useful for the problem you’re solving.

After you’ve settled on the data to be used for training, it is more appropriate to materialize the final SQL into an extract on S3. The dataset on S3 can then be used for the training phase, as is demonstrated in the sample Amazon SageMaker notebooks.

Deployment into production has different requirements, with a different data access pattern. For example, the interactive responses needed by online transactions are not a good fit for Amazon Redshift. Consider the needs of your application and data pipeline, and engineer an appropriate combination of data sources and access methods for that need. Replicating this solution

Cleanup

To avoid additional charges, remember to delete the AWS CloudFormation stack when you’ve finished with the solution.

Conclusion

By now, you can see the true power of this combination in exploring data that’s in your data lake and data warehouse:

  • Expose data via the AWS Glue Data Catalog.
  • Use the scalability and processing capabilities of Amazon Redshift and Amazon EMR to preprocess, filter, join, and aggregate data from your Amazon S3 data lake data.
  • Your data scientists can use tools they’re familiar with—Amazon SageMaker, Jupyter notebooks, and SQL—to quickly explore and visualize data that’s already been cataloged.

Another source of friction has been removed, and your data scientists can move at the pace of business.


About the Author

Veronika Megler is a Principal Consultant, Big Data, Analytics & Data Science, for AWS Professional Services. She holds a PhD in Computer Science, with a focus on spatio-temporal data search. She specializes in technology adoption, helping customers use new technologies to solve new problems and to solve old problems more efficiently and effectively.