Category: Global
Tracking the throughput of your private labeling team through Amazon SageMaker Ground Truth
Launched at AWS re:Invent 2018, Amazon SageMaker Ground Truth helps you quickly build highly accurate training datasets for your machine learning models. Amazon SageMaker Ground Truth offers easy access to public and private human labelers, and provides them with built-in workflows and interfaces for common labeling tasks. Additionally, Amazon SageMaker Ground Truth can lower your labeling costs by up to 70% using automatic labeling, which works by training Ground Truth from data labeled by humans so that the service learns to label data independently.
When using your own private workers to perform data labeling, you want to measure and track their throughput and efficiency. Amazon SageMaker Ground Truth now logs worker events (for example, when a labeler starts and submits a task) to Amazon CloudWatch. In addition, you can also use the built-in metrics feature of CloudWatch to measure and track throughput across a work team or for individual workers. In this blog post, we cover how to use the raw worker event logs and built-in metrics in your AWS account.
How to use worker activity logs
Once you set up a private team of workers and run a labeling job with Amazon SageMaker Ground Truth, worker activity logs are automatically emitted to CloudWatch. To learn how to set up a private team and kick off your first labeling job, reference this getting started blog post. Note: If you have previously created a private work team, you need to create a new private work team to set up the trust permissions between work teams and CloudWatch. Realize, you do not have to use that private work team, and this is simply a one-time setup step.
To view the logs, visit the CloudWatch console and click on Logs in the left-hand panel. Here, you should see a log group named /aws/sagemaker/groundtruth/WorkerActivity.

This Log Group contains logs for each task a worker accepts during an Amazon SageMaker Ground Truth labeling job, and we have included an example log below. You see the worker’s Amazon Cognito sub ID in the “cognito_sub_id” field. We will demonstrate how to tie this back to worker’s identity through Amazon Cognito. In addition, you see the Amazon Resource Name (ARN) for the Amazon SageMaker Ground Truth labeling job in the “workflow_arn”. This log also contains timestamps for when the worker begins the task (“task_accepted_time”) and when the worker either returns or submits the task (“task_returned_time” or “task_submitted_time”).
Learn more about using CloudWatch Logs from the developer documentation.
How to use worker activity metrics
You can also use the CloudWatch metrics capability to generate your own interesting statistics or graphs about the throughput of your private workers. You can begin by navigating to the Metrics tab and then the AWS/SageMaker/Workteam namespace.

Say you want to find the average amount of time workers spent on tasks for a specific labeling job. You would select the LabelingJob, Workteam option.

From here, you can calculate your own statistics. In the example below, we calculate the average time spent per submitted task for a specific labeling job. There were 14 tasks submitted that took a total of 2.28 minutes or, on average, 9.78 seconds per task.

Learn more about using CloudWatch metrics from the developer documentation.
How to link Amazon Cognito sub ID to worker information
You can link the outputted Amazon Cognito sub ID to identifiable worker information, such as user name. To do so, you can write a quick script using the Amazon Cognito ListUsers API. Alternatively, you can use the Amazon Cognito console by following these steps:
- Navigate to Manage User Pools in the AWS Region where you are running your labeling jobs.
- Select the sagemaker-ground-userpool (if you integrated your own Amazon Cognito user pool with Amazon SageMaker Ground Truth, select that user pool).
- From the left-hand panel, click Users and groups to see all of the users in your user pool.
- Click on any users to see their respective sub ID.
Conclusion
In this post, I introduced how to measure and track the throughput of your private labeling team using CloudWatch Logs and metrics. In addition, I walked through how to link the outputted worker ID to identifiable worker information, such as a user name. Visit the AWS Management Console to get started.
As always, AWS welcomes feedback. Please submit comments or questions below.
About the Authors
 Vikram Madan is the Product Manager for Amazon SageMaker Ground Truth. He focusing on delivering products that make it easier to build machine learning solutions. In his spare time, he enjoys running long distances and watching documentaries.
 Pranav Sachdeva is a Software Development Engineer in AWS AI. He is passionate about building high performance distributed systems to solve real life problems. He is currently focused on innovating and building capabilities in the AWS AI ecosystem that allow customers to give AI the much needed human aspect.
How AI Can Protect the World’s Woods from Deforestation
For weeks, the Amazon rainforest has been burning at a startling rate. Tens of thousands of fires have been recorded this year — largely started by humans clearing land for logging, ranching or mining.
Weak regulations and the insufficient levels of forest monitoring personnel around the globe are no match for an illegal timber market worth up to $152 billion. Around a fifth of global carbon dioxide emissions come from deforestation.
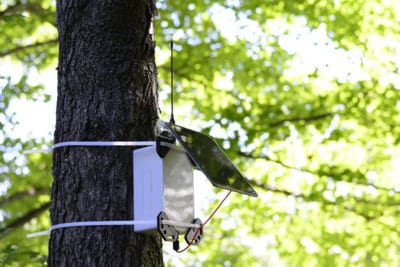
But AI can give officials ears all over the forest, listening for chainsaws and unauthorized vehicles — warning signs of illegal logging in progress. Outland Analytics, a member of the NVIDIA Inception virtual accelerator, has developed a tree-mounted device that uses audio recognition algorithms to detect these signals and alert forest rangers.
“We have a dire law enforcement shortage,” said Elliot Richards, 20-year-old CEO of the Philadelphia-based startup, which began as a high school engineering project and is now a six-person company. “It’s a lot of not being in the right place at the right time.”
For every 300,000 acres of land managed by the U.S. Forest Service — an area equivalent to nearly 500 square miles — there’s just one law enforcement officer patrolling for illicit activity. A network of warning systems could help understaffed forest monitoring agencies worldwide better track and prevent illicit logging before it’s too late.
The AI algorithms behind Outland Analytics’ system are trained using NVIDIA GPUs, including a V100 Tensor Core GPU in the IBM Cloud. The company is working with the New York State Department of Environmental Conservation for field testing and plans to launch a paid pilot program in the fall.
If a Tree Falls in the Forest, AI Will Hear It
Not every high school project turns into a full-fledged startup. But that’s how Outland Analytics got going, inspired by Richards and co-founder Edward Buckler’s love of nature and interest in land management.
Now undergrads at Drexel University and Stony Brook University, respectively, the founders started working on the company three years ago with the goal of improving forest protection.
While some organizations use satellite imagery or trail cameras that might provide notifications to forest rangers, those methods typically don’t provide immediate results — and it’s near impossible to identify individuals from the footage. Low-latency AI models that analyze audio could shorten response times, giving rangers minute-to-minute visibility into large areas of forest.
Using the TensorFlow deep learning framework, the team trained their AI algorithms with around 100 hours of audio from field recordings and publicly available data.
“GPUs in the cloud are nice because they’re preconfigured for you,” said Buckler. “We were blown away by how easy it was to tell a V100 on IBM Cloud to train our model, come back a few hours later and it’s all good to go.”
Buckler and Richards built a cellular-connected edge device about the size of a small backpack, topped with a solar panel and antenna. Strapped to a tree, a single device can monitor up to 150 acres of forest, collecting sound signals and sending them to the cloud for analysis.
If the neural network detects a chainsaw or unauthorized vehicle, it’ll contact officials through an email to a dispatch center or a text message to an individual ranger. Authorities can then head to the scene to catch potential environmental crimes in progress.
The low-maintenance device can be mounted at any height on a tree and is charged by solar power — though it can last a few days without sun. It’s so far been tested in the Adirondack and Catskill mountain ranges.
“The forests have the odds against them for protection,” said Richards. “We want to bolster the presence of specialized police forces by enabling them to respond to in-progress crimes.”
The post How AI Can Protect the World’s Woods from Deforestation appeared first on The Official NVIDIA Blog.
Enable smart text analytics using Amazon Elasticsearch Search and Amazon Comprehend
We’re excited to announce an end-to-end solution that leverages natural language processing to analyze and visualize unstructured text in your Amazon Elasticsearch Service domain with Amazon Comprehend in the AWS Cloud. You can deploy this solution in minutes with an AWS CloudFormation template and visualize your data in a Kibana dashboard.
Amazon Elasticsearch Service (Amazon ES) is a fully managed service that delivers Elasticsearch’s easy-to-use APIs and real-time capabilities along with the availability, scalability, and security required by production workloads. Amazon Comprehend is a fully managed natural language processing (NLP) service that enables text analytics to extract insights from the content of documents. Customers can now leverage Amazon ES and Amazon Comprehend to index and analyze unstructured text, and deploy a pre-configured Kibana dashboard to visualize extracted entities, key phrases, syntax, and sentiment from their documents.
As an example, a company might have large volumes of online customer feedback or transcribed customer calls. With this solution, you can visualize a time series of the sentiment of customer contacts, analyze a word cloud of the entities or key phrases in those contacts, search contacts for a specific product by sentiment, and much more. In this blog post, let’s look at an example Kibana dashboard that you can deploy to draw insights from your text data with Amazon ES and Amazon Comprehend. For detailed instructions, please visit the solution implementation guide.
This solution uses AWS CloudFormation to automate the deployment on the AWS Cloud. You can learn more about the solution by clicking this link and download the template here:
![]()
You can use this template to launch the solution and all associated components. Deploying this solution with the default parameters builds the following environment in the AWS Cloud.
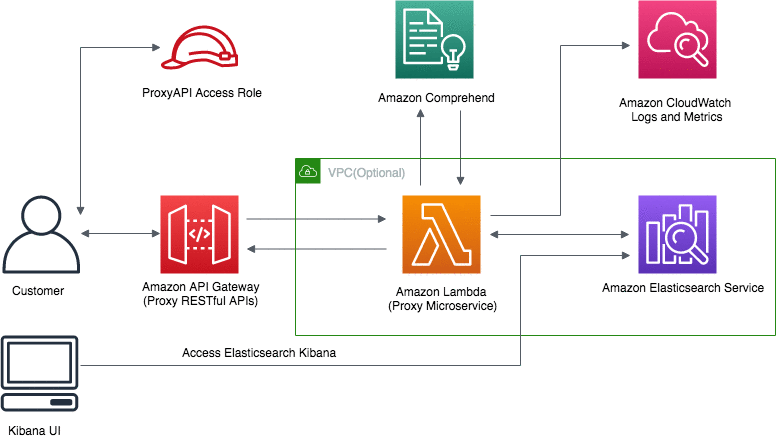
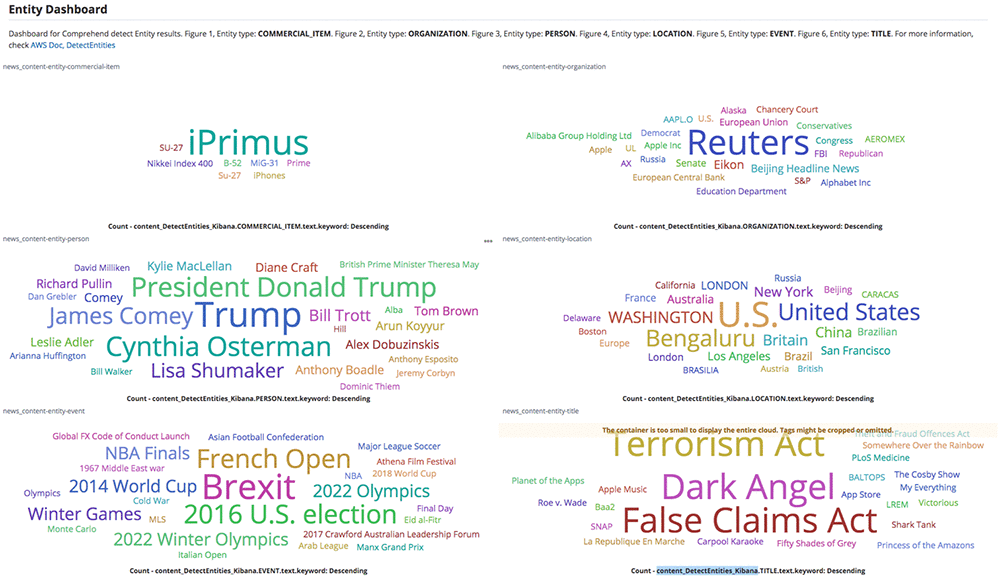
The default configuration deploys Amazon API Gateway, AWS Lambda, Amazon Elasticsearch Service, and AWS Identity and Access Management roles and policies, but you can also customize the template based on your specific network needs. Once the solution is deployed, you get a fully compatible Amazon ES RESTful API that you can use to ingest documents to Amazon ES and automatically tag the documents with NLP-based text analytics from Amazon Comprehend. You can then use the pre-configured Kibana dashboard to visualize these insights. In the example below, the entity dashboard below shows the word cloud for commercial items, organizations, people, locations, events, and titles from news content.
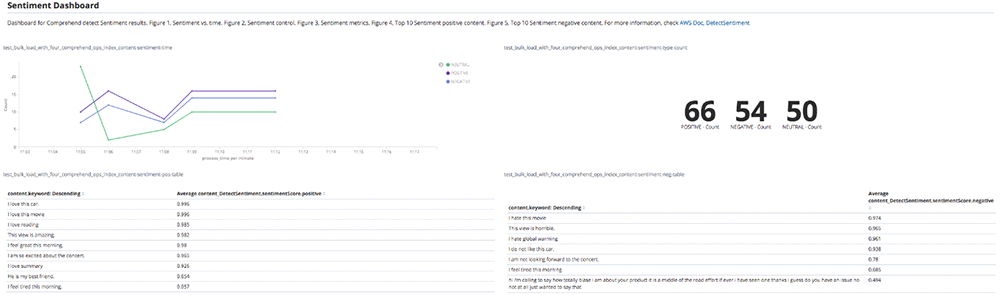
The sentiment dashboard below shows the sentiment over time, total counts of each sentiment and the top documents with positive and negative sentiment from unstructured text.
The Kibana dashboard is interactive and user-friendly, allowing you to dive deep into your unstructured text data. Try this solution now:
This solution is available in all Regions where Amazon ES and Amazon Comprehend is available. Please refer to the AWS Region Table for more information about Amazon Elasticsearch Service and Amazon Comprehend availability.
About the Author
 Sameer Karnik is a Sr. Product Manager leading product for Amazon Comprehend, AWS’s natural language processing service.
Enable smart text analytics using Amazon Elasticsearch Service and Amazon Comprehend
We’re excited to announce an end-to-end solution that leverages natural language processing to analyze and visualize unstructured text in your Amazon Elasticsearch Service domain with Amazon Comprehend in the AWS Cloud. You can deploy this solution in minutes with an AWS CloudFormation template and visualize your data in a Kibana dashboard.
Amazon Elasticsearch Service (Amazon ES) is a fully managed service that delivers Elasticsearch’s easy-to-use APIs and real-time capabilities along with the availability, scalability, and security required by production workloads. Amazon Comprehend is a fully managed natural language processing (NLP) service that enables text analytics to extract insights from the content of documents. Customers can now leverage Amazon ES and Amazon Comprehend to index and analyze unstructured text, and deploy a pre-configured Kibana dashboard to visualize extracted entities, key phrases, syntax, and sentiment from their documents.
As an example, a company might have large volumes of online customer feedback or transcribed customer calls. With this solution, you can visualize a time series of the sentiment of customer contacts, analyze a word cloud of the entities or key phrases in those contacts, search contacts for a specific product by sentiment, and much more. In this blog post, let’s look at an example Kibana dashboard that you can deploy to draw insights from your text data with Amazon ES and Amazon Comprehend. For detailed instructions, please visit the solution implementation guide.
This solution uses AWS CloudFormation to automate the deployment on the AWS Cloud. You can learn more about the solution by clicking this link and download the template here:
![]()
You can use this template to launch the solution and all associated components. Deploying this solution with the default parameters builds the following environment in the AWS Cloud.
The default configuration deploys Amazon API Gateway, AWS Lambda, Amazon Elasticsearch Service, and AWS Identity and Access Management roles and policies, but you can also customize the template based on your specific network needs. Once the solution is deployed, you get a fully compatible Amazon ES RESTful API that you can use to ingest documents to Amazon ES and automatically tag the documents with NLP-based text analytics from Amazon Comprehend. You can then use the pre-configured Kibana dashboard to visualize these insights. In the example below, the entity dashboard below shows the word cloud for commercial items, organizations, people, locations, events, and titles from news content.
The sentiment dashboard below shows the sentiment over time, total counts of each sentiment and the top documents with positive and negative sentiment from unstructured text.
The Kibana dashboard is interactive and user-friendly, allowing you to dive deep into your unstructured text data. Try this solution now:
This solution is available in all Regions where Amazon ES and Amazon Comprehend is available. Please refer to the AWS Region Table for more information about Amazon Elasticsearch Service and Amazon Comprehend availability.
About the Author
Sameer Karnik is a Sr. Product Manager leading product for Amazon Comprehend, AWS’s natural language processing service.
Giving Lens New Reading Capabilities in Google Go
Around the world, millions of people are coming online for the first time, and many of them are among the 800 million adults worldwide who are unable to read or write, or those who are migrating to towns and cities where they are not able to speak the predominant language. As a smartphone camera-based tool, Google Lens has great potential for helping people who struggle with reading and other language-based challenges. Lens uses computer vision, machine learning and Google’s Knowledge Graph to let people turn the things they see in the real world into a visual search box, enabling them to identify objects like plants and animals, or to copy and paste text from the real world into their phone.
However, in order for Lens to be able to help the greatest number of people, we needed to create a special version that can work on even the most basic smartphones. So at I/O 2019, we announced a new version of Lens designed specifically for use in Google Go—our Search app for entry level devices—and we included a new set of features designed to help people who face reading and other language-based challenges. When users point their camera at text they don’t understand, Lens in Google Go can translate and read it out loud. It even highlights each word as it’s being read so users can follow along. If you want to try out these features for yourself, they are available today via Lens in Google Go. While Google Go was initially available only on Android Go devices and on the Google Play Store in select markets, recently, we made it available globally in the Google Play Store.

To make these reading features work, the Google Go version of Lens needs to be able to capture high quality images on a wide variety of devices, then identify the text, understand its structure, translate and overlay it in context, and finally, read it out loud.
Image Capture
Image capture on entry-level devices, like those that run Android Go, is tricky since it must work on a wide variety of devices, many of which are more resource constrained than flagship phones. To build a universal tool that can reliably capture high-quality images with minimal lag, we made Lens in Google Go an early adopter of a new Android support library called CameraX. Available in Jetpack—a suite of libraries, tools, and guidance for Android developers—CameraX is an abstraction layer over the Android Camera2 API that resolves device compatibility issues so developers don’t have to write their own device-specific code.
Using CameraX, we implemented two capture strategies to balance capture latency against performance impact. On higher-end phones, which are powerful enough to provide a constant stream of high-resolution frames from which to select an image, we’ve made capture instantaneous. On less advanced devices, streaming these frames could cause camera lag since the CPU is less powerful, so we process the frame when the user taps capture to produce a single, on-demand high-resolution image.
Text Recognition
After Lens in Google Go captures an image, it needs to make sense of the shapes and letters that constitute the words, sentences and paragraphs. To do this, the image is scaled down and transferred to the Lens server, where the processing will be performed. Next, optical character recognition (OCR) is applied, which utilizes a region proposal network to detect character level bounding boxes that can be merged into lines for text recognition.

Merging these character boxes into words is a two-step, sequential process. The first step is to apply the Hough Transform, which assumes the text is distributed across parallel lines. The second step uses Text Flow, which instead traces text that may follow a curve by finding the shortest path through a graph of detected text boxes. This ensures that text with a variety of distributions, be they straight, curved or mixed, can be identified and processed.
Because the images captured by Lens in Google Go may include sources such as signage, handwriting or documents, a slew of additional challenges can arise. For example, the text can be obscured, scripts can be uniquely stylized, and images can be blurry. All of these issues can cause the OCR engine to misunderstand various characters within each word. To correct mistakes and improve word accuracy, Lens in Google Go uses the context of surrounding words to make corrections. It also utilizes the Knowledge Graph to provide contextual clues, such as whether a word is likely a proper noun and should not be spell-corrected.
All of these steps, from script detection and direction identification to text recognition, are performed by separable convolutional neural networks (CNNs) with an additional quantized long short-term memory (LSTM) network. And the models are trained on data from a variety of sources, ranging from ReCaptcha to scanned images from Google Books.
 |
| Left: Image with bounding box around recognized text. The raw OCR output from this image reads, “Cise is beauti640”. Right: By applying Knowledge Graph in addition to context from nearby words, Lens in Google Go recognizes the words, “life is beautiful”. |
Understanding Structure
Once the individual words have been recognized, Lens must determine how to fit them together. The text that people come across in the real world is laid out in many different ways. A newspaper, for example, is laid out into columns, with headlines, article text, and advertisements. Meanwhile, a bus schedule, has one column for destinations and another with times. While understanding text structure comes very naturally to people, computers need to be taught how to comprehend it. Lens uses CNNs to detect coherent text blocks like columns, or text in a consistent style or color. And then, within each block, it uses signals like text-alignment, language, and the geometric relationship of the paragraphs to determine their final reading order.
One of the other challenges in detecting document structure is that people take pictures of text from different angles, often with a warped perspective. This means we cannot revert to off-the-shelf detectors that rely on axis aligned boxes, but must generalize our systems to be able to deal with homographic distortions.
 |
| Paragraph segmentation on the front page of a newspaper. Notice how “News Analysis”, which is embedded in the middle of a column, has been identified separately due to its distinct style features. |
Translations in Context
To provide users with the most helpful information, translations must be both accurate and contextual. Lens uses Google Translate’s neural machine translation (NMT) algorithms, to translate entire sentences at a time, rather than going word-by-word, in order to preserve proper grammar and diction.
For the translation to be most useful, it needs to be placed in the context of the original text. For example, when translating instructions on an ATM, it is important to know which buttons correspond to which instructions. Part of the challenge is accounting for the fact that the translated text can be much shorter or longer than the original. For example, German sentences tend to be longer than English ones. To accomplish this seamless overlay, Lens redistributes the translation into lines of similar length, and chooses an appropriate font size to match. It also matches the color of the translation and its background with the original text through the use of a heuristic that assumes the background and the text differ in luminosity, and that the background takes up the majority of the space. This allows Lens to classify whether a pixel represents background or text, and then sample the average color from these two regions to ensure the translated text matches the original text.
Reading the Text Out Loud
The final challenge in delivering information in the most helpful way with Lens in Google Go is reading the text aloud. High-fidelity audio is generated using Google Text-to-Speech (TTS), a service that applies machine learning to disambiguate and detected entities such as dates, phone numbers and addresses, and uses that to generate realistic speech based on DeepMind’s WaveNet.
These reading features become more contextual and useful when they are paired with display. Lens utilizes timing annotations from the TTS service that mark the beginning of each word in order to highlight each word on screen as it’s being read, similar to a karaoke machine. Say for example, a user takes a picture of an ATM screen with different labels next to different buttons. This karaoke effect allows users to know which label applies to which button. It may also help users learn how to pronounce the words being translated.
Looking Ahead
Taken together, it is our hope that these features will have a positive impact on the day-to-day lives of millions of people. Moving forward, we will continue to work on further updates to these reading features to make the OCR more precise, including improvements to text structure understanding (e.g. multi-column text) and recognition of Indic scripts. As we address these text challenges, we continue to look for new ways that the combination of machine learning and the smartphone camera can help people as they go about their lives.

Build a custom entity recognizer using Amazon Comprehend
Amazon Comprehend is a natural language processing service that can extract key phrases, places, names, organizations, events, and even sentiment from unstructured text, and more. Customers usually want to add their own entity types unique to their business, like proprietary part codes or industry-specific terms. In November 2018, enhancements to Amazon Comprehend added the ability to extend the default entity types to custom entities. In addition, a custom classification feature allows you to group documents into named categories. For example, you can now group support emails by department, social media posts by product, and analyst reports by business unit.
Overview
In this post, I cover how to build a custom entity recognizer. No prior machine learning knowledge is required. I demonstrate an example that requires you to wrangle, filter, and clean the data before you can train the custom entity recognizer. Otherwise, you can just adhere to the following step-by-step instructions. These instructions begin with the dataset already prepared.
In this example, I use the following dataset: Customer Support on Twitter hosted on Kaggle. The dataset is chiefly comprised of short utterances. This is a typical and common illustration of chat conversations between a customer and a support representative. Here are some sample utterances from the Twitter dataset:
@AppleSupport causing the reply to be disregarded and the tapped notification under the keyboard is opened
@SpotifyCares Thanks! Version 8.4.22.857 armv7 on anker bluetooth speaker on Samsung Galaxy Tab A (2016) Model SM-T280 Does distance from speaker matter?

I filtered the data and kept only the tweets that contain “TMobileHelp” and “sprintcare” so that you can focus on one particular domain and context. Download and unzip the dataset onto your computer from comprehend_blog_data.zip file.
Walkthrough
In this example, you create a custom entity recognizer to extract information regarding iPhones and Samsung Galaxy phones. Currently, Amazon Comprehend recognizes both devices as “commercial items.” In this use case, you should be more specific.
Because you must be able to extract smartphone devices in particular, it would be counterproductive to limit the extracted data to generic commercial items. With this capability, a service provider can then easily extract device information from a tweet and route the problem to the relevant technical support team.
In the Amazon Comprehend console, create a custom entity recognizer for devices. Choose Train Recognizer.
Provide a name and an Entity type label, such as DEVICE.
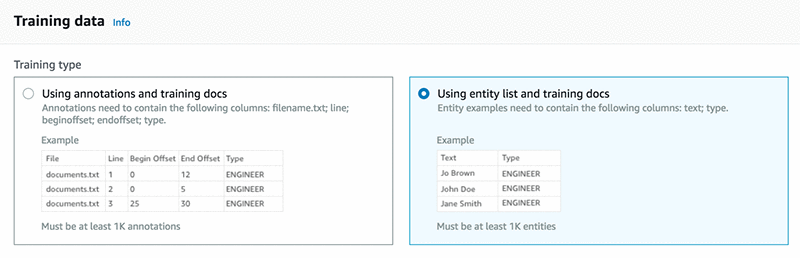
To train a custom entity recognition model, you can choose one of two ways to provide data to Amazon Comprehend:
- Annotations: Uses an annotation list, which provides the location of your entities within a large number of documents. Amazon Comprehend can train from both the entity itself and its context.
- Entity lists: Provides only a limited context. It only uses a selection from the specific entities list so that Amazon Comprehend can train on identifying the custom entity.
For simplicity, use the entity list method. The Annotation method can often lead to more refined results.
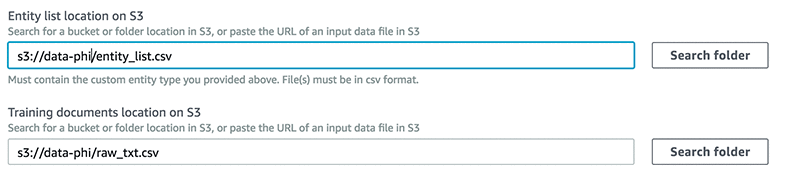
Provide a list of unique entities that have at least 1000 matches within a training dataset. Here is a list of devices included in the entity_list.csv file:
Split the initial dataset and hold out about 1000 records for testing purposes. This sample of records is used to test the model in a later step.
The rest of the data constitutes the training dataset (raw_txt.csv). As a general rule, you should include as much relevant data as possible. The more data that you add, the more context the model can have on which to train itself.
Upload the entity_list.csv and the raw_txt.csv files to an S3 bucket and provide the path for the entity list and training dataset locations.
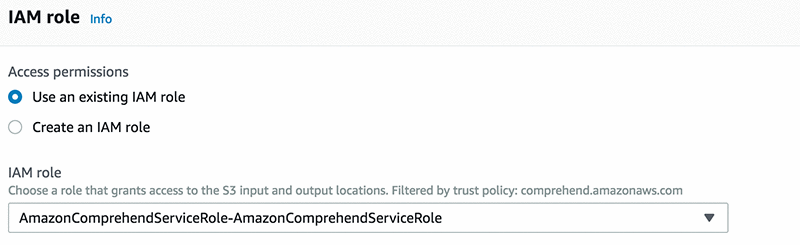
To grant permissions to Amazon Comprehend to access your S3 bucket, create an IAM service-linked role, as shown in the screenshot below. Use AmazonComprehendServiceRole-role.
Choose Train. This command allows you to submit your custom entity recognizer, go through a number of models, tune your hyperparameter, and check for cross validation to make sure that your model is robust. These are all the activities that data scientists perform to ensure that their models are robust.
Test your model
Next, create a job and test your model, as shown in the screenshot below.
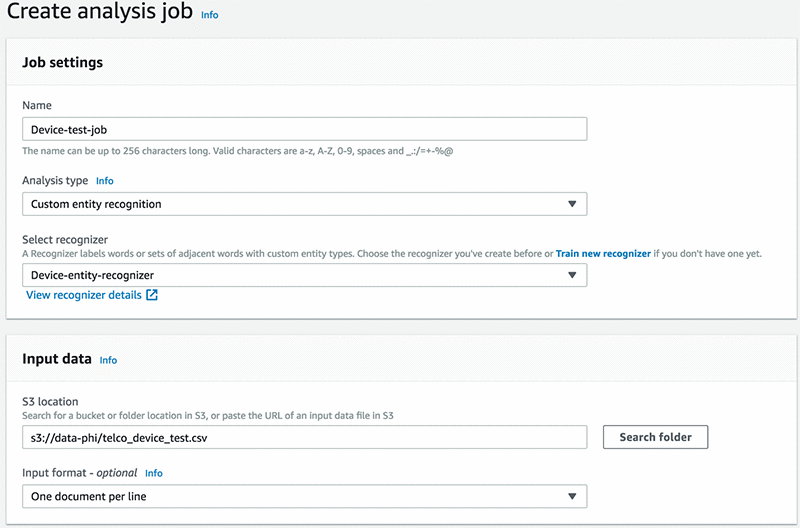
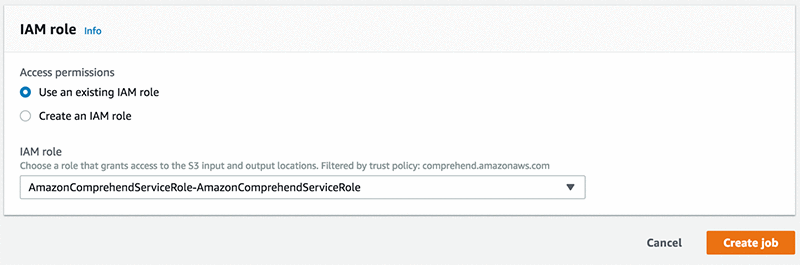
Provide an output folder where Amazon Comprehend saves the results.

Select the IAM role that you created in the previous step, and choose Create Job.
When your job analysis is complete, you have JSON files in your output S3 bucket path.

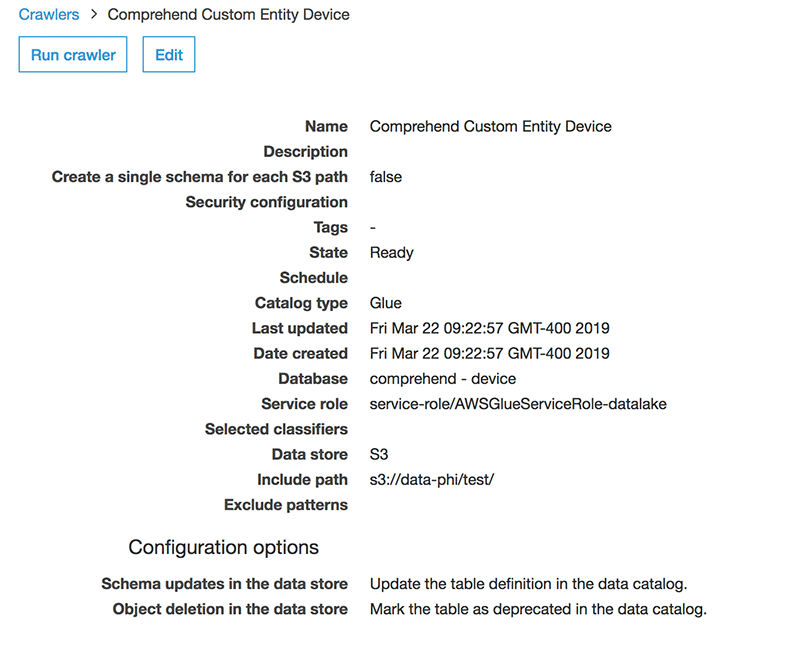
Now, to create a schema and to query your data, use AWS Glue and Amazon Athena, respectively. Follow the steps, provide the output path of your results, and create a database in AWS Glue. My AWS Glue crawler is shown in the following screenshot.
Next, run some queries in Athena and see which entities your custom annotator picks up.
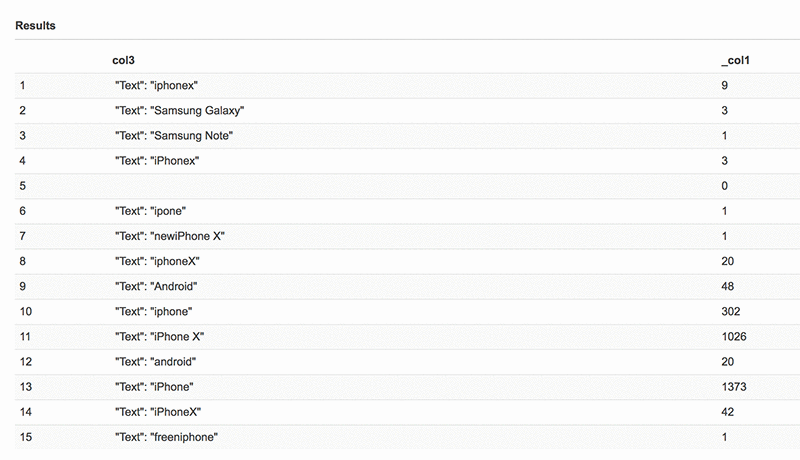
You might now notice that Amazon Comprehend has picked up additional words with varying spellings, which is something that can be expected when analyzing social media data, which has typos and abbreviated spellings.
Conclusion
In this post, I demonstrated how to build a custom entity recognition model, run some validation, and query the results. You could follow this post without having to know any of the complex and intricate procedures that must be mastered to build an NLP model.
In a real-life scenario, a service provider monitoring these tweets could leverage the custom entity recognition capabilities of Amazon Comprehend to extract information about the types of device mentioned in the tweet. They might also extract and assess the tone or sentiment of the tweet using Amazon Comprehend’s built-in sentiment analysis API.
This machine learning application can provide important context and assessment of a customer’s intent, which then enables Amazon Comprehend to make intelligent routing and remediation decisions. Overall, this process improves service and increases customer satisfaction.
Try custom entities now from the Amazon Comprehend console and get detailed instructions in the Amazon Comprehend documentation. This solution is available in all Regions where Amazon Comprehend is available. Please refer to the AWS Region Table for more information.
About the Authors
 Phi Nguyen is a solution architect at AWS helping customers with their cloud journey with a special focus on data lake, analytics, semantics technologies and machine learning. In his spare time, you can find him biking to work, coaching his son’s soccer team or enjoying nature walk with his family.
 Ro Mullier is a Sr. Solutions Architect at AWS helping customers run a variety of applications on AWS and machine learning workloads in particular. In his spare time, he enjoy spending time with family and friends, playing soccer and competing in machine learning competitions.
Frontera’s New Frontier: Fastest Academic Supercomputer Wields NVIDIA GPUs for Science Research
Everything’s bigger in Texas — supercomputers included.
The Texas Advanced Computing Center today launched Frontera, the most powerful academic supercomputer in the world, now featuring two subsystems powered by some 800 NVIDIA GPUs.
Frontera will leverage the AI, high performance computing and data analytics capabilities of NVIDIA Tensor Core GPUs to enable powerful scientific simulation and accelerate research areas including drug discovery, astrophysics and natural hazards modeling.
Housed at The University of Texas at Austin, Frontera ranked fifth on the most recent TOP500 list of fastest supercomputers, achieving 23.5 petaflops on the High-Performance Linpack benchmark and 38.75 petaflops of peak double-precision performance. The new GPU subsystems add a further 11 petaflops of peak single-precision performance for researchers.
NVIDIA GPUs power more than 100 systems on the TOP500 list, including half the top 10 incuding Summit, the world’s fastest supercomputer.
“With Frontera, the key is time to solution. That’s what we’re here for — to solve the biggest problems in science and engineering,” said Niall Gaffney, the center’s director of data-intensive computing.
One of the new subsystems features a cluster of 360 NVIDIA Tensor Core GPUs, liquid-cooled in racks developed by GRC, which specializes in immersion cooling for data centers. Another, built by IBM and named Longhorn, consists of 448 NVIDIA Tensor Core GPUs. Purpose-built with mixed-precision capabilities, these powerful GPUs provide scientists the flexibility to accelerate a variety of AI, simulation and data analysis workloads.
More than three dozen research teams have been using Frontera since the system began supporting science applications in June. The supercomputer was funded by a $60 million award from the National Science Foundation.
Over its lifetime, Frontera and its GPU subsystems will be used for hundreds of applications by thousands of researchers from academic institutions around the world.
From Molecular to Supermassive, Accelerating Science Research
High performance computing systems help researchers rapidly analyze data and run experiments and simulations. GPU acceleration enables faster iteration, cutting down the time it takes for scientists to achieve breakthroughs that can improve human health, broaden our understanding of the universe, and inform how we use materials and energy resources.
“Techniques like machine learning and AI are becoming more and more important for researchers doing large-scale compute,” Gaffney said. “GPU environments allow scientists to take advantage of acceleration for a wide array of applications.”
Initial projects benefiting from the powerful NVIDIA GPU-accelerated Frontera subsystems include:
- Astronomy insights: In the field of astrophysics, researchers often work with datasets 100 terabytes in size or more. GPU acceleration and AI enables them to separate signal from noise in these massive datasets, run large-scale simulations of the universe and better understand phenomena like neutron star collision.
- Medical breakthroughs: Deep learning tools are used in the field of medical imaging to help doctors more quickly identify diseases and abnormalities, like spotting glioblastoma tumors from brain scans. With supercomputing resources, developers can create more complex models to improve the accuracy of cancer diagnosis.
- Drug discovery: Identifying promising molecular compounds for drug candidates is computationally demanding, time-consuming and expensive. Researchers can leverage GPU-accelerated systems for faster simulations of protein folding, helping narrow down candidates to test in a wet laboratory.
- Smart city planning: Cities collect vast quantities of data that can be analyzed for smarter urban planning. With an AI model that can analyze visual data from traffic pole cameras, cities can identify congested areas and better address safety concerns like dangerous intersections.
- Understanding Earth: In weather modeling and in energy research, scientists depend on high-fidelity simulations to analyze the interaction of complex natural systems. Researchers can use AI to better predict weather events and earthquakes, inform precision agriculture projects and explore potential energy sources such as nuclear fusion.
Learn more about how NVIDIA GPUs power the world’s top supercomputers.
The post Frontera’s New Frontier: Fastest Academic Supercomputer Wields NVIDIA GPUs for Science Research appeared first on The Official NVIDIA Blog.
Power contextual bandits using continual learning with Amazon SageMaker RL
Amazon SageMaker is a modular, fully-managed service that enables developers and data scientists to quickly and easily build, train, and deploy machine learning models at any scale. Training models is quick and easy using a set of built-in high-performance algorithms, pre-built deep learning frameworks, or using your own framework. To help select your machine learning (ML) algorithm, Amazon SageMaker comes with the most common ML algorithms that are pre-installed and performance-optimized.
In addition to building machine learning models using supervised and unsupervised learning techniques, you can also build reinforcement learning models in Amazon SageMaker using Amazon SageMaker RL. Amazon SageMaker RL includes pre-built RL libraries and algorithms that make it easy to get started with reinforcement learning. There are several examples in GitHub that show you how you can use Amazon SageMaker RL for training robots and autonomous vehicles, portfolio management, energy optimization, and automatic capacity scaling.
In this blog post, we are excited to show you how you can use Amazon SageMaker RL to implement contextual multi-armed bandits (or contextual bandits for short) to personalize content for users. The contextual bandits algorithm recommends various content options to the users (such as gamers or hiking enthusiasts) by learning from user responses to the recommendations such as clicking a recommendation or not. These algorithms require that the machine learning models be continually updated to adapt to changes in data, and we show you how to build an iterative training and deployment loop in Amazon SageMaker.
Contextual bandits
Many applications like personalized web services (content layout, ads, search, product recommendations, etc.) are continuously faced with decisions to make, often based on some contextual information. These applications need to personalize content for individuals by making use of both user and content information. For example, user information related to her being a gaming enthusiast and content information related to it being a racing game. Machine learning systems that enable these applications face two challenges. The data to learn user preferences is sparse and biased (many users have little or no history and many products have never been recommended in the past). Also, new users and content are always being added to the system. Traditional Collaborative Filtering (CF) based approaches, used for personalization, build a static recommendation model for the sparse/biased dataset and for the current set of users and content. Contextual bandits, on the other hand, collect and augment data in a strategic manner by trading off between exploiting known information (recommending games to the gaming enthusiast) and exploring recommendations (recommending hiking gear to the gaming enthusiast) which may yield higher benefits. Bandits models also use user and content features and hence they can make recommendations for new content/users based on preferences of similar content and users.
Before we go any further, let us introduce some terminology. Contextual bandits algorithm is characterized by an iterative process. There are a number of choices (known as arms or actions), from which an agent can choose, which contain stochastic rewards. At the beginning of each round, the environment generates a state of fixed dimensionality (also called context), and rewards for each action, which are related to the state. The agent chooses an arm with a certain probability for that round, and the environment reveals the reward for that arm, but not for the others. The goal of the agent is to explore and exploit actions so that it learns a good model while minimizing use of actions that yield low rewards.
Amazon SageMaker RL contextual bandits solution
To implement the explore-exploit strategy in Amazon SageMaker RL, we developed an iterative training and deployment system that: (1) Presents the recommendations from the currently hosted contextual bandit model to the user, based on her features (context), (2) Captures the implicit feedback over time, and (3) Continuously re-trains the model with incremental interaction data.
In particular, the Amazon SageMaker RL bandits solution has the following features. Accompanying this blog, we are also releasing an Amazon SageMaker example Notebook demonstrating these features.
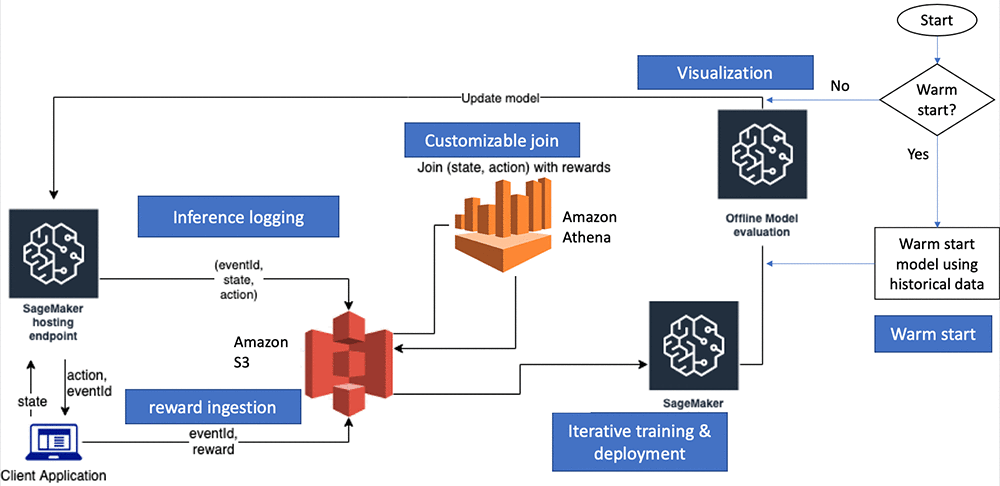
Amazon SageMaker RL Bandits Container: The Amazon SageMaker RL bandits container provides a library of contextual bandits algorithms from the Vowpal Wabbit (VW) project. In addition, it also provides support for hosting the trained bandit models for predictions.
Warm start: If there is historical data capturing user and content interactions, it can be used to create the initial model. In particular, data of the form <state, action, probability, reward> is needed. Presence of such data can help improve the model convergence times (number of training and deployment cycles). In the absence of such data, we can also initialize the model randomly. In the following code from our Amazon SageMaker example Notebook, we show how to warm start the bandits model with historical data.
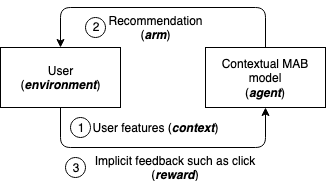
(Simulated) Client Application and Reward Ingestion: Any real world application (for example, a retail website serving recommendations to users) is referred to as the Client Application in the figure above, will ping the Amazon SageMaker hosted endpoint with user features (state) and will receive recommendations (action) with an associated probability (probability) in return. In addition, the client application will also receive a system-generated event_id. Data generated as a result of user interactions with the recommendations is used in the subsequent iteration of training. In particular, the user behavior of interest (such as clicks and purchases) is captured as the feedback or reward. The feedback may not be instantaneous (purchase after a few hours of the recommendation) and the client application is expected to (1) associate the reward with the event_id and (2) upload the aggregated rewards data (<reward, event_id>) back on to S3. We include code in the example notebook to demonstrate how such a client application can be implemented. The simulated application has a predictor object that has the logic to make HTTP requests to the Amazon SageMaker endpoint. The event_id is used to join inference data (<state, action, probability, event_id>) with the rewards data (<reward, event_id>).
Inference logging: To use data generated from user interactions with the deployed contextual bandit models, we need to be able to capture data at the inference time (<state, action, probability, event_id>). Inference data logging happens automatically from the deployed Amazon SageMaker endpoint serving the bandits model. The data is captured and uploaded to an S3 bucket in the user account. Please refer to the notebook for details on the S3 locations where this data is stored.
Customizable joins: At every iteration, the training data is obtained by joining the inference data with the rewards data. By default, all of the specified rewards data and inference data are used for the join. The Amazon SageMaker RL bandits solution also lets customers specify a time window on which the inference data and rewards data can be joined (number of hours before the join).
Iterative training and deployment (Continual Learning setup): The example notebook and accompanying code help demonstrate how to use Amazon SageMaker and other AWS services to create the iterative training and deployment loop to build and train bandit models. This is demonstrated in two parts. First, the notebook demonstrates each step individually (model initialization, deploying the first model, initializing the client application, reward ingestion, model re-training and re-deployment). These individual steps help during the development phase. Subsequently, an end-to-end loop demonstrates how bandits models can be deployed post development. The ExperimentManager class can be used for all the Bandits/RL and continual learning workflows. Similar to the estimators in the Amazon SageMaker Python SDK, ExperimentManager contains methods for training, deployment, and evaluation. It keeps track of the job status and reflects current progress in the workflow. It sets up an AWS CloudFormation stack of AWS resources like Amazon DynamoDB, Amazon Kinesis Data Firehose and Amazon Athena, that are required to support the continual learning loop, in addition to Amazon SageMaker.
Offline model evaluation and visualization: At every training and deployment iteration, we demonstrate how offline model evaluation can be used to aid the decision to update the deployed model. After every training cycle, we need to evaluate if the newly trained model is better than the one currently deployed. Using an evaluation dataset, we evaluate how the new model would have done had it been deployed compared to the model that is currently deployed. Amazon SageMaker RL supports offline evaluation by performing this counterfactual analysis (CFA). By default, we apply a doubly robust (DR) estimation method [1]. These evaluation scores are also sent to Amazon CloudWatch so that for long running cycles, users can visualize the progress over time.
Amazon SageMaker example notebook
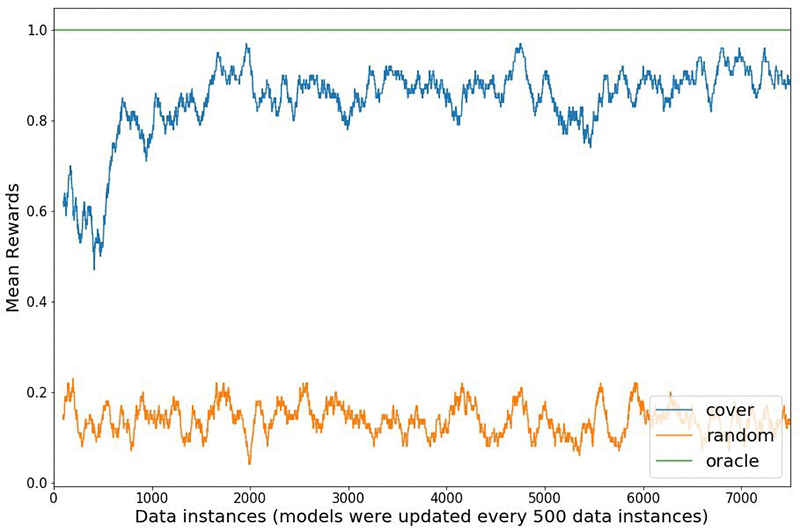
To demonstrate the bandits application, we used the Statlog(Shuttle) dataset from the UCI Machine Learning repository [2]. It contains nine integer attributes (or features) related to indicators during a space shuttle flight, and the goal is to predict one of seven states of the radiator subsystem of the shuttle. For demonstrating the bandits solution, this multi-class classification problem is converted into a bandits problem. In the classification problem, the algorithm receives features and correct label per datapoint. In the bandit problem, the algorithm picks one of the label options given the features. If this matches the class in the original data point, a reward of one is assigned. If not, a reward of zero is assigned.
We create an offline dataset to showcase the warm-start feature. For this purpose, 100 data points are randomly selected. The features are considered as the context and an action is generated for each sample by selecting one class randomly from the seven (probability=1/7). During the training and deployment loop, the hosted bandits model generates a predicted class (action) and the associated probability. Again, the reward is assigned as one if the predicted class matches the actual class. Otherwise, it is set to zero. After every 500 data points the accumulated data is used to re-train the model that is deployed based on its offline model evaluation.
Local vs Amazon SageMaker modes
The explore/exploit strategy requires iterative training and model deployment cycles. For faster experimentation/development cycles, we have used the Amazon SageMaker local mode. In this mode, the model training, data joins, and deployment are happening in the Amazon SageMaker notebook instance, which aids faster iteration. You can easily move from the local mode to training in Amazon SageMaker for production use-cases where you need to scale to a high model throughput with a single click.
Comparing different Exploration strategies
We compare the rewards received in the Statlog (Shuttle) simulated environment between using a naive random strategy to explore the environment versus a bandit algorithm called online cover [3]. The figure below shows how the bandit algorithm explores different actions initially, learns from the received rewards and shifts to exploiting as time progresses. The agent receives a reward of one if the predicted action is the correct class and zero otherwise. The oracle always knows the right action to take for each state, and gets a perfect score of one. The experiment starts with a model warm started from 100 data points and updates the model every 500 interactions for a total of 7500 interactions. The rewards shown are a rolling mean over 100 data points. The rewards plot aligns with results reported in the literature [4].
Conclusion
In this blog post, we showcased how to you can use Amazon SageMaker RL and the Amazon SageMaker built-in bandits container to systematically train and deploy contextual bandit models. We explained how you can get started with training multi-armed contextual bandit models interacting with a live environment and updating the model along with efficient exploration. The accompanying Amazon SageMaker example notebook demonstrates how you can manage your own bandits workflow on top of all the benefits offered by the Amazon SageMaker managed service. To learn more about Amazon SageMaker RL, please visit the developer documentation here.
References
- Dudik, M., Langford, J. and Li, L. (2011). Doubly Robust Policy Evaluation and Learning. In Proceedings of the 28thInternational Conferenceon Machine Learning (ICML 2011).
- Dua, D. and Graff, C. (2019). UCI Machine Learning Repository. Irvine, CA: University of California, School of Information and Computer Science.
- Agarwal, A., Hsu, D., Kale, S., Langford, J., Li, L. and Schapire, R.E. (2014). Taming the monster: A fast and simple algorithm for contextual bandits. In Proceedings of the 31st International Conference on Machine Learning (ICML-14).
- Bietti, A., Agarwal, A. and Langford, J. (2018). A Contextual Bandit Bake-off.
About the Authors
 Saurabh Gupta is an Applied Scientist with AWS Deep Learning. He did his MS in AI and Machine Learning from UC San Diego. His interests lie in Natural Language Processing and Reinforcement Learning algorithms, and in providing high performance practical implementations of the former, that are deployable in the real world.
 Bharathan Balaji is a Research Scientist in AWS and his research interests lie in reinforcement learning systems and applications. He contributed to the launch of Amazon SageMaker RL and AWS DeepRacer. He received his Ph.D. in Computer Science and Engineering from University of California, San Diego.
 Anna Luo is an Applied Scientist in the AWS. She works on utilizing RL techniques for different domains including supply chain and recommender system. She received her Ph.D. in Statistics from University of California, Santa Barbara.
 Yijie Zhuang is a Software Engineer with AWS SageMaker. He did his MS in Computer Engineering from Duke. His interests lie in building scalable algorithms and reinforcement learning systems. He contributed to Amazon SageMaker Built-in Algorithms and Amazon SageMaker RL.
 Siddhartha Agarwal is a Software Developer with AWS Deep Learning team. He did his Masters in Computer Science from UC San Diego, and currently focuses on bulding Reinforcement Learning solutions on SageMaker. Prior to SageMaker, he worked on Amazon Comprehend, a natural language processing service on AWS. In his leisure time, he loves to cook and explore new places.
 Vineet Khare is a Sciences Manager for AWS Deep Learning. He focuses on building Artificial Intelligence and Machine Learning applications for AWS customers using techniques that are at the forefront of research. In his spare time, he enjoys reading, hiking and spending time with his family.
Kitchen Confidential: Robotics Startup Dishes Out Automation to Clean Up Food Service Operations
Clean dishes make the world go ‘round — for food service operations, at least.
Dishwashers are a key component to a commercial kitchen’s smooth operation, but they have one of the highest labor shortage and turnover rates in any industry. With the average dishwasher staying only 42 days, the commercial food industry continuously faces the expensive challenge of hiring and training.
Dishcraft Robotics, a startup based in Silicon Valley, aims to wash away this and other problems the commercial food service industry faces with the implementation of its dish-washing automation technology.
Washing dishes isn’t just difficult, it can be dangerous as well. A slip ‘n slide is ideal on a hot summer day, but not in the kitchen — the primary cause of injuries in the commercial food industry is caused by the wet floor surrounding sinks. Beyond slips and falls, dish washing is an exhausting job due to the repetition, muscle strain and frequent burns from hot water.
In response, many operations have transitioned to using disposable or compostable dishes and bowls. But that is turning out to be an even bigger headache to operations and the environment as regulations increasingly crack down on the growing volume of waste being generated each day.
According to a 2017 study by Rethink Disposable, the vast majority of compostable foodware ends up in landfill.
Dishcraft is solving these labor, safety and environmental issues with a dish delivery service that uses proprietary robotic and AI technology to provide food service operations with clean, reusable dishes every day at an affordable price. Called Dishcraft Daily, the delivery service increases efficiency and productivity of operations while reducing waste.
Dishcraft founders, CEO Linda Pouliot and CTO Paul Birkmeyer, both robotics industry veterans, spent time washing dishes in commercial dish rooms to identify challenges of the job and how robotics could resolve them. It’s that hands-on experience, combined with their vision for automation and innovative spirit, that led to the creation of Dishcraft.
Taking its inspiration from the linen service model, Dishcraft exchanges dirty dishes from the client’s location for commercially cleaned dishes from one of its dish-washing hubs each day.
The company uses its own line of dishware that includes a magnet that enables its robotic dish machine to easily pick up the dishes to scrub, wash and rack them. Dishcraft’s robot then use cameras to inspect the dishes and analyze that data through deep neural networks to clean them efficiently. Birkmeyer says that, after the dishes are washed, the robotics system uses vision-based networks to perform a quality inspection step prior to allowing the dishes to leave the system.
Each system generates a lot of data and requires real-time inference powered by internal GPUs. The startup is currently experimenting with GeForce RTX 2080 Ti cards in its robot.
The system’s deep learning training uses local NVIDIA GPUs and occasionally AWS with NVIDIA V100 Tensor Core GPUs.
Constructing a robot that can handle commercial dish washing — akin to the mania of the family kitchen after Thanksgiving dinner but with more dishes — is no easy feat. The commercial kitchen is a fast-paced, unpredictable environment, said Birkmeyer, and building a robot that can anticipate complicated scenarios is a challenge.
“Without deep neural networks, trained and deployed on NVIDIA hardware, we wouldn’t be able to provide the consistent and reliable operations that our customers demand,” he says.
Since its founding in 2015, Dishcraft’s team of just under 50 staff members has raised over $25 million in venture funding. It’s providing its Dishcraft Daily service to mostly companies ranging from 300 to 2,500 employees.
Dishcraft’s clients are primarily dining service operations in the San Francisco Bay Area that provide food on site or through catering and delivery. The company is also planning on servicing universities and hospitals in the future.
The post Kitchen Confidential: Robotics Startup Dishes Out Automation to Clean Up Food Service Operations appeared first on The Official NVIDIA Blog.