
Blog

Learn About Our Meetup

5000+ Members

MEETUPS

LEARN, CONNECT, SHARE

Join our meetup, learn, connect, share, and get to know your Toronto AI community. 

JOB POSTINGS

INDEED POSTINGS

Browse through the latest deep learning, ai, machine learning postings from Indeed for the GTA.

CONTACT

CONNECT WITH US

Are you looking to sponsor space, be a speaker, or volunteer, feel free to give us a shout.

Category: Global

Let Them Eat Take-Out: Kiwibots Bring Sustenance to Students

College students are many things — sleepy, overly caffeinated, stressed — but above all, they are hungry. Kiwi Campus is here to help.

Co-founder and CEO of Kiwi Campus, Felipe Chávez, joined AI Podcast host Noah Kravitz to talk about Kiwi and its delivery service.

Based in Berkeley, Calif., the company specializes in creating a robotic ecosystem for last-mile delivery. Its solution is the Kiwibot. The small autonomous robot delivers orders seven days a week from 10 a.m. to 8 p.m. Its coverage area includes UC Berkeley and the surrounding streets.

Chávez, originally from Colombia, noticed how expensive it was to have food delivered in the US. He says online food ordering ranks at about 20 percent in Latin America’s largest cities. By contrast, when he moved to America, “it was 6 percent two years ago, and now it’s 9 percent.”

Given the American economy and level of productivity, Chávez says, “It’s insane that we’re not ordering several times per day.”

Kiwi Campus has a unique delivery system. It starts with Kiwi Trike, an autonomous tricycle, that brings Kiwibots to restaurants. Kitchen staff load the order into the Kiwibots, which then complete the final legs of the journey.

The Kiwibot runs on a blend of AI and human input. The bots themselves use a Jetson TX2, six ultra-HD cameras, and radar to navigate the streets of Berkeley. Chávez realized that the best way to avoid high-risk situations would be to incorporate human input.

Kiwi’s human workers are based in Colombia. Each person is assigned to three robots and provides observations, with a latency of just five seconds. Their role is to ensure that the robots “are in the correct direction. Also, sometimes we have a behavioral neural network that keeps the robot centered in the sidewalk but sometimes it’s not, so they keep it centered, and also giving extra input about position.”

Human observations also are key in crossing the street. Kiwibots are “crossing 2,000 streets per day,” says Chávez. Before each crossing, humans confirm the input each Kiwibot receives from traffic lights. They then cross the street safely.

This approach seems to be working — Kiwi Campus has had more than 30,000 orders in the last 10 months.

Chávez promises that Kiwi Campus will soon be in more than 10 campuses. In the meantime, you can visit their website to learn more, or connect with Chávez on twitter at @felipekiwi90.

The post Let Them Eat Take-Out: Kiwibots Bring Sustenance to Students appeared first on The Official NVIDIA Blog.

What’s the Difference Between Developing AI on Premises and in the Cloud?

Choosing between an on-premises GPU system and the cloud is a bit like deciding between buying or renting a home.

Renting takes less capital up front. It’s pay as you go, and features like the washer-dryer unit or leaky roof repair might be handled by the property owner. If their millennial children finally move out and it’s time to move to a different-sized home, a renter is only obligated to stick around for as long as contract terms dictate.

Those are the key benefits of renting GPUs in the cloud: a low financial barrier to entry, support from cloud service providers and the ability to quickly scale up or down to a different-sized computing cluster.

Buying, on the other hand, is a one-time, fixed cost — once you purchase a property, stay there as long as you’d like. Unless they’re living with teenagers, the owner has full sovereignty over what goes on inside. There’s no lease agreement, so as long as everyone fits in the house, it’s okay to invite over a few friends and relatives for an extended stay.

And that’s the same reasoning for investing in GPUs on premises. An on-prem system can be used for as much time and as many projects as the hardware can handle, making it easier to iterate and try different methods without considering cost. For sensitive data like financial information or healthcare records, it might be essential to keep everything behind an organization’s firewall.

Depending on the use case at hand and the kind of data involved, developers may choose to build their AI tools on a deskside system, on-prem data center or in the cloud. More likely than not, they’ll move from one environment to another at different points in the journey from initial experimentation to large-scale deployment.

Using GPUs in the Cloud

Cloud-based GPUs can be used for tasks as diverse as training multilingual AI speech engines, detecting early signs of diabetes-induced blindness and developing media-compression technology. Startups, academics and creators can quickly get started, explore new ideas and experiment without a long-term commitment to a specific size or configuration of GPUs.

NVIDIA data center GPUs can be accessed through all major cloud platforms, including Alibaba Cloud, Amazon Web Services, Google Cloud, IBM Cloud, Microsoft Azure and Oracle Cloud Infrastructure.

Cloud service providers aid users with setup and troubleshooting by offering helpful resources such as development tools, pre-trained neural networks and technical support for developers. When a flood of training data comes in, a pilot program launches or a ton of new users arrive, the cloud lets companies easily scale their infrastructure to cope with fluctuating demand for computing resources.

Adding to cost-effectiveness, developers using the cloud for research, containerized applications, experiments or other projects that aren’t time-sensitive can get discounts of up to 90 percent by using excess capacity. This usage, known as “spot instances,” effectively subleases space on cloud GPUs not in use by other customers.

Users working on the cloud long term can also upgrade to the latest, most powerful data center GPUs as cloud providers update their offerings — and can often take advantage of discounts for their continued use of the platform.

Using GPUs On Prem 

When building complex AI models with huge datasets, operating costs for a long-term project can sometimes escalate. That might cause developers to be mindful of each iteration or training run they undertake, leaving less freedom to experiment. An on-prem GPU system gives developers unlimited iteration and testing time for a one-time, fixed cost.

Data scientists, students and enterprises using on-prem GPUs don’t have to count how many hours of system use they’re racking up or budget how many runs they can afford over a particular timespan.

If a new methodology fails at first, there’s no added investment required to try a different variation of code, encouraging developer creativity. The more an on-prem system is used, the greater the developer’s return on investment.

From powerful desktop GPUs to workstations and enterprise systems, on-prem AI machines come in a broad spectrum of choices. Depending on the price and performance needs, developers might start off with a single NVIDIA GPU or workstation and eventually ramp up to a cluster of AI supercomputers.

NVIDIA and VMware support modern, virtualized data centers with vComputeServer software and the NVIDIA NGC container registry. These help organizations streamline the deployment and management of AI workloads on virtual environments using GPU servers.

Healthcare companies, human rights organizations and the financial services industry all have strict standards for data sovereignty and privacy. On-prem deep learning systems can make it easier to adopt AI while following regulations and minimizing cybersecurity risks.

Using a Hybrid Cloud Architecture

For many enterprises, it’s not enough to pick just one method. Hybrid cloud computing combines both, taking advantage of the security and manageability of on-prem systems while also leveraging public cloud resources from a service provider.

The hybrid cloud can be used when demand is high and on-prem resources are maxed out, a tactic known as cloud bursting. Or a business could rely on its on-prem data center for processing its most sensitive data, while running dynamic, computationally intensive tasks in the hybrid cloud.

Many enterprise data centers are already virtualized and looking to deploy a hybrid cloud that’s consistent with the business’ existing computing resources. NVIDIA partners with VMware Cloud on AWS to deliver accelerated GPU services for modern enterprise applications, including AI, machine learning and data analytics workflows.

The service will allow hybrid cloud users to seamlessly orchestrate and live-migrate AI workloads between GPU-accelerated virtual servers in data centers and the VMware Cloud.

Get the Best of Both Worlds: A Developer’s AI Roadmap

Making a choice between cloud and on-prem GPUs isn’t a one-time decision taken by a company or research team before starting an AI project. It’s a question developers can ask themselves at multiple stages during the lifespan of their projects.

A startup might do some early prototyping in the cloud, then switch to a desktop system or GPU workstation to develop and train its deep learning models. It could move back to the cloud when scaling up for production, fluctuating the number of clusters used based on customer demand. As the company builds up its global infrastructure, it may invest in a GPU-powered data center on premises.

Some organizations, such as ones building AI models to handle highly classified information, may stick to on-prem machines from start to finish. Others may build a cloud-first company that never builds out an on-prem data center.

One key tenet for organizations is to train where their data lands. If a business’s data lives in a cloud server, it may be most cost-effective to develop AI models in the cloud to avoid shuttling the data to an on-prem system for training. If training datasets are in a server onsite, investing in a cluster of on-prem GPUs might be the way to go.

Whichever route a team takes to accelerate their AI development with GPUs, NVIDIA developer resources are available to support engineers with SDKs, containers and open-source projects. Additionally, the NVIDIA Deep Learning Institute offers hands-on training for developers, data scientists, researchers and students learning how to use accelerated computing tools.

Visit the NVIDIA Deep Learning and AI page for more.

Main image by MyGuysMoving.com, licensed from Flickr under CC BY-SA 2.0.

The post What’s the Difference Between Developing AI on Premises and in the Cloud? appeared first on The Official NVIDIA Blog.

Recursive Sketches for Modular Deep Learning

Much of classical machine learning (ML) focuses on utilizing available data to make more accurate predictions. More recently, researchers have considered other important objectives, such as how to design algorithms to be small, efficient, and robust. With these goals in mind, a natural research objective is the design of a system on top of neural networks that efficiently stores information encoded within—in other words, a mechanism to compute a succinct summary (a “sketch”) of how a complex deep network processes its inputs. Sketching is a rich field of study that dates back to the foundational work of Alon, Matias, and Szegedy, which can enable neural networks to efficiently summarize information about their inputs.

For example: Imagine stepping into a room and briefly viewing the objects within. Modern machine learning is excellent at answering immediate questions, known at training time, about this scene: “Is there a cat? How big is said cat?” Now, suppose we view this room every day over the course of a year. People can reminisce about the times they saw the room: “How often did the room contain a cat? Was it usually morning or night when we saw the room?”. However, can one design systems that are also capable of efficiently answering such memory-based questions even if they are unknown at training time?

In “Recursive Sketches for Modular Deep Learning”, recently presented at ICML 2019, we explore how to succinctly summarize how a machine learning model understands its input. We do this by augmenting an existing (already trained) machine learning model with “sketches” of its computation, using them to efficiently answer memory-based questions—for example, image-to-image-similarity and summary statistics—despite the fact that they take up much less memory than storing the entire original computation.

Basic Sketching Algorithms
In general, sketching algorithms take a vector x and produce an output sketch vector that behaves like x but whose storage cost is much smaller. The fact that the storage cost is much smaller allows one to succinctly store information about the network, which is critical for efficiently answering memory-based questions. In the simplest case, a linear sketch x is given by the matrix-vector product Ax where A is a wide matrix, i.e., the number of columns is equal to the original dimension of x and the number of rows is equal to the new reduced dimension. Such methods have led to a variety of efficient algorithms for basic tasks on massive datasets, such as estimating fundamental statistics (e.g., histogram, quantiles and interquartile range), finding popular items (known as frequent elements), as well as estimating the number of distinct elements (known as support size) and the related tasks of norms and entropy estimation.

A simple method to sketch the vector x is to multiply it by a wide matrix A to produce a lower-dimensional vector y.

This basic approach works well in the relatively simple case of linear regression, where it is possible to identify important data dimensions simply by the magnitude of weights (under the common assumption that they have uniform variance). However, many modern machine learning models are actually deep neural networks and are based on high-dimensional embeddings (such as Word2Vec, Image Embeddings, Glove, DeepWalk and BERT), which makes the task of summarizing the operation of the model on the input much more difficult. However, a large subset of these more complex networks are modular, allowing us to generate accurate sketches of their behavior, in spite of their complexity.

Neural Network Modularity
A modular deep network consists of several independent neural networks (modules) that only communicate via one’s output serving as another’s input. This concept has inspired several practical architectures, including Neural Modular Networks, Capsule Neural Networks and PathNet. It is also possible to split other canonical architectures to view them as modular networks and apply our approach. For example, convolutional neural networks (CNNs) are traditionally understood to behave in a modular fashion; they detect basic concepts and attributes in their lower layers and build up to detecting more complex objects in their higher layers. In this view, the convolution kernels correspond to modules. A cartoon depiction of a modular network is given below.

This is a cartoon depiction of a modular network for image processing. Data flows from the bottom of the figure to the top through the modules represented with blue boxes. Note that modules in the lower layers correspond to basic objects, such as edges in an image, while modules in upper layers correspond to more complex objects, like humans or cats. Also notice that in this imaginary modular network, the output of the face module is generic enough to be used by both the human and cat modules.

Sketch Requirements
To optimize our approach for these modular networks, we identified several desired properties that a network sketch should satisfy:

  • Sketch-to-Sketch Similarity: The sketches of two unrelated network operations (either in terms of the present modules or in terms of the attribute vectors) should be very different; on the other hand, the sketches of two similar network operations should be very close.
  • Attribute Recovery: The attribute vector, e.g., the activations of any node of the graph can be approximately recovered from the top-level sketch.
  • Summary Statistics: If there are multiple similar objects, we can recover summary statistics about them. For example, if an image has multiple cats, we can count how many there are. Note that we want to do this without knowing the questions ahead of time.
  • Graceful Erasure: Erasing a suffix of the top-level sketch maintains the above properties (but would smoothly increase the error).
  • Network Recovery: Given sufficiently many (input, sketch) pairs, the wiring of the edges of the network as well as the sketch function can be approximately recovered.
This is a 2D cartoon depiction of the sketch-to-sketch similarity property. Each vector represents a sketch and related sketches are more likely to cluster together.

The Sketching Mechanism
The sketching mechanism we propose can be applied to a pre-trained modular network. It produces a single top-level sketch summarizing the operation of this network, simultaneously satisfying all of the desired properties above. To understand how it does this, it helps to first consider a one-layer network. In this case, we ensure that all the information pertaining to a specific node is “packed” into two separate subspaces, one corresponding to the node itself and one corresponding to its associated module. Using suitable projections, the first subspace lets us recover the attributes of the node whereas the second subspace facilitates quick estimates of summary statistics. Both subspaces help enforce the aforementioned sketch-to-sketch similarity property. We demonstrate that these properties hold if all the involved subspaces are chosen independently at random.

Of course, extra care has to be taken when extending this idea to networks with more than one layer—which leads to our recursive sketching mechanism. Due to their recursive nature, these sketches can be “unrolled” to identify sub-components, capturing even complicated network structures. Finally, we utilize a dictionary learning algorithm tailored to our setup to prove that the random subspaces making up the sketching mechanism together with the network architecture can be recovered from a sufficiently large number of (input, sketch) pairs.

Future Directions
The question of succinctly summarizing the operation of a network seems to be closely related to that of model interpretability. It would be interesting to investigate whether ideas from the sketching literature can be applied to this domain. Our sketches could also be organized in a repository to implicitly form a “knowledge graph”, allowing patterns to be identified and quickly retrieved. Moreover, our sketching mechanism allows for seamlessly adding new modules to the sketch repository—it would be interesting to explore whether this feature can have applications to architecture search and evolving network topologies. Finally, our sketches can be viewed as a way of organizing previously encountered information in memory, e.g., images that share the same modules or attributes would share subcomponents of their sketches. This, on a very high level, is similar to the way humans use prior knowledge to recognize objects and generalize to unencountered situations.

Acknowledgements
This work was the joint effort of Badih Ghazi, Rina Panigrahy and Joshua R. Wang.

Assessing the Quality of Long-Form Synthesized Speech

Automatically generated speech is everywhere, from directions being read out aloud while you are driving, to virtual assistants on your phone or smart speaker devices at home. While much research is being done to try to make synthesized speech sound as natural as possible—such as generating speech for low-resource languages and creating human-like speech with Tacotron 2—how does one evaluate if the generated speech sounds natural or not? The best way to find out is to ask people, who are very good at telling if something sounds natural or not.

In the field of speech synthesis, subjects are routinely asked to listen to samples of synthesized speech and rate their quality. Yet, until now, evaluation of synthesized speech has been done on a sentence by sentence basis. But often one wants to know the quality of a series of sentences that belong together, such as a paragraph in a news article or a turn in a conversation. This is where it gets interesting, as there is more than one way of evaluating sentences that naturally occur in a sequence, and, surprisingly, a rigorous comparison of these different methods has not been carried out. This in turn can hinder research progress in developing products that rely on generated speech.

To address this challenge, we present “Evaluating Long-form Text-to-Speech: Comparing the Ratings of Sentences and Paragraphs”, a publication to appear at SSW10 in which we compare several ways of evaluating synthesized speech for multi-line texts. We find that when a sentence is evaluated as part of a longer text involving several sentences, the outcome is influenced by the way in which the audio sample is presented to the people evaluating it. For example, when the sentence is presented by itself, without any context, the rating people give on average is substantially different from the rating they give when they listen to the same sentence with some context (while the context doesn’t have to be rated).

Evaluating Automatically Generated Speech
To determine the quality of speech signals, it is common practice to ask several human raters to give their opinion for a particular sample, on a 1-to-5 scale. This sample can be automatically generated, but it can also be natural speech (i.e., an actual person saying a sentence out loud), which serves as a control. The scores of all reviewers rating a particular speech sample are averaged to get a Mean Opinion Score (MOS).

Until now, MOS ratings were typically collected per sentence, i.e., raters listened to sentences in isolation to form their opinion. Instead of this typical approach, we consider three different ways of presenting speech samples to raters—both with and without context—and we show that each approach yields different results. The first, presenting the sentence in isolation, is the default method commonly used in the field. An alternative method is to provide the full context for the sentence. In this case, the entire paragraph to which the sentence belongs is included and the ensemble is rated. The final approach is to provide a context-stimulus pair. Here, rather than providing full context, only some context is provided, such as the preceding sentence(s) from the original paragraph.

Interestingly, these three different approaches for presenting speech give different results even when applied to natural speech. This is demonstrated in the figure below, where the MOS scores are presented for natural speech samples rated using the three different methods of presentation. Even though the sentences being rated are identical across the three different settings, the scores are different on average, depending on the context in which they were presented.

MOS results for natural speech from a dataset consisting of news articles. Though the differences appear small, they are significant between all conditions (two-tailed t-test with α=0.05).

Examination of the figure above reveals that raters rarely give top scores (a five) even to recorded human speech, which may be surprising. However, this is a typical result seen in sentence evaluation studies and probably has to do with a more generic pattern of behavior, that people tend to avoid using the extreme ends of a scale, regardless of the task or setting.

When evaluated synthesized speech, the differences are more pronounced.

MOS results for synthesized speech on the same news article dataset used above. All lines are synthesized speech, unless indicated otherwise.

To see if the way context is presented makes a difference, we tried several different ways of providing it: one or two sentences leading up to the sentence to be evaluated, provided as generated speech or real speech. When context is added, the scores get higher (the four blue bars on the left) except when the context presented is real speech, in which case the score drops (the rightmost blue bar). Our hypothesis is that this has to do with an anchoring effect—if the context is very good (real speech) the synthesized speech, in comparison, is perceived as less natural.

Predicting Paragraph Score
When an entire paragraph of synthesized speech is played (the yellow bar), this is perceived as even less natural than in the other settings. Our original hypothesis was a weakest-link argument—the rating is probably as bad as the worst sentence in the paragraph. If that were the case, it should be easy to predict the rating of a paragraph by considering the ratings of the individual sentences in it, perhaps simply taking the minimum value to get the paragraph rating. It turns out, however, that does not work.

The failure of the weakest-link hypothesis may be due to more subtle factors that are difficult to tease out with such a simple approach. To test this, we also trained a machine learning algorithm to predict the paragraph score from the individual sentences. However, this approach, too, was unable to successfully predict paragraph scores reliably.

Conclusion
Evaluating synthesized speech is not straightforward when multiple sentences are involved. The traditional paradigm of rating sentences in isolation does not give the full picture, and one should be aware of anchoring effects when context is provided. Rating full paragraphs might be the most conservative approach. We hope our findings help advance future work in speech synthesis where long-form content is concerned, such as audio book readers and conversational agents.

Acknowledgments
Many thanks to all authors of the paper: Rob Clark, Hanna Silen, Ralph Leith.

Performing batch inference with TensorFlow Serving in Amazon SageMaker

After you’ve trained and exported a TensorFlow model, you can use Amazon SageMaker to perform inferences using your model. You can either:

  • Deploy your model to an endpoint to obtain real-time inferences from your model.
  • Use batch transform to obtain inferences on an entire dataset stored in Amazon S3.

In the case of batch transform, it’s becoming increasingly necessary to perform fast, optimized batch inference on large datasets.

In this post, you learn how to use Amazon SageMaker batch transform to perform inferences on large datasets. The example in this post uses a TensorFlow Serving (TFS) container to do batch inference on a large dataset of images. You also see how to use the new pre– and post-processing feature of the Amazon SageMaker TFS container. This feature enables your TensorFlow model to make inferences directly on data in S3 and also save post-processed inferences to S3.

Overview

The dataset in this example is the “Challenge 2018/2019” subset of the Open Images V5 Dataset. This subset consists of 100,000 images in JPG format for a total of 10 GB. The model you use is an image-classification model based on the ResNet-50 architecture that has been trained on the ImageNet dataset and exported as a TensorFlow SavedModel. Use this model to predict the class of each image (for example, boat, car, bird). You write a pre– and post-processing script and package it with the SavedModel to perform inferences quickly, efficiently, and at scale.

Walkthrough

When you run a batch transform job, you specify:

  • Where your input data is stored
  • Which Amazon SageMaker Model object (named “Model”) to use to transform your data
  • The number of cluster instances to use for your batch transform job

In our use case, a Model object is an HTTP server that serves a trained model artifact, a TensorFlow SavedModel, via the Amazon SageMaker TFS container. Amazon SageMaker batch transform distributes your input data among the instances.

To each instance in the cluster, Amazon SageMaker batch transform sends HTTP requests for inferences containing input data from S3 to the Model. Amazon SageMaker batch transform then saves these inferences back to S3.

Data often must be converted from one format to another before it can be passed to a model for predictions. For example, images may be in PNG or JPG format, but they must be converted into a format the model can accept. Also, sometimes other preprocessing of the data, such as resizing of images, must be performed.

Using the Amazon SageMaker TFS container’s new pre– and post-processing feature, you can easily convert data that you have in S3 (such as raw image data) into a TFS request. Your TensorFlow SavedModel can then use this request for inference. Here’s what happens:

  1. Your pre-processing code runs in an HTTP server inside the TFS container and processes incoming requests before sending them to a TFS instance within the same container.
  2. Your post-processing code processes responses from TFS before they are saved to S3.

The following diagram illustrates this solution.

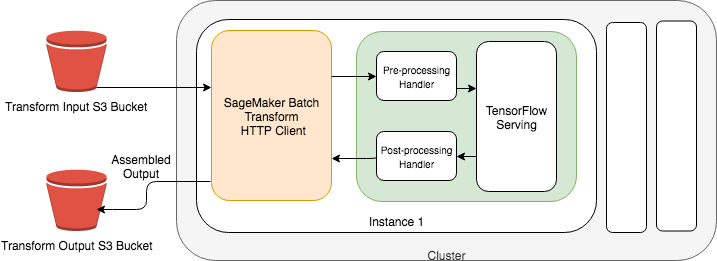
Performing inferences on raw image data with an Amazon SageMaker batch transform

Here are the three steps required for implementation:

  1. Write a pre– and post-processing script for JPEG input data.
  2. Package a Model for JPEG input data.
  3. Run an Amazon SageMaker batch transform job for JPEG input data.

To write a pre– and post-processing script for JPEG input data

To make inferences, you first preprocess your image data in S3 to match the serving signature of your TensorFlow SavedModel, which you can inspect using thesaved_model_cli. The following is the serving signature of the ResNet-50 v2 (NCHW, JPEG) model:

MetaGraphDef with tag-set: 'serve' contains the following SignatureDefs:

[...]

signature_def['serving_default']:
  The given SavedModel SignatureDef contains the following input(s):
    inputs['image_bytes'] tensor_info:
        dtype: DT_STRING
        shape: (-1)
        name: input_tensor:0
  The given SavedModel SignatureDef contains the following output(s):
    outputs['classes'] tensor_info:
        dtype: DT_INT64
        shape: (-1)
        name: ArgMax:0
    outputs['probabilities'] tensor_info:
        dtype: DT_FLOAT
        shape: (-1, 1001)
        name: softmax_tensor:0
  Method name is: tensorflow/serving/predict

The Amazon SageMaker TFS container uses the model’s SignatureDef named serving_default, which is declared when the TensorFlow SavedModel is exported. This SignatureDef says that the model accepts a string of arbitrary length as input, and responds with classes and their probabilities. With your image classification model, the input string is a base64 encoded string representing a JPEG image, which your SavedModel decodes. The Python script that you use for pre– and post-processing, inference.py, is reproduced as follows:

import base64
import io
import json
import requests

def input_handler(data, context):
    """ Pre-process request input before it is sent to TensorFlow Serving REST API

    Args:
        data (obj): the request data stream
        context (Context): an object containing request and configuration details

    Returns:
        (dict): a JSON-serializable dict that contains request body and headers
    """

    if context.request_content_type == 'application/x-image':
        payload = data.read()
        encoded_image = base64.b64encode(payload).decode('utf-8')
        instance = [{"b64": encoded_image}]
        return json.dumps({"instances": instance})
    else:
        _return_error(415, 'Unsupported content type "{}"'.format(context.request_content_type or 'Unknown'))


def output_handler(response, context):
    """Post-process TensorFlow Serving output before it is returned to the client.

    Args:
        response (obj): the TensorFlow serving response
        context (Context): an object containing request and configuration details

    Returns:
        (bytes, string): data to return to client, response content type
    """
    if response.status_code != 200:
        _return_error(response.status_code, response.content.decode('utf-8'))
    response_content_type = context.accept_header
    prediction = response.content
    return prediction, response_content_type


def _return_error(code, message):
    raise ValueError('Error: {}, {}'.format(str(code), message))

The input_handler intercepts inference requests, base64 encodes the request body, and formats the request body to conform to the TFS REST API. The return value of the input_handler function is used as the request body in the TensorFlow Serving request. Binary data must use key “b64”, according to the TFS REST API.

Because your serving signature’s input tensor has the suffix “_bytes,” the encoded image data under key “b64” is passed to the “image_bytes” tensor. Some serving signatures may accept a tensor of floats or integers instead of a base64 encoded string. However, for binary data (including image data), your model should accept a base64 encoded string for binary data because JSON representations of binary data can be large.

Each incoming request originally contains a serialized JPEG image in its request body. After passing through the input_handler, the request body contains the following, which TFS accepts for inference:

{"instances": [{"b64":"[base-64 encoded JPEG image]"}]}

The first field in the return value of output_handler is what Amazon SageMaker batch transform saves to S3 as this example’s prediction. In this case, output_handler passes the content on to S3 unmodified.

Pre– and post-processing functions let you perform inference with TFS on any data format, not just images. To learn more about the input_handler and output_handler, see the Amazon SageMaker TFS Container README.

Packaging a model for JPEG input data

After writing a pre– and post-processing script, package your TensorFlow SavedModel along with your script into a model.tar.gz file. Then, upload the file to S3 for the Amazon SageMaker TFS container to use. The following is an example of a packaged model:

├── code
│   ├── inference.py
│   └── requirements.txt
└── 1538687370
    ├── saved_model.pb
    └── variables
       ├── variables.data-00000-of-00001
       └── variables.index

The number 1538687370 refers to the model version number of the SavedModel, and this directory contains your SavedModel artifacts. The code directory contains your pre– and post-processing script, which must be named inference.py. It also contains an optional requirements.txt file, which is used to install dependencies (with pip) from the Python Package Index before the batch transform job starts. In this use case, you don’t need any additional dependencies.

To package your SavedModel and your code, create a GZIP tar file named model.tar.gz by running the following command:

tar -czvf model.tar.gz code --directory=resnet_v2_fp32_savedmodel_NCHW_jpg 1538687370

Use this model.tar.gz when you create a Model object to run batch transform jobs. To learn more about packaging a model, see the Amazon SageMaker TFS Container README.

After creating a model artifact package, upload your model.tar.gz and create a Model object that refers to your packaged model artifact and the Amazon SageMaker TFS container. Specify that you are running in Region us-west-2 using TFS 1.13.1 and GPU instances.

The following code examples use both the AWS CLI, which is helpful for scripting automated pipelines, and the Amazon SageMaker Python SDK. However, you can create models and Amazon SageMaker batch transform jobs using any AWS SDK.

AWS CLI
timestamp() {
  date +%Y-%m-%d-%H-%M-%S
}

MODEL_NAME="image-classification-tfs-$(timestamp)"
MODEL_DATA_URL="s3://my-sagemaker-bucket/model/model.tar.gz"

aws s3 cp model.tar.gz $MODEL_DATA_URL

REGION="us-west-2"
TFS_VERSION="1.13.1"
PROCESSOR_TYPE="gpu"

IMAGE="520713654638.dkr.ecr.$REGION.amazonaws.com/sagemaker-tensorflow-serving:$TFS_VERSION-$PROCESSOR_TYPE"

# See the following document for more on SageMaker Roles:
# https://docs.aws.amazon.com/sagemaker/latest/dg/sagemaker-roles.html
ROLE_ARN="[SageMaker-compatible IAM Role ARN]"

aws sagemaker create-model 
    --model-name $MODEL_NAME 
    --primary-container Image=$IMAGE,ModelDataUrl=$MODEL_DATA_URL 
    --execution-role-arn $ROLE_ARN
    
tar -czvf model.tar.gz code --directory=resnet_v2_fp32_savedmodel_NCHW_jpg 1538687370

Amazon SageMaker Python SDK
import os
import sagemaker
from sagemaker.tensorflow.serving import Model

sagemaker_session = sagemaker.Session()
# See the following document for more on SageMaker Roles:
# https://docs.aws.amazon.com/sagemaker/latest/dg/sagemaker-roles.html
role = '[SageMaker-compatible IAM Role ARN']
bucket = 'sagemaker-data-bucket'
prefix = 'sagemaker/high-throughput-tfs-batch-transform'
s3_path = 's3://{}/{}'.format(bucket, prefix)

model_data = sagemaker_session.upload_data('model.tar.gz',
                                           bucket,
                                           os.path.join(prefix, 'model'))
                                           
tensorflow_serving_model = Model(model_data=model_data,
                                 role=role,
                                 framework_version='1.13',
                                 sagemaker_session=sagemaker_session)

Running an Amazon SageMaker transform job for JPEG input data

Now, use the Model object you created to run batch predictions with Amazon SageMaker batch transform. Specify the S3 input data, the content type of the input data, the output S3 bucket, and the instance type and count.

You must specify two additional parameters that affect performance: max-payload-in-mb and max-concurrent-transforms.

The max-payload-in-mb parameter determines how large request payloads can be when sending requests to your model. Because the largest object in your S3 input is less than one megabyte, set this parameter to 1.

The max-concurrent-transforms parameter determines how many concurrent requests to send to your model. The value that maximizes throughput varies according to your model and input data. For this post, it was set to 64 after experimenting with powers of two.

AWS CLI
TRANSFORM_JOB_NAME="tfs-image-classification-job-$(timestamp)"
# This S3 prefix contains .jpg files.
TRANSFORM_S3_INPUT="s3://your-sagemaker-input-data/jpeg-images/"
TRANSFORM_S3_OUTPUT="s3://your-sagemaker-output-data-bucket/output"

TRANSFORM_INPUT_DATA_SOURCE={S3DataSource={S3DataType="S3Prefix",S3Uri=$TRANSFORM_S3_INPUT}}
CONTENT_TYPE="application/x-image"

INSTANCE_TYPE="ml.p3.2xlarge"
INSTANCE_COUNT=2

MAX_PAYLOAD_IN_MB=1
MAX_CONCURRENT_TRANSFORMS=64

aws sagemaker create-transform-job 
    --model-name $MODEL_NAME 
    --transform-input DataSource=$TRANSFORM_INPUT_DATA_SOURCE,ContentType=$CONTENT_TYPE 
    --transform-output S3OutputPath=$TRANSFORM_S3_OUTPUT 
    --transform-resources InstanceType=$INSTANCE_TYPE,InstanceCount=$INSTANCE_COUNT 
    --max-payload-in-mb $MAX_PAYLOAD_IN_MB 
    --max-concurrent-transforms $MAX_CONCURRENT_TRANSFORMS 
    --transform-job-name $JOB_NAME  
Amazon SageMaker Python SDK
output_path = 's3://your-sagemaker-output-data-bucket/output'
tensorflow_serving_transformer = tensorflow_serving_model.transformer(
                                     instance_count=2,
                                     instance_type='ml.p3.2xlarge',
                                     max_concurrent_transforms=64,
                                     max_payload=1,
                                     output_path=output_path)

input_path = 's3://your-sagemaker-input-data/jpeg-images/'
tensorflow_serving_transformer.transform(input_path, content_type='application/x-image')

Your input data consists of 100,000 JPEG images. The S3 input data path looks like this:

2019-05-09 19:41:18     129216 00000b4dcff7f799.jpg
2019-05-09 19:41:18     118629 00001a21632de752.jpg
2019-05-09 19:41:18     154661 0000d67245642c5f.jpg
2019-05-09 19:41:18     163722 0001244aa8ed3099.jpg
2019-05-09 19:41:18     117780 000172d1dd1adce0.jpg
...

In tests, the batch transform job finished transforming the 100,000 images in 12 minutes on two ml.p3.2xlarge instances. You can easily scale your batch transform jobs to handle larger datasets or run faster by increasing the instance count.

After the batch transform job completes, inspect the output. In your output path, you find one S3 object per object in the input:

2019-05-16 05:46:05   12.7 KiB 00000b4dcff7f799.jpg.out
2019-05-16 05:46:04   12.6 KiB 00001a21632de752.jpg.out
2019-05-16 05:46:05   12.7 KiB 0000d67245642c5f.jpg.out
2019-05-16 05:46:05   12.7 KiB 0001244aa8ed3099.jpg.out
2019-05-16 05:46:04   12.7 KiB 000172d1dd1adce0.jpg.out
...

Inspecting one of the output objects, you see the prediction from the model:

{
    "predictions": [
        {
            "probabilities": [6.08312e-07, 9.68555e-07, ...],
            "classes": 576
        }
    ]
}

So that’s how to get inferences on a dataset consisting of JPEG images. In some cases, you may have converted your data to TFRecords for training or to encode multiple feature vectors in a single record. The following section shows how to perform batch inference with TFRecords.

Performing inferences on a TFRecord dataset with an Amazon SageMaker batch transform

TFRecord is a record-wrapping format commonly used with TensorFlow for storing multiple instances of tf.Example. With TFRecord, you can store multiple images (or other binary data) in a single S3 object, along with annotations and other metadata.

Amazon SageMaker batch transform can split an S3 object by the TFRecord delimiter, letting you perform inferences either on one example at a time or on batches of examples. Using Amazon SageMaker batch transform to perform inference on TFRecord data is similar to performing inference directly on image data, per the example earlier in this post.

To write a pre– and post-processing script for TFRecord data

Assume that you converted the image data used earlier into the TFRecord format. Rather than performing inference on 100,000 separate S3 image objects, perform inference on 100 S3 objects, each containing 1000 images bundled together as a TFRecord file. The images are stored in key “image/encoded” in a tf.Example and these tf.Examples are wrapped in the TFRecord format.​ We can perform inference on these TFRecords and output them in any data format, like JSON or CSV.

Now, tell Amazon SageMaker batch transform to split each object by a TFRecord header and do inference on a single record at a time, so that each request contains one serialized tf.Example. Use the following pre– and post-processing script to perform inference:

import base64
import io
import json
import requests
import tensorflow as tf
from google.protobuf.json_format import MessageToDict
from string import whitespace

def input_handler(data, context):
    """ Pre-process request input before it is sent to TensorFlow Serving REST API

    Args:
        data (obj): the request data stream
        context (Context): an object containing request and configuration details

    Returns:
        (dict): a JSON-serializable dict that contains request body and headers
    """

    if context.request_content_type == 'application/x-tfexample':
        payload = data.read()
        example = tf.train.Example()
        example.ParseFromString(payload)
        example_feature = MessageToDict(example.features)['feature']
        encoded_image = example_feature['image/encoded']['bytesList']['value'][0]
        instance = [{"b64": encoded_image}]
        return json.dumps({"instances": instance})
    else:
        _return_error(415, 'Unsupported content type "{}"'.format(context.request_content_type or 'Unknown'))


def output_handler(response, context):
    """Post-process TensorFlow Serving output before it is returned to the client.

    Args:
        data (obj): the TensorFlow serving response
        context (Context): an object containing request and configuration details

    Returns:
        (bytes, string): data to return to client, response content type
    """
    if response.status_code != 200:
        _return_error(response.status_code, response.content.decode('utf-8'))
    response_content_type = context.accept_header
    # Remove whitespace from output JSON string.
    prediction = response.content.decode('utf-8').translate(dict.fromkeys(map(ord,whitespace)))
    return prediction, response_content_type


def _return_error(code, message):
    raise ValueError('Error: {}, {}'.format(str(code), message))

Your input handler extracts the image data from the value stored in the tf.Example’s key “image/encoded”. It then base64 encodes the image data for inference in TFS, just as in the previous example for JPEG input data.

Each output object contains 1000 predictions (one per image in the input object). These predictions are ordered in the same way they were in the input object. Your output_handler removes white space from the output JSON-formatted string that represents each TFS prediction. This way, the output S3 object can adhere to the JSONLines format, making it easier to parse. Later, configure your batch transform job to join each record with a newline character.

The pre-processing script requires additional dependencies to parse the input data. Add a dependency on TensorFlow to the requirements.txt file in the previous example so you can parse the serialized instances of tf.Example:

tensorflow==1.13.1

TensorFlow 1.13.1 is installed when each transform job starts. There are other options for including external dependencies, including options to avoid installing dependencies at runtime at all. For more information, see the Amazon SageMaker TFS Container README.

To package a model for TFRecord input data

Re-create your model.tar.gz to contain your new pre-processing script and then create a new Model object pointing to the new model.tar.gz. This step is identical to the previous example for JPEG input data, so refer to that section for details.

To run an Amazon SageMaker batch transform job for TFRecord input data

Now run a batch transform job against TFRecord files that contain the images:

AWS CLI
TRANSFORM_JOB_NAME="tfs-image-classification-job-$(timestamp)"

TRANSFORM_S3_INPUT="s3://your-sagemaker-input-data/tfrecord-images/"
TRANSFORM_S3_OUTPUT="s3://your-sagemaker-output-data-bucket/tfrecord-output/"

TRANSFORM_INPUT_DATA_SOURCE={S3DataSource={S3DataType="S3Prefix",S3Uri=$TRANSFORM_S3_INPUT}}

SPLIT_TYPE="TFRecord"
BATCH_STRATEGY="SingleRecord"

CONTENT_TYPE="application/x-tfexample"
DATA_SOURCE=$TRANSFORM_INPUT_DATA_SOURCE,ContentType=$CONTENT_TYPE,SplitType=$SPLIT_TYPE

ASSEMBLE_WITH="Line"
INSTANCE_TYPE="ml.p3.2xlarge"
INSTANCE_COUNT=2

MAX_PAYLOAD_IN_MB=1
MAX_CONCURRENT_TRANSFORMS=64

aws sagemaker create-transform-job 
    --model-name $MODEL_NAME 
    --transform-input DataSource=$DATA_SOURCE 
    --transform-output S3OutputPath=$TRANSFORM_S3_OUTPUT,AssembleWith=$ASSEMBLE_WITH 
    --transform-resources InstanceType=$INSTANCE_TYPE,InstanceCount=$INSTANCE_COUNT 
    --max-payload-in-mb $MAX_PAYLOAD_IN_MB 
    --max-concurrent-transforms $MAX_CONCURRENT_TRANSFORMS 
    --transform-job-name $JOB_NAME 
    --batch-strategy $BATCH_STRATEGY 
    --environment SAGEMAKER_TFS_ENABLE_BATCHING=true,SAGEMAKER_TFS_BATCH_TIMEOUT_MICROS="50000",SAGEMAKER_TFS_MAX_BATCH_SIZE="16"
Amazon SageMaker Python SDK
env = {'SAGEMAKER_TFS_ENABLE_BATCHING': 'true', 'SAGEMAKER_TFS_BATCH_TIMEOUT_MICROS': '50000','SAGEMAKER_TFS_MAX_BATCH_SIZE': '16'}
output_path = 's3://sagemaker-output-data-bucket/tfrecord-output/'
tensorflow_serving_transformer = tensorflow_serving_model.transformer(
                                     instance_count=2,
                                     split_type='TFRecord',
                                     assemble_with='Line'
                                     instance_type='ml.p3.2xlarge',
                                     max_concurrent_transforms=64,
                                     max_payload=1,
                                     output_path=output_path, env=env)

input_path = 's3://your-sagemaker-input-data/tfrecord-images/'
tensorflow_serving_transformer.transform(input_path, content_type='application/x-tfexample')

The command is nearly identical to the one in the previous example for JPEG input data, with a few notable differences:

  • You specify SplitType as “TFRecord.” This is the delimiter that Amazon SageMaker batch transform uses. Other supported delimiters are “Line” for newline characters and “RecordIO” for the RecordIO data format.
  • You specify BatchStrategy as “SingleRecord” (rather than “MultiRecord”). This means that one record at a time is sent to the model after splitting by the TFRecord delimiter. In this case, choose “SingleRecord” to avoid having to strip records of the TFRecord header in your pre-processing script. If you choose “MultiRecord” instead, each request sent to your model contains up to 1 MB of records (since you chose MaxPayloadInMB to be 1 MB).
  • You specify AssembleWith as “Line.” This instructs your batch transform job to assemble the individual predictions in each object by newline characters rather than concatenate them.
  • You specify environment variables to be passed to the Amazon SageMaker TFS container. These particular environment variables enable request batching, a TFS feature that allows records from multiple requests to be batched together. The MaxConcurrentTransforms parameter is increased to 100, since TFS queues batches of requests. Request batching is an advanced feature that, when correctly configured, can significantly improve throughput, especially on GPU-enabled instances. For more information on configuring request batching, see the Amazon SageMaker TFS Container

Your S3 input data consisted of 100 objects corresponding to TFRecord files:

2019-05-20 21:07:12   99.3 MiB train-00000-of-00100
2019-05-20 21:07:12  100.8 MiB train-00001-of-00100
2019-05-20 21:07:12  100.4 MiB train-00002-of-00100
2019-05-20 21:07:12   99.2 MiB train-00003-of-00100
2019-05-20 21:07:12  101.5 MiB train-00004-of-00100
2019-05-20 21:07:14   99.8 MiB train-00005-of-00100
...

Your batch transform job on the images in TFRecord format should finish in about 8 minutes on two ml.p3.2xlarge instances with request batching enabled. Now, your output S3 data path consists of one output object for each of the 100 input objects:

2019-05-20 23:21:23   11.3 MiB train-00000-of-00100.out
2019-05-20 23:21:35   11.4 MiB train-00001-of-00100.out
2019-05-20 23:21:30   11.4 MiB train-00002-of-00100.out
2019-05-20 23:21:40   11.3 MiB train-00003-of-00100.out
2019-05-20 23:21:35   11.4 MiB train-00004-of-00100.out
...

Each object in the output follows the JSONLines format and contains 1000 lines, with each line containing the TFS output for one image:

{"predictions":[{"probabilities":[2.58252e-08,...],"classes":636}]}
{"predictions":[{"probabilities":[2.9319e-07,...],"classes":519}]}
...

For each file, the order of the images in the output remains the same as in the input. In other words, the first image in each input file corresponds to the first line in the matching output file, the second image to the second line, and so on.

Conclusion

Amazon SageMaker batch transform can transform large datasets quickly and at scale. You saw how to use the Amazon SageMaker TFS container to perform inferences with GPU-accelerated instances on image data as well as TFRecord files.

While the Amazon SageMaker TFS container supports CSV and JSON data out-of-the-box, its new pre– and post-processing feature also lets you run batch transform jobs on data of any format. The same container can be used for real-time inference as well, using an Amazon SageMaker-hosted model endpoint.

Our example in the blog post text above uses the Open Images dataset. However, we’ve made several examples available to suit your time constraints, use case, and preferred workflow. They are available on GitHub (click the links below) and in SageMaker notebook instances.

  • CIFAR-10 example: the CIFAR-10 dataset is much smaller than Open Images, so this example is meant for a quick demonstration of the above features.
  • Open Images example, image data: this example uses the Open Images dataset, and performs inference on raw image files. Two versions are available: one uses the SageMaker Python SDK, while the other uses the AWS CLI.
  • Open Images example, TFRecord data: this example uses the Open Images dataset, and performs inference on data stored in the TensorFlow binary format, TFRecord. Two versions are available: one uses the SageMaker Python SDK, while the other uses the AWS CLI.

To get started with these examples, go to Amazon SageMaker console, and either create a SageMaker notebook instance or open an existing one. Then go to the SageMaker Examples tab, and select the relevant examples from the SageMaker Batch Transform drop-down menu.


About the Authors

Andre Moeller is a Software Development Engineer at AWS AI. He focuses on developing scalable and reliable platforms and tools to help data scientists and engineers train, evaluate, and deploy machine learning models.


Brent Rabowsky focuses on data science at AWS, and leverages his expertise to help AWS customers with their own data science projects.


Announcing Two New Natural Language Dialog Datasets

Today’s digital assistants are expected to complete tasks and return personalized results across many subjects, such as movie listings, restaurant reservations and travel plans. However, despite tremendous progress in recent years, they have not yet reached human-level understanding. This is due, in part, to the lack of quality training data that accurately reflects the way people express their needs and preferences to a digital assistant. This is because the limitations of such systems bias what we say—we want to be understood, and so tailor our words to what we expect a digital assistant to understand. In other words, the conversations we might observe with today’s digital assistants don’t reach the level of dialog complexity we need to model human-level understanding.

To address this, we’re releasing the Coached Conversational Preference Elicitation (CCPE) and Taskmaster-1 dialog datasets. Both collections make use of a Wizard-of-Oz platform that pairs two people who engage in spoken conversations, just like those one might like to have with a truly effective digital assistant. For both datasets, an in-house Wizard-of-Oz interface was designed to uniquely mimic today’s speech-based digital assistants, preserving the characteristics of spoken dialog in the context of an automated system. Since the human “assistants” understand exactly what the user asks, as any person would, we are able to capture how users would actually express themselves to a “perfect” digital assistant, so that we can continue to improve such systems. Full details of the CCPE dataset are described in our research paper to be published at the 2019 Annual Conference of the Special Interest Group on Discourse and Dialogue, and the Taskmaster-1 dataset is described in detail in a research paper to appear at the 2019 Conference on Empirical Methods in Natural Language Processing.

Preference Elicitation
In the movie-oriented CCPE dataset, individuals posing as a user speak into a microphone and the audio is played directly to the person posing as a digital assistant. The “assistant” types out their response, which is in turn played to the user via text-to-speech. These 2-person dialogs naturally include disfluencies and errors that happen spontaneously between the two parties that are difficult to replicate using synthesized dialog. This creates a collection of natural, yet structured, conversations about people’s movie preferences.

Among the insights into this dataset, we find that the ways in which people describe their preferences are amazingly rich. This dataset is the first to characterize that richness at scale. We also find that preferences do not always match the way digital assistants, or for that matter recommendation sites, characterize options. To put it another way, the filters on your favorite movie website or service probably don’t match the language you would use in describing the sorts of movies that you like when seeking a recommendation from a person.

Task-Oriented Dialog
The Taskmaster-1 dataset makes use of both the methodology described above as well as a one-person, written technique to increase the corpus size and speaker diversity—about 7.7k written “self-dialog” entries and ~5.5k 2-person, spoken dialogs. For written dialogs, we engaged people to create the full conversation themselves based on scenarios outlined for each task, thereby playing roles of both the user and assistant. So, while the spoken dialogs more closely reflect conversational language, written dialogs are both appropriately rich and complex, yet are cheaper and easier to collect. The dataset is based on one of six tasks: ordering pizza, creating auto repair appointments, setting up rides for hire, ordering movie tickets, ordering coffee drinks and making restaurant reservations.

This dataset also uses a simple annotation schema that provides sufficient grounding for the data, while making it easy for workers to apply labels to the dialog consistently. As compared to traditional, detailed strategies that make robust agreement among workers difficult, we focus solely on API arguments for each type of conversation, meaning just the variables required to execute the transaction. For example, in a dialog about scheduling a rideshare, we label the “to” and “from” locations along with the car type (economy, luxury, pool, etc.). For movie tickets, we label the movie name, theater, time, number of tickets, and sometimes the screening type (e.g., 3D or standard). A complete list of labels is included with the corpus release.

It is our hope that these datasets will be useful to the research community for experimentation and analysis in both dialog systems and conversational recommendation.

Acknowledgements
We would like to thank our co-authors and collaborators whose hard work and insights made the release of these datasets possible: Karthik Krishnamoorthi, Krisztian Balog, Chinnadhurai Sankar, Arvind Neelakantan, Amit Dubey, Kyu-Young Kim, Andy Cedilnik, Scott Roy, Muqthar Mohammed, Mohd Majeed, Ashwin Kakarla and Hadar Shemtov.

Optimizing TensorFlow model serving with Kubernetes and Amazon Elastic Inference

This post offers a dive deep into how to use Amazon Elastic Inference with Amazon Elastic Kubernetes Service. When you combine Elastic Inference with EKS, you can run low-cost, scalable inference workloads with your preferred container orchestration system.

Elastic Inference is an increasingly popular way to run low-cost inference workloads on AWS. It allows you to attach low-cost GPU-powered acceleration to Amazon EC2 and Amazon SageMaker instances to reduce the cost of running deep learning inference by up to 75%. Amazon EKS is also of growing importance to companies of all sizes, from startups to enterprises, for running containers on AWS. For those who are looking to run inference workloads in a managed Kubernetes environment, using Elastic Inference and EKS together opens the door to running these workloads with accelerated yet low-cost compute resources.

The example in this post shows how to use Elastic Inference and EKS together to deliver a cost-optimized, scalable solution for performing object detection on video frames. More specifically, it does the following:

  • Run pods in EKS that read a video from Amazon S3
  • Preprocess video frames
  • Send the frames for object detection to a TensorFlow Serving pod modified to work with Elastic Inference.

This computationally intensive use case showcases the advantages of using Elastic Inference and EKS to achieve accelerated inference at low cost within a scalable, containerized architecture. For more information about this code, see Optimizing scalable ML inference workloads with Amazon Elastic Inference and Amazon EKS on GitHub.

Elastic Inference overview

Research by AWS indicates that inference can drive as much as 90% of the cost of running machine learning workloads, a much higher percentage than training models. However, using a GPU instance for inference often is wasteful because you’re typically not fully utilizing the instance.

Elastic Inference solves this by allowing you to attach just the right amount of low-cost GPU-powered acceleration to any Amazon EC2 or Amazon SageMaker CPU-based instance. This reduces inference costs by up to 75% because you no longer need to over-provision GPU compute for inference.

You can configure EC2 instances or Amazon SageMaker endpoints with Elastic Inference accelerators using the AWS Management Console, AWS CLI, the AWS SDK, AWS CloudFormation, or Terraform. Launching an instance with Elastic Inference provisions an accelerator in the same Availability Zone behind a VPC endpoint. The accelerator then attaches to the instance over the network. There are two prerequisites:

  • First, provision an AWS PrivateLink VPC endpoint for the subnets where you plan to launch accelerators.
  • Second, provide an instance role with a policy that allows actions on Elastic Inference accelerators.

You also will need to make sure your security groups are properly configured to allow traffic to and from the VPC endpoint and instance. For further details, see Setting Up to Launch Amazon EC2 with Elastic Inference.

Deep learning tools and frameworks enabled for Elastic Inference can automatically detect and offload the appropriate model computations to the attached accelerator. Elastic Inference supports TensorFlow, Apache MXNet, and ONNX models, with more frameworks coming soon. If you are a PyTorch user, you can convert your models to the ONNX format to enable usage of Elastic Inference. The example in this post uses TensorFlow.

EKS overview

Kubernetes is open-source software that allows you to deploy and manage containerized applications at scale. Kubernetes groups containers into logical groupings for management and discoverability, then launches them into clusters of EC2 instances. EKS makes it easy to deploy, manage, and scale containerized applications using Kubernetes on AWS.

More specifically, EKS provisions, manages, and scales the Kubernetes control plane for you. At a high level, Kubernetes consists of two major components: a cluster of worker nodes that run your containers, and the control plane that manages when and where containers start on your cluster and monitors their status.

Without EKS, you have to run both the Kubernetes control plane and the cluster of worker nodes yourself. By handling the control plane for you, EKS removes a substantial operational burden for running Kubernetes, and allows you to focus on building your application instead of managing infrastructure.

Additionally, EKS is secure by default, and runs the Kubernetes management infrastructure across multiple Availability Zones to eliminate a single point of failure. EKS is certified Kubernetes conformant so you can use existing tooling and plugins from partners and the Kubernetes community. Applications running on any standard Kubernetes environment are fully compatible, and you can easily migrate them to EKS.

Integrating Elastic Inference with EKS

This post’s example involves performing object detection on video frames. These frames are extracted from videos stored in S3. The following diagram shows the overall architecture:

Inference node container with TensorFlow Serving and Elastic Inference support

TensorFlow Serving (TFS) is the preferred way to serve TensorFlow models. Accordingly, the first step in this solution is to build an inference container with TFS and Elastic Inference support. AWS provides a TFS binary modified for Elastic Inference. Versions of the binary are available for several different versions of TFS, as well as Apache MXNet. For more information and links to the binaries, see Amazon Elastic Inference Basics.

In this solution, the inference Dockerfile gets the modified TFS binary from S3 and installs it, along with an object detection model. The model is a variant of MobileNet trained on the COCO dataset, published in the Tensorflow detection model zoo. The complete Dockerfile is available in the amazon-elastic-inference-eks GitHub repo, under the /Dockerfile_tf_serving directory.

Standard node container

In addition to an inference container with Elastic Inference-enabled TFS and an object detection model, you also need a separate standard node container which performs the bulk of the application tasks and gets predictions from the inference container. As a top-level summary, this standard node container performs the following tasks:

  • Polls an Amazon SQS queue for messages regarding the availability of videos.
  • Fetches the next available video from S3.
  • Converts the video to individual frames.
  • Batches some of the frames together and sends the batched frames to the model server container for inference.
  • Processes the returned predictions.

The only aspect of the code that isn’t straightforward is the need to enable EC2 instance termination protection while workers are processing videos, as shown in the following code example:

ec2.modify_instance_attribute(
    InstanceId=instance_id,
    DisableApiTermination={ 'Value': True },
)

After the job processes, a similar API call disables termination protection. This example application uses termination protection because the jobs are long-running, and you don’t want an EC2 instance terminated during a scale-in event if it is still processing a video.

You can easily modify the inference code and optimize it for your use case, so this post doesn’t spend further time examining it. To review the Dockerfile for the inference code, see the amazon-elastic-inference-eks GitHub repo, under the /Dockerfile directory. The code itself is in the test.py file.

Kubernetes cluster details

The EKS cluster deployed in the sample CloudFormation template contains two distinct node groups by default. One node group contains M5 instances, which are currently the latest generation of general purpose instances, and the other node group contains C5 instances, which are currently the latest generation of compute-optimized instances. The instances in the C5 node group each have a single Elastic Inference accelerator attached.

Currently, Kubernetes doesn’t schedule pods using Elastic Inference accelerators. Accordingly, this example uses Kubernetes labels and selectors to distribute the inference workload to the resources in the cluster with attached Elastic Inference accelerators.

More specifically, to minimize the complexity of scheduling access to the Elastic Inference accelerator, the application and inference pods deploy as a DaemonSet with a selector, which ensures that each node with a defined label runs one copy of the application and inference on the instance. The sample application pulls job metadata from the SQS queue and then processes each one sequentially, so you don’t need to worry about multiple processes interacting with the Elastic Inference accelerator.

Additionally, the deployed cluster contains an Auto Scaling group that scales the nodes in the inference group in/out based upon the approximate depth of the SQS queue. Automatic scaling helps keep the inference node group sized appropriately to keep costs as low as possible. Depending on your workload, you also could consider using Spot Instances to keep your costs low.

Currently, SQS metrics update every five minutes, so you can trigger an AWS Lambda function using CloudWatch Events one time per minute to query the depth of the queue directly and update a custom CloudWatch metric.

Launching with AWS CloudFormation

To create the resources described in this post, you must run several AWS CLI commands. For more information about running and launching these resources, see the associated Makefile on GitHub. For instructions to create these resources using a CloudFormation template, see the README file in the GitHub repository.

Comparing costs

Finally, you can see how much you saved on costs by using Elastic Inference rather than a full GPU instance.

By default, this solution uses a CPU instance of type c5.large with an attached accelerator of type eia1.medium for the inference nodes. The current On-Demand pricing for those resources is $0.085 per hour, plus $0.130 per hour, for a total of $0.215 per hour. The total cost compared to the pricing of the smallest current generation GPU instance is as follows:

  • Elastic Inference solution – $0.215 per hour
  • GPU instance p3.2xlarge – $3.06 per hour

To summarize, the Elastic Inference solution cost is less than 10% of the cost of using a full GPU instance.

Despite its much lower cost, the Elastic Inference solution in these tests can do real-time inference, processing video at a rate of almost 30 frames per second. This result is impressive, especially considering that there is room to optimize the code further. For more information about the cost comparison of Elastic Inference versus GPU instances, see Optimizing costs in Amazon Elastic Inference with TensorFlow. To achieve even greater costs savings, you can use Spot Instances for the CPU instances for up to a 90% discount for those instances compared to On-Demand prices.

Conclusion

Elastic Inference enables low-cost accelerated inference, and EKS makes it easy to run Kubernetes on AWS. You can combine the two to create a powerful, low-touch solution for running inexpensive accelerated inference workloads in a managed, scalable, and highly available Kubernetes cluster.

Many variations of this solution are possible on AWS. For example, instead of using EKS, you could use Amazon ECS, another managed container orchestration service on AWS. Alternatively, you could run the Kubernetes control plane yourself directly on EC2, or run containers directly on EC2 without Kubernetes. The choice is yours. AWS enables you to build the architecture that best suits your use case, tooling, and workflow preferences.

To get started, go to the CloudFormation console and create a stack using the CloudFormation template for this blog post’s example solution. Details can be found in the Launching with AWS CloudFormation section above, and in the related GitHub repository linked there.


About the Authors

Ryan Nitz is a software engineer and architect working on the Startup Solutions Architecture team.


Brent Rabowsky focuses on data science at AWS, and leverages his expertise to help AWS customers with their own data science projects.


Dial A for AI: Charter Boosts Customer Service with AI

Charter Communications is working to make customer service smarter even before an operator picks up the phone.

Senior Director of Wireless Engineering Jared Ritter took a break from his presentations at GTC in Santa Clara to talk to AI Podcast host Noah Kravitz about Charter’s perspective on customer relations.

Multi-service operators — operators that run multiple cable television systems — revolve around client relations. And when it comes to customer service, “cable companies don’t have the best reputations,” Ritter admits.

Charter Communications, also known as Spectrum, is using AI to improve their customer service and process data more intelligently.

The most common basis for customer service at a standard telecommunications company is called interactive voice response. This automated voice lists a menu to route customers to the correct line.

But this often takes too long or routes customers incorrectly. Kravitz admits that when he hears the automated voice, “I just start yelling ‘representative’ at it until someone answers or my wife takes the phone away.”

Charter wants to make it easier for clients to call and get help. “You want your customers to talk to you,” Ritter says. “And no matter how good your network is, you’re never gonna have a day where you don’t receive calls or questions from customers.”

The other aspect of customer service is called agency, which is what the company’s AI can do. Charter wants to move past the traditional use of AI to route customers to yet another menu.

To do so, Charter is challenging the data lake model. Ritter explains that, in this traditional setup, networks generate a large amount of data that pours into a lake and stays in its native format until it’s needed. It’s then more challenging to recognize and access important data.

“We’ve flipped the script on that, and we’ve got the antithesis of a data lake, where we’ve got the AI looking through all that data before we ever store it,” Ritter explains. Their AI is trained to look for key issues or trends, allowing customer service representatives to be better informed to help clients.

Their reps can then preemptively predict customer problems, rather than learning about network outages or other issues after the fact.

When asked what else AI can make possible for Charter’s customer service, Ritter reflects, “I can’t even think about what it’ll look like in five years, because every week something new happens.”

To find out more about what Charter is making possible, visit their newsroom.

Help Make the AI Podcast Better

Have a few minutes to spare? Fill out this short listener survey. Your answers will help us make a better podcast.

How to Tune in to the AI Podcast

Get the AI Podcast through iTunesCastbox, DoggCatcher, OvercastPlayerFMPodbayPodBean, Pocket Casts, PodCruncher, PodKicker, Stitcher, Soundcloud and TuneIn. Your favorite not listed here? Email us at aipodcast [at] nvidia [dot] com.

The post Dial A for AI: Charter Boosts Customer Service with AI appeared first on The Official NVIDIA Blog.

Announcement of the 2019 Fellowship Awardees and Highlights from the Google PhD Fellowship Summit

In 2009, Google created the PhD Fellowship Program to recognize and support outstanding graduate students who are doing exceptional research in Computer Science and related fields who seek to influence the future of technology. Now in its eleventh year, these Fellowships have helped support 450 graduate students globally in North America and Europe, Australia, Asia, Africa and India.

Every year, recipients of the Fellowship are invited to a global summit at our Mountain View campus, where they can learn more about Google’s state-of-the-art research, and network with Google’s research community as well as other PhD Fellows from around the world. Below we share some highlights from our most recent summit, and also announce the latest class of Google PhD Fellows.

Summit Highlights
At this year’s summit event, active Google Fellowship recipients were joined by special guests, FLIP (Diversifying Future Leadership in the Professoriate) Alliance Fellows. Research Director Peter Norvig opened the event with a keynote on the fundamental practice of machine learning, followed by a number of talks by prestigious researchers. Among the list of speakers were Research Scientist Peggy Chi, who spoke about crowdsourcing geographically diverse images for use in training data, Senior Google Fellow and SVP of Google Research and Health Jeff Dean, who discussed using deep learning to solve a variety of challenging research problems at Google, and Research Scientist Vinodkumar Prabhakaran, who presented the ethical implications of machine learning, especially around questions of fairness and accountability. See the complete list of insightful talks delivered by all speakers here.

Google and FLIP Alliance Fellows attending the 2019 PhD Fellowship Summit

Google Fellows had the opportunity to present their work in lightning talks to small groups with common research interests. In addition, Google and FLIP Alliance Fellows came together to share their work with Google researchers and each other during a poster session.

Poster session in full swing

2019 Google PhD Fellows
The Google PhD Fellows represent some of the best and brightest young computer science researchers from around the globe, and it is our ongoing goal to support them as they make their mark on the world. Congratulations to all of this year’s awardees! The complete list of recipients is:

Algorithms, Optimizations and Markets
Aidasadat Mousavifar, EPFL Ecole Polytechnique Fédérale de Lausanne
Peilin Zhong, Columbia University
Siddharth Bhandari, Tata Institute of Fundamental Research
Soheil Behnezhad, University of Maryland at College Park
Zhe Feng, Harvard University

Computational Neuroscience
Caroline Haimerl, New York University
Mai Gamal, Nile University

Human Computer Interaction
Catalin Voss, Stanford University
Hua Hua, Australian National University
Zhanna Sarsenbayeva, University of Melbourne

Machine Learning
Abdulsalam Ometere Latifat, African University of Science and Technology Abuja
Adji Bousso Dieng, Columbia University
Blake Woodworth, Toyota Technological Institute at Chicago
Diana Cai, Princeton University
Francesco Locatello, ETH Zurich
Ihsane Gryech, International University Of Rabat, Morocco
Jaemin Yoo, Seoul National University
Maruan Al-Shedivat, Carnegie Mellon University
Ousseynou Mbaye, Alioune Diop University of Bambey
Redani Mbuvha, University of Johannesburg
Shibani Santurkar, Massachusetts Institute of Technology
Takashi Ishida, University of Tokyo

Machine Perception, Speech Technology and Computer Vision
Anshul Mittal, IIT Delhi
Chenxi Liu, Johns Hopkins University
Kayode Kolawole Olaleye, Stellenbosch University
Ruohan Gao, The University of Texas at Austin
Tiancheng Sun, University of California San Diego
Xuanyi Dong, University of Technology Sydney
Yu Liu, Chinese University of Hong Kong
Zhi Tian, University of Adelaide

Mobile Computing
Naoki Kimura, University of Tokyo

Natural Language Processing
Abigail See, Stanford University
Ananya Sai B, IIT Madras
Byeongchang Kim, Seoul National University
Daniel Patrick Fried, UC Berkeley
Hao Peng, University of Washington
Reinald Kim Amplayo, University of Edinburgh
Sungjoon Park, Korea Advanced Institute of Science and Technology

Privacy and Security
Ajith Suresh, Indian Institute of Science
Itsaka Rakotonirina, Inria Nancy
Milad Nasr, University of Massachusetts Amherst
Sarah Ann Scheffler, Boston University

Programming Technology and Software Engineering
Caroline Lemieux, UC Berkeley
Conrad Watt, University of Cambridge
Umang Mathur, University of Illinois at Urbana-Champaign

Quantum Computing
Amy Greene, Massachusetts Institute of Technology
Leonard Wossnig, University College London
Yuan Su, University of Maryland at College Park

Structured Data and Database Management
Amir Gilad, Tel Aviv University
Nofar Carmeli, Technion
Zhuoyue Zhao, University of Utah

Systems and Networking
Chinmay Kulkarni, University of Utah
Nicolai Oswald, University of Edinburgh
Saksham Agarwal, Cornell University