Amazon Elastic Inference (EI) is a new service launched at re:Invent 2018. Elastic Inference reduces the cost of running deep learning inference by up to 75% compared to using standalone GPU instances. Elastic Inference lets you attach accelerators to any Amazon SageMaker or Amazon EC2 instance type and run inference on TensorFlow, Apache MXNet, and ONNX models. Amazon ECS is a highly scalable, high-performance container orchestration service that supports Docker containers and allows you to run and scale containerized applications on AWS easily.
In this post, I describe how to accelerate deep learning inference workloads in Amazon ECS by using Elastic Inference. I also demonstrate how multiple containers, running potentially different workloads on the same ECS container instance, can share a single Elastic Inference accelerator. This sharing enables higher accelerator utilization.
As of February 4, 2019, ECS supports pinning GPUs to tasks. This works well for training workloads. However, for inference workloads, using Elastic Inference from ECS is more cost effective when those GPUs are not fully used.
For example, the following diagram shows a cost efficiency comparison of a p2/p3 instance type and a c5.large instance type with each type of Elastic Inference accelerator per 100K single-threaded inference calls (normalized by minimal cost):
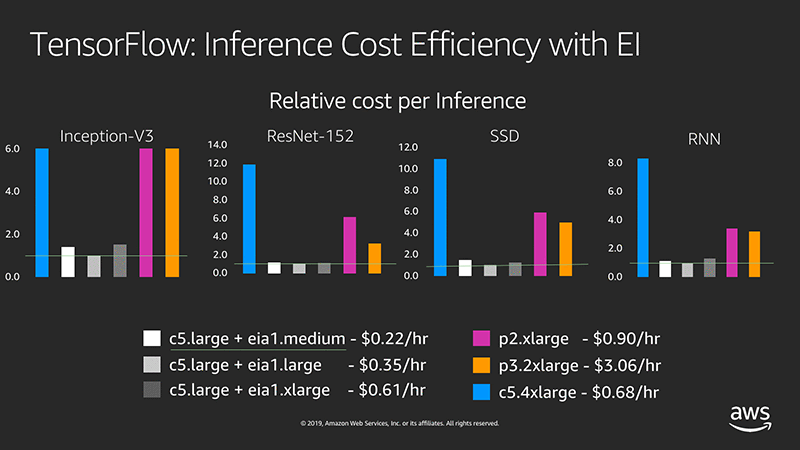
TensorFlow: Inference Cost Efficiency with EI
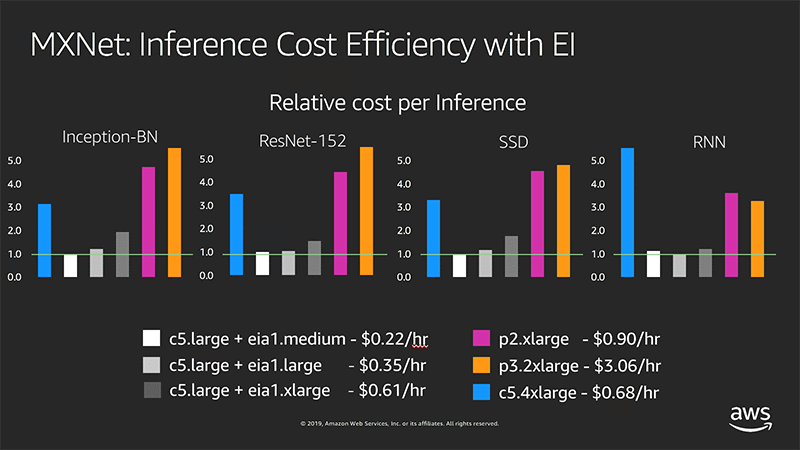
MXNet: Inference Cost Efficiency with EI
Using Elastic Inference on ECS
As an example, this post spins up TensorFlow ModelServer containers as part of an ECS task. You try to identify objects in a single image (the giraffe image that follows), using an SSD with ResNet-50 model, trained with a COCO dataset.

Next, you profile and compare the inference latencies of both a regular and an Elastic Inference–enabled TensorFlow ModelServer. Base your profiling setup on the Elastic Inference with TensorFlow Serving example. You can follow step-by-step instructions or launch an AWS CloudFormation stack with the same infrastructure as this post. Either way, you must be logged into your AWS account as an administrator. For AWS CloudFormation stack creation, choose Launch Stack and follow the instructions.

If Elastic Inference is not supported in the selected Availability Zone, delete and re-create the stack with a different zone. To launch the stack in a Region other than us-east-1, use the same template and template URL. Make sure to select the appropriate Region and Availability Zone.
After choosing Launch Stack, you can also examine the AWS CloudFormation template in detail in AWS CloudFormation Designer.
The AWS CloudFormation stack includes the following resources:
- A VPC
- A subnet
- An Internet gateway
- An Elastic Inference endpoint
- IAM roles and policies
- Security groups and rules
- Two EC2 instances
- One for running TensorFlow ModelServer containers (this instance has an Elastic Inference accelerator attached and works as an ECS container instance).
- One for running a simple client application for making inference calls against the first instance.
- An ECS task definition
After you create the AWS CloudFormation stack:
- Go directly to the Running an Elastic Inference-enabled TensorFlow ModelServer task section in this post.
- Skip Making inference calls.
- Go directly to Verifying the results.
The second instance runs an example application as part of the bootstrap script.
Make sure to delete the stack once it is no longer needed.
Create an ecsInstanceRole to be used by the ECS container instance
In this step, you create an ecsInstanceRole role to be used by the ECS container instance through an associated instance profile.
In the IAM console, check if an ecsInstanceRole role exists. If the role does not exist, create a new role with the managed policy AmazonEC2ContainerServiceforEC2Role attached and name it ecsInstanceRole. Update its trust policy with the following code:
{
  "Version": "2008-10-17",
  "Statement": [
    {
      "Sid": "",
      "Effect": "Allow",
      "Principal": {
        "Service": "ec2.amazonaws.com"
      },
      "Action": "sts:AssumeRole"
    }
  ]
}
Setting up an ECS container instance for Elastic Inference
Your goal is to launch an ECS container instance with an Elastic Inference endpoint attached and with the following additional properties:
Launching the stack automates the setup process. To execute the steps manually, follow the instructions to set up an EC2 instance for Elastic Inference. Make the following changes to these procedures, for simplicity.
Because you plan to call Elastic Inference from ECS tasks, define a task role with relevant permissions. In the IAM console, create a new role with the following properties:
- Trusted entity type: AWS service
- Service to use this role: Elastic Container Service
- Select your use case: Elastic Container Service Task
- Name: ecs-ei-task-role
In the Attach permissions policies step, select the policy that you created in Set up an EC2 instance for Elastic Inference step. The policy’s content should look like the following example:
{
    "Statement": [
        {
            "Effect": "Allow",
            "Resource": "*",
            "Action": [
                "elastic-inference:Connect",
                "iam:List*",
                "iam:Get*",
                "ec2:Describe*",
                "ec2:Get*"
            ]
        }
    ],
    "Version": "2012-10-17"
}
Only the elastic-inference:Connect permission is required. The remaining permissions provide troubleshooting assistance. You can remove them for production setup.
To validate the role’s trust relationship, on the Trust Relationships tab, choose Show policy document. The policy should look like the following:
{
  "Version": "2012-10-17",
  "Statement": [
    {
      "Sid": "",
      "Effect": "Allow",
      "Principal": {
        "Service": "ecs-tasks.amazonaws.com"
      },
      "Action": "sts:AssumeRole"
    }
  ]
}
Creating an ECS task execution IAM role
Running on an ECS container instance, the ECS agent needs permissions to make ECS API calls on behalf of the task (for example, pulling container images from ECR). As a result, you must create an IAM role that captures the exact permissions needed. If you’ve created any ECS tasks before, you probably have created this or an equivalent role. For more information, see ECS Task Execution IAM Role.
If no such role exists, in the IAM console, choose Roles and create a new role with the following properties:
- Trusted entity type: AWS service
- Service to this role: Elastic Container Service
- Select your use case: Elastic Container Service Task
- Name: ecsTaskExecutionRole
- Attached managed policy: AmazonECSTaskExecutionRolePolicy
Creating a task definition for both regular and Elastic Inference–enabled TensorFlow ModelServer containers
In this step, you create an ECS task definition comprising two containers:
- One running TensorFlow ModelServer
- One running an Elastic Inference-enabled TensorFlow ModelServer
Both containers use tensorflow-inference: 1.13-cpu-py27-ubuntu16.04 image (one of the newly released Deep Learning Containers Images). These images already have a regular TensorFlow ModelServer and all its library dependencies. Both containers retrieve and set up the relevant model.
Second container, downloads the Elastic Inference-enabled TensorFlow ModelServer binary. It also removes the ECS_CONTAINER_METADATA_URI environment variable setting to enable Elastic Inference endpoint metadata lookup from the ECS container instance’s metadata:
# install unzip
apt-get --assume-yes install unzip
# download and unzip the model
wget https://s3-us-west-2.amazonaws.com/aws-tf-serving-ei-example/ssd_resnet.zip -P /models/ssdresnet/
unzip -j /models/ssdresnet/ssd_resnet.zip -d /models/ssdresnet/1
# download and extract Elastic Inference enabled TensorFlow Serving
wget https://s3.amazonaws.com/amazonei-tensorflow/tensorflow-serving/v1.13/ubuntu/latest/tensorflow-serving-1-13-1-ubuntu-ei-1-1.tar.gz
tar xzvf tensorflow-serving-1-13-1-ubuntu-ei-1-1.tar.gz
# make the binary executable
chmod +x tensorflow-serving-1-13-1-ubuntu-ei-1-1/amazonei_tensorflow_model_server
# Unset the ECS_CONTAINER_METADATA_URI environment variable to force Elastic Inference endpoint metadata lookup from ECS container instance's metadata.
# Otherwise, Elastic Inference endpoint metadata would tried to be retrieved from container metadata, which would fail.
env -u ECS_CONTAINER_METADATA_URI tensorflow-serving-1-13-1-ubuntu-ei-1-1/amazonei_tensorflow_model_server --port=${GRPC_PORT} --rest_api_port=${REST_PORT} --model_name=${MODEL_NAME} --model_base_path=${MODEL_BASE_PATH}/${MODEL_NAME}
For a regular production setup, I recommend creating a new image from the deep learning container image by turning relevant steps into Dockerfile RUN commands. For this post, you can skip that for simplicity’s sake.
First container downloads model and then, runs the unchanged /usr/bin/tf_serving_entrypoint.sh:
#!/bin/bash

tensorflow_model_server --port=8500 --rest_api_port=8501 --model_name=${MODEL_NAME} --model_base_path=${MODEL_BASE_PATH}/${MODEL_NAME} "$@"
In the ECS console, under Task Definitions, choose Create New Task Definitions.
In the Select launch type compatibility dialog box, choose EC2.
In the Create new revision of Task Definition dialog box, scroll to the bottom of the page and choose Configure via JSON.
Paste the following definition into the space provided. Before saving, make sure to replace the two occurrences of <replace-with-your-account-id> with your AWS account ID.
{
    "executionRoleArn": "arn:aws:iam::<replace-with-your-account-id>:role/ecsTaskExecutionRole",
    "containerDefinitions": [
        {
            "entryPoint": [
                "bash",
                "-c",
                "apt-get --assume-yes install unzip; wget https://s3-us-west-2.amazonaws.com/aws-tf-serving-ei-example/ssd_resnet.zip -P ${MODEL_BASE_PATH}/${MODEL_NAME}/; unzip -j ${MODEL_BASE_PATH}/${MODEL_NAME}/ssd_resnet.zip -d ${MODEL_BASE_PATH}/${MODEL_NAME}/1/; /usr/bin/tf_serving_entrypoint.sh"
            ],
            "portMappings": [
                {
                    "hostPort": 8500,
                    "protocol": "tcp",
                    "containerPort": 8500
                },
                {
                    "hostPort": 8501,
                    "protocol": "tcp",
                    "containerPort": 8501
                }
            ],
            "cpu": 0,
            "environment": [
                {
                    "name": "KMP_SETTINGS",
                    "value": "0"
                },
                {
                    "name": "TENSORFLOW_INTRA_OP_PARALLELISM",
                    "value": "2"
                },
                {
                    "name": "MODEL_NAME",
                    "value": "ssdresnet"
                },
                {
                    "name": "KMP_AFFINITY",
                    "value": "granularity=fine,compact,1,0"
                },
                {
                    "name": "MODEL_BASE_PATH",
                    "value": "/models"
                },
                {
                    "name": "KMP_BLOCKTIME",
                    "value": "0"
                },
                {
                    "name": "TENSORFLOW_INTER_OP_PARALLELISM",
                    "value": "2"
                },
                {
                    "name": "OMP_NUM_THREADS",
                    "value": "1"
                }
            ],
            "mountPoints": [],
            "volumesFrom": [],
            "image": "763104351884.dkr.ecr.us-east-1.amazonaws.com/tensorflow-inference:1.13-cpu-py27-ubuntu16.04",
            "essential": true,
            "name": "ubuntu-tfs"
        },
        {
            "entryPoint": [
                "bash",
                "-c",
                "apt-get --assume-yes install unzip; wget https://s3-us-west-2.amazonaws.com/aws-tf-serving-ei-example/ssd_resnet.zip -P /models/ssdresnet/; unzip -j /models/ssdresnet/ssd_resnet.zip -d /models/ssdresnet/1; wget https://s3.amazonaws.com/amazonei-tensorflow/tensorflow-serving/v1.13/ubuntu/latest/tensorflow-serving-1-13-1-ubuntu-ei-1-1.tar.gz; tar xzvf tensorflow-serving-1-13-1-ubuntu-ei-1-1.tar.gz; chmod +x tensorflow-serving-1-13-1-ubuntu-ei-1-1/amazonei_tensorflow_model_server; env -u ECS_CONTAINER_METADATA_URI tensorflow-serving-1-13-1-ubuntu-ei-1-1/amazonei_tensorflow_model_server --port=${GRPC_PORT} --rest_api_port=${REST_PORT} --model_name=${MODEL_NAME} --model_base_path=${MODEL_BASE_PATH}/${MODEL_NAME}"
            ],
            "portMappings": [
                {
                    "hostPort": 9000,
                    "protocol": "tcp",
                    "containerPort": 9000
                },
                {
                    "hostPort": 9001,
                    "protocol": "tcp",
                    "containerPort": 9001
                }
            ],
            "cpu": 0,
            "environment": [
                {
                    "name": "GRPC_PORT",
                    "value": "9000"
                },
                {
                    "name": "REST_PORT",
                    "value": "9001"
                },
                {
                    "name": "MODEL_NAME",
                    "value": "ssdresnet"
                },
                {
                    "name": "MODEL_BASE_PATH",
                    "value": "/models"
                }
            ],
            "mountPoints": [],
            "volumesFrom": [],
            "image": "763104351884.dkr.ecr.us-east-1.amazonaws.com/tensorflow-inference:1.13-cpu-py27-ubuntu16.04",
            "essential": true,
            "name": "ubuntu-tfs-ei"
        }
    ],
    "memory": "2048",
    "taskRoleArn": "arn:aws:iam::<replace-with-your-account-id>:role/ecs-ei-task-role",
    "family": "ei-ecs-ubuntu-tfs-bridge-s3",
    "requiresCompatibilities": [
        "EC2"
    ],
    "networkMode": "bridge",
    "volumes": [],
    "placementConstraints": []
}
You could create an ECS service out of this task definition, but for the sake of this post, you need only run the task.
Running an Elastic Inference–enabled TensorFlow ModelServer task
Make sure to run the task defined in the previous section on the previously created ECS container instance. Register this instance to your default cluster.
In the ECS console, choose Clusters.
Confirm that your EC2 container instance appears in the ECS Instances tab.
Choose Tasks, Run new task.
For Launch type, select EC2, then pick previously created task (task created by CloudFormation template is named ei-ecs-blog-ubuntu-tfs-bridge) and choose Run Task.
Making inference calls
In this step, you create and run a simple client application to make multiple inference calls using the previously built infrastructure. You also launch an EC2 instance with Deep Learning AMI (DLAMI) on which to run the client application. The TensorFlow library that you use in this example requires the AVX2 instructions set.
Pick the c5.large instance type. Any of the latest generation x86-based EC2 instance types with sufficient memory are fine. The DLAMI provides preinstalled libraries on which TensorFlow relies. Also, because DLAMI is an HVM virtualization type AMI, you can take advantage of the AVX2 instruction set provided by c5.large.
Download labels and an example image to do the inference on:
curl -O https://raw.githubusercontent.com/amikelive/coco-labels/master/coco-labels-paper.txt
curl -O https://s3.amazonaws.com/amazonei/media/3giraffes.jpg
Create a local file named ssd_resnet_client.py, with the following content:
from __future__ import print_function
import grpc
import tensorflow as tf
from PIL import Image
import numpy as np
import time
import os
from tensorflow_serving.apis import predict_pb2
from tensorflow_serving.apis import prediction_service_pb2_grpc

tf.app.flags.DEFINE_string('server', 'localhost:8500',
                           'PredictionService host:port')
tf.app.flags.DEFINE_string('image', '', 'path to image in JPEG format')
FLAGS = tf.app.flags.FLAGS

if(FLAGS.image == ''):
  print("Supply an Image using '--image [path/to/image]'")
  exit(1)

local_coco_classes_txt = "coco-labels-paper.txt"

# Setting default number of predictions
NUM_PREDICTIONS = 20

# Reading coco labels to a list
with open(local_coco_classes_txt) as f:
  classes = ["No Class"] + [line.strip() for line in f.readlines()]

def main(_):

  channel = grpc.insecure_channel(FLAGS.server)
  stub = prediction_service_pb2_grpc.PredictionServiceStub(channel)

  with Image.open(FLAGS.image) as f:
    f.load()

    # Reading the test image given by the user
    data = np.asarray(f)

    # Setting batch size to 1
    data = np.expand_dims(data, axis=0)

    # Creating a prediction request
    request = predict_pb2.PredictRequest()

    # Setting the model spec name
    request.model_spec.name = 'ssdresnet'

    # Setting up the inputs and tensors from image data
    request.inputs['inputs'].CopyFrom(
        tf.contrib.util.make_tensor_proto(data, shape=data.shape))

    # Iterating over the predictions. The first inference request can take several seconds to complete

    durations = []

    for curpred in range(NUM_PREDICTIONS):
      if(curpred == 0):
        print("The first inference request loads the model into the accelerator and can take several seconds to complete. Please standby!")

      # Start the timer
      start = time.time()

      # This is where the inference actually happens
      result = stub.Predict(request, 60.0)  # 60 secs timeout
      duration = time.time() - start
      durations.append(duration)
      print("Inference %d took %f seconds" % (curpred, duration))

    # Extracting results from output
    outputs = result.outputs
    detection_classes = outputs["detection_classes"]

    # Creating an ndarray from the output TensorProto
    detection_classes = tf.make_ndarray(detection_classes)

    # Creating an ndarray from the detection_scores
    detection_scores = tf.make_ndarray(outputs['detection_scores'])

    # Getting the number of objects detected in the input image from the output of the predictor
    num_detections = int(tf.make_ndarray(outputs["num_detections"])[0])
    print("%d detection[s]" % (num_detections))

    # Getting the class ids from the output and mapping the class ids to class names from the coco labels with associated detection score
    class_label_score = ["%s: %.2f" % (classes[int(detection_classes[0][index])], detection_scores[0][index])
                   for index in range(num_detections)]
    print("SSD Prediction is (label, probability): ", class_label_score)
    print("Latency:")
    for percentile in [95, 50]:
      print("p%d: %.2f seconds" % (percentile, np.percentile(durations, percentile, interpolation='lower')))

if __name__ == '__main__':
  tf.app.run()
Make sure to edit the ECS container instance’s security group to permit TCP traffic over ports 8500–8501 and 9000–9001 from the client instance IP address.
From the client instance, check connectivity and the status of the model:
SERVER_IP=<replace-with-ECS-container-instance-IP-address>
for PORT in 8501 9001
do
  curl -s http://${SERVER_IP}:${PORT}/v1/models/ssdresnet
done
Wait until you get two responses like the following:
{
 "model_version_status": [
  {
   "version": "1",
   "state": "AVAILABLE",
   "status": {
    "error_code": "OK",
    "error_message": ""
   }
  }
 ]
}
Then, proceed to run the client application:
source activate amazonei_tensorflow_p27
for PORT in 8500 9000
do
  python ssd_resnet_client.py --server=${SERVER_IP}:${PORT} --image 3giraffes.jpg
done
Verifying the results
The output should be similar to the following:
The first inference request loads the model into the accelerator and can take several seconds to complete. Please standby!
Inference 0 took 12.923095 seconds
Inference 1 took 1.363095 seconds
Inference 2 took 1.338855 seconds
Inference 3 took 1.311022 seconds
Inference 4 took 1.305457 seconds
Inference 5 took 1.303680 seconds
Inference 6 took 1.297357 seconds
Inference 7 took 1.302721 seconds
Inference 8 took 1.299495 seconds
Inference 9 took 1.293291 seconds
Inference 10 took 1.305852 seconds
Inference 11 took 1.292999 seconds
Inference 12 took 1.300874 seconds
Inference 13 took 1.300001 seconds
Inference 14 took 1.297276 seconds
Inference 15 took 1.297859 seconds
Inference 16 took 1.305029 seconds
Inference 17 took 1.315366 seconds
Inference 18 took 1.288984 seconds
Inference 19 took 1.289530 seconds
4 detection[s]
SSD Prediction is (label, probability):  ['giraffe: 0.84', 'giraffe: 0.74', 'giraffe: 0.68', 'giraffe: 0.50']
Latency:
p95: 1.36 seconds
p50: 1.30 seconds
The first inference request loads the model into the accelerator and can take several seconds to complete. Please standby!
Inference 0 took 14.081767 seconds
Inference 1 took 0.295794 seconds
Inference 2 took 0.293941 seconds
Inference 3 took 0.311396 seconds
Inference 4 took 0.291605 seconds
Inference 5 took 0.285228 seconds
Inference 6 took 0.226951 seconds
Inference 7 took 0.283834 seconds
Inference 8 took 0.290349 seconds
Inference 9 took 0.228826 seconds
Inference 10 took 0.284496 seconds
Inference 11 took 0.293179 seconds
Inference 12 took 0.296765 seconds
Inference 13 took 0.230531 seconds
Inference 14 took 0.283406 seconds
Inference 15 took 0.292458 seconds
Inference 16 took 0.300849 seconds
Inference 17 took 0.294651 seconds
Inference 18 took 0.293372 seconds
Inference 19 took 0.225444 seconds
4 detection[s]
SSD Prediction is (label, probability):  ['giraffe: 0.84', 'giraffe: 0.74', 'giraffe: 0.68', 'giraffe: 0.50']
Latency:
p95: 0.31 seconds
p50: 0.29 seconds
If you launched the AWS CloudFormation stack, connect to the client instance with SSH and check the last several lines of this output in /var/log/cloud-init-output.log.
You see a 78% reduction in latency when using an Elastic Inference accelerator with this model and input.
You can launch more than one task and more than one container on the same ECS container instance. You can use the awsvpc network mode if tasks expose the same port numbers. For bridge mode, tasks should expose unique ports.
In multi-task/container scenarios, keep in mind that all clients share accelerator memory. AWS publishes accelerator memory utilization metrics to Amazon CloudWatch as AcceleratorMemoryUsage under the AWS/ElasticInference namespace.
Also, Elastic Inference–enabled containers using the same accelerator must all use either TensorFlow or the MXNet framework. To switch between frameworks, stop and start the ECS container instance.
Conclusion
The described setup shows how multiple deep learning inference workloads running in ECS can be efficiently accelerated by use of Elastic Inference. If inference workload tasks don’t use the entire GPU instance, then using Elastic Inference accelerators may offer an attractive alternative, at a fraction of the cost of dedicated GPU instances. A single accelerator’s capacity can be shared across multiple containers running on the same EC2 container instance, allowing for even greater use of the attached accelerator.
About the Author
 Vladimir Mitrovic is a Software Engineer with AWS AI Deep Learning. He is passionate about building fault-tolerant, distributed deep-learning systems. In his spare time, he enjoys solving Project Euler problems.
![[P] Small, fast and simple Python CLI image converter for CNNs.](https://b.thumbs.redditmedia.com/zt5NPjQU5jaKNQNk3z7BH9I5X4pL2mui1uDHtAACOWg.jpg "[P] Small, fast and simple Python CLI image converter for CNNs.")
![[D] XGBoost doesnt follow the others models](https://b.thumbs.redditmedia.com/qHeJigUnF_L7afuqpGRgFZNqrdgnUDGGPmNxrzj6tSg.jpg "[D] XGBoost doesnt follow the others models")