
Blog

Learn About Our Meetup

5000+ Members

MEETUPS

LEARN, CONNECT, SHARE

Join our meetup, learn, connect, share, and get to know your Toronto AI community. 

JOB POSTINGS

INDEED POSTINGS

Browse through the latest deep learning, ai, machine learning postings from Indeed for the GTA.

CONTACT

CONNECT WITH US

Are you looking to sponsor space, be a speaker, or volunteer, feel free to give us a shout.

Author: torontoai

[D] Best conferences for machine learning research in the natural sciences

I was wondering what everyone thought were the best matched conferences for machine learning research applied to the natural sciences. From my research online, KDD and AAAI seems to be the best venues. Other venues such as ICLR seem to encourage applied research in their calls for papers but not to accept many applied papers (outside of a few chemistry papers).

Thanks for your help.

submitted by /u/drd13
[link] [comments]

[P] Can someone provide an overview of what a tf.data pipeline looks like for real world data instead of ML-ready datasets?

I am refactoring my data input pipeline from a custom set of classes, which need to be scrapped because the process is inefficient, error-prone, hard-to-use, and not scalable, to an end-to-end pipeline built using Tensorflow 2.0’s tf.data module. I understand the overall process, and how to use the module, but I have a few questions regarding how to properly structure the pipeline:

  1. Should I use object-oriented design or functional design? Because I would intuitively go with the OO route, using abstract base classes, and eventually having each feature be it’s own sub-class, since my dataset doesn’t actually include any of my features, but rather just the files from which data is sourced to calculate the features. But in the examples I have seen, I don’t really see anyone implementing that sort of structure.
  2. Should use the tf.feature_columns module to store each individual feature, and then concatenate these feature columns to get my output data? Or should I concatenate the individual feature tensors together and use this as my input data?
  3. My model takes 3 different inputs – one consisting of numerical and categorical features, and two separate tokenized sequence inputs. Should I implement this by creating three instances of tf.data.Dataset, one for each input, or should I create one instance for all the data, and then just ‘pop’ or whatever the equivalent function is the two columns holding my sequence data? Or is it a matter of preference?
  4. This one is more just to help me out and not necessarily having to do with tf.data pipeline structure. How do I implement a dynamic tokenizer for my sequence data, which will just update the vocabulary dict with the new word and assign it the next integer, so that the model can be trained continuously with new data, rather than having create a new tokenizer each time a significant amount of new words appear in the data, and retrain the entire model from scratch?

If anyone could point to some good examples of pipelines like this, or just help me understand the way the TF designed this module to be used, and how I can use it most effectively, I would be most appreciative and send a virtual hug your way, Or order you UberEats – I’m dead serious lol, that’s how desperate I am to understand this. Because I have already planned everything out and how everything is supposed to work, but don’t want to start coding until I’m sure I’m structuring and using everything properly.

Cheers, and if you help me figure out the answers, I will literally DM you and get you UberEats (up to $20 max).

submitted by /u/that_one_ai_nerd
[link] [comments]

EfficientNet-EdgeTPU: Creating Accelerator-Optimized Neural Networks with AutoML

For several decades, computer processors have doubled their performance every couple of years by reducing the size of the transistors inside each chip, as described by Moore’s Law. As reducing transistor size becomes more and more difficult, there is a renewed focus in the industry on developing domain-specific architectures — such as hardware accelerators — to continue advancing computational power. This is especially true for machine learning, where efforts are aimed at building specialized architectures for neural network (NN) acceleration. Ironically, while there has been a steady proliferation of these architectures in data centers and on edge computing platforms, the NNs that run on them are rarely customized to take advantage of the underlying hardware.

Today, we are happy to announce the release of EfficientNet-EdgeTPU, a family of image classification models derived from EfficientNets, but customized to run optimally on Google’s Edge TPU, a power-efficient hardware accelerator available to developers through the Coral Dev Board and a USB Accelerator. Through such model customizations, the Edge TPU is able to provide real-time image classification performance while simultaneously achieving accuracies typically seen only when running much larger, compute-heavy models in data centers.

Using AutoML to customize EfficientNets for Edge TPU
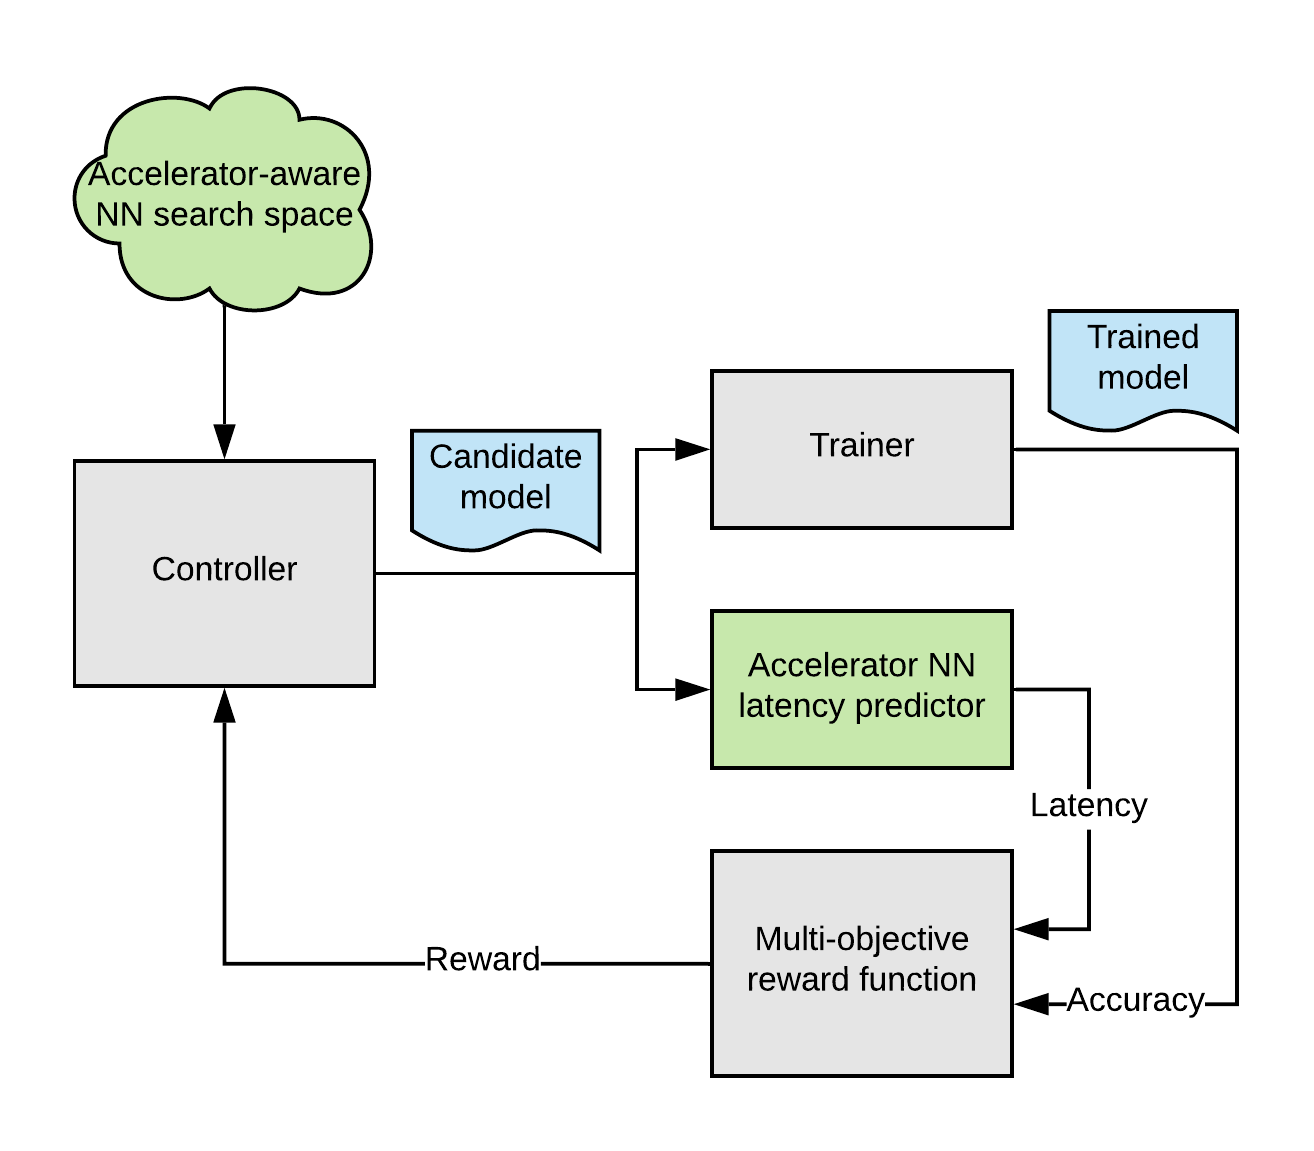
EfficientNets have been shown to achieve state-of-the-art accuracy in image classification tasks while significantly reducing the model size and computational complexity. To build EfficientNets designed to leverage the Edge TPU’s accelerator architecture, we invoked the AutoML MNAS framework and augmented the original EfficientNet’s neural network architecture search space with building blocks that execute efficiently on the Edge TPU (discussed below). We also built and integrated a “latency predictor” module that provides an estimate of the model latency when executing on the Edge TPU, by running the models on a cycle-accurate architectural simulator. The AutoML MNAS controller implements a reinforcement learning algorithm to search this space while attempting to maximize the reward, which is a joint function of the predicted latency and model accuracy. From past experience, we know that Edge TPU’s power efficiency and performance tend to be maximized when the model fits within its on-chip memory. Hence we also modified the reward function to generate a higher reward for models that satisfy this constraint.

Overall AutoML flow for designing customized EfficientNet-EdgeTPU models.

Search Space Design
When performing the architecture search described above, one must consider that EfficientNets rely primarily on depthwise-separable convolutions, a type of neural network block that factorizes a regular convolution to reduce the number of parameters as well as the amount of computations. However, for certain configurations, a regular convolution utilizes the Edge TPU architecture more efficiently and executes faster, despite the much larger amount of compute. While it is possible, albeit tedious, to manually craft a network that uses an optimal combination of the different building blocks, augmenting the AutoML search space with these accelerator-optimal blocks is a more scalable approach.

A regular 3×3 convolution (right) has more compute (multiply-and-accumulate (mac) operations) than an depthwise-separable convolution (left), but for certain input/output shapes, executes faster on Edge TPU due to ~3x more effective hardware utilization.

In addition, removing certain operations from the search space that require modifications to the Edge TPU compiler to fully support, such swish non-linearity and squeeze-and-excitation block, naturally leads to models that are readily ported to the Edge TPU hardware. These operations tend to improve model quality slightly, so by eliminating them from the search space, we have effectively instructed AutoML to discover alternate network architectures that may compensate for any potential loss in quality.

Model Performance
The neural architecture search (NAS) described above produced a baseline model, EfficientNet-EdgeTPU-S, which is subsequently scaled up using EfficientNet’s compound scaling method to produce the -M and -L models. The compound scaling approach selects an optimal combination of input image resolution scaling, network width, and depth scaling to construct larger, more accurate models. The -M, and -L models achieve higher accuracy at the cost of increased latency as shown in the figure below.

EfficientNet-EdgeTPU-S/M/L models achieve better latency and accuracy than existing EfficientNets (B1), ResNet, and Inception by specializing the network architecture for Edge TPU hardware. In particular, our EfficientNet-EdgeTPU-S achieves higher accuracy, yet runs 10x faster than ResNet-50.

Interestingly, the NAS-generated model employs the regular convolution quite extensively in the initial part of the network where the depthwise-separable convolution tends to be less effective than the regular convolution when executed on the accelerator. This clearly highlights the fact that trade-offs usually made while optimizing models for general purpose CPUs (reducing the total number of operations, for example) are not necessarily optimal for hardware accelerators. Also, these models achieve high accuracy even without the use of esoteric operations. Comparing with the other image classification models such as Inception-resnet-v2 and Resnet50, EfficientNet-EdgeTPU models are not only more accurate, but also run faster on Edge TPUs.

This work represents a first experiment in building accelerator-optimized models using AutoML. The AutoML-based model customization can be extended to not only a wide range of hardware accelerators, but also to several different applications that rely on neural networks.

From Cloud TPU training to Edge TPU deployment
We have released the training code and pretrained models for EfficientNet-EdgeTPU on our github repository. We employ tensorflow’s post-training quantization tool to convert a floating-point trained model to an Edge TPU-compatible integer-quantized model. For these models, the post-training quantization works remarkably well and produces only a very slight loss in accuracy (~0.5%). The script for exporting the quantized model from a training checkpoint can be found here. For an update on the Coral platform, see this post on the Google Developer’s Blog, and for full reference materials and detailed instructions, please refer to the Coral website.

Acknowledgements
Special thanks to Quoc Le, Hongkun Yu, Yunlu Li, Ruoming Pang, and Vijay Vasudevan from the Google Brain team; Bo Wu, Vikram Tank, and Ajay Nair from the Google Coral team; Han Vanholder, Ravi Narayanaswami, John Joseph, Dong Hyuk Woo, Raksit Ashok, Jason Jong Kyu Park, Jack Liu, Mohammadali Ghodrat, Cao Gao, Berkin Akin, Liang-Yun Wang, Chirag Gandhi, and Dongdong Li from the Google Edge TPU team.

Use Amazon Lex as a conversational interface with Twilio Media Streams

Businesses use the Twilio platform to build new ways to communicate with their customers: whether it’s fully automating a restaurant’s food orders with a conversational Interactive Voice Response (IVR) or building a next generation advanced contact center. With the launch of Media Streams, Twilio is opening up their Voice platform by providing businesses access to the raw audio stream of their phone calls in real time.

You can use Media Streams to increase productivity in the call center by transcribing speech in real time with Amazon Transcribe Streaming WebSockets or to automate end-user interactions and make recommendations to agents based on the caller’s intent using Amazon Lex.

In this blog post, we show you how to use Amazon Lex to integrate conversational interfaces (chatbots) to your voice application using the raw audio stream provided by Twilio Media Streams. Lex uses deep learning to do the heavy lifting required to recognize the intent of human speech so that you can easily build engaging user experiences and lifelike conversations.

The solution follows these steps:

  1. Receive audio stream from Twilio
  2. Send the audio stream to a voice activity detection component to determine voice in audio
  3. Start streaming the user data to Amazon Lex when voice is detected
  4. Stop streaming the user data to Amazon Lex when silence is detected
  5. Update the ongoing Twilio call based on the response from Amazon Lex

The Voice activity detection (VAD) implementation provided in this sample is for reference/demo purpose only and uses a rudimentary approach to detect voice and silence by looking at amplitude. It is not recommended for production use. You will need to implement a robust form of VAD module as per your need for use in production scenarios.

The diagram below describes the steps:

The instructions for integrating an Amazon Lex Bot with the Twilio Voice Stream are provided in the following steps:

  • Step 1: Create an Amazon Lex Bot
  • Step 2: Create a Twilio Account and Setup Programmable Voice
  • Step 3: Build and Deploy the Amazon Lex and Twilio Voice Stream Integration code to Amazon ECS/Fargate
  • Step 4: Test the deployed service
  • As an optional next step, you can build and test the service locally. For instructions, see Step 5 (Optional): Build and Test the service locally

To build and deploy the service, the following pre-requisites are needed:

  1. Python (The language used to build the service)
  2. Docker (The tool used for packaging the service for deployment)
  3. AWS CLI installed and configured (For creating the required AWS services and deploying the service to AWS). For instructions see, Configuring AWS CLI

In addition, you need a domain name for hosting your service and you must register an SSL certificate for the domain using Amazon Certificate Manager.  For instructions, see Request a Public Certificate. Record the Certificate ARN from the console.

An SSL certificate is needed to communicate securely over wss (WebSocket Secure), a persistent bidirectional communication protocol used by the Twilio voice stream. The <Stream> instruction in the templates/streams.xml file allows you to receive raw audio streams from a live phone call over WebSockets in near real-time. On successful connection, a WebSocket connection to the service is established and audio will start streaming.

Step 1: Create an Amazon Lex Bot

If you don’t already have an Amazon Lex Bot, create and deploy one. For instructions, see Create an Amazon Lex Bot Using a Blueprint (Console).

Once you’ve created the bot, deploy the bot and create an alias. For instructions, see Publish a Version and Create an Alias.

In order to call the Amazon Lex APIs from the service, you must create an IAM user with an access type “Programmatic Access” and attach the appropriate policies.

For this, in the AWS Console, go to IAM->Users->Add user

Provide a user name, select “Programmatic access” Access type, then click on “Next: Permissions”

Using the “Attach existing policies directly” option, filter for Amazon Lex policies and select AmazonLexReadOnly and AmazonLexRunBotsOnly policies.

Click “Next: Tags”, “Next: Review”, and “Create User” in the pages that follow to create the user. Record the access key ID and the secret access key. We use these credentials during the deployment of the stack.

Step 2: Create a Twilio account and setup programmable voice

Sign up for a Twilio account and create a programmable voice project.

For sign-up instructions, see https://www.twilio.com/console.

Record the “AUTH TOKEN”. You can find this information on the Twilio dashboard under Settings->General->API Credentials.

You must also verify the caller ID by adding the phone number that you are using to make calls to the Twilio phone number. You can do this by clicking on the   button on the Verify caller IDs page.

Step 3: Build and deploy the Amazon Lex and Twilio Stream Integration code to Amazon ECS

In this section, we create a new service using AWS Fargate to host the integration code. AWS Fargate is a deployment option in Amazon Elastic Container Service (ECS) that allows you to deploy containers without worrying about provisioning or scaling servers. For our service, we use Python and Flask in a Docker container behind an Application Load Balancer (ALB).

Deploy the core infrastructure

As the first step in creating the infrastructure, we deploy the core infrastructure components such as VPC, Subnets, Security Groups, ALB, ECS cluster, and IAM policies using a CloudFormation Template.

Clicking on the “Launch Stack” button below takes you to the AWS CloudFormation Stack creation page. Click “Next” and fill in the parameters. Please note that you will be using the same “EnvironmentName” parameter later in the process where we will be launching the service on top of the core infrastructure. This allows us to reference the stack outputs from this deployment.

Once the stack creation is complete, from the “outputs” tab, record the value of the “ExternalUrl” key.

Package and deploy the code to AWS

In order to deploy the code to Amazon ECS, we package the code in a Docker container and upload the Docker image to the Amazon Elastic Container Registry (ECR).

The code for the service is available at the GitHub repository below. Clone the repository on your local machine.

git clone https://github.com/veerathp/lex-twiliovoice.git
cd lex-twiliovoice

Next, we update the URL for the Streams element inside templates/streams.xml to match the DNS name for your service that you configured with the SSL certificate in the pre-requisites section.

<Stream url="wss://<Your DNS>/"></Stream>

Now, run the following command to build the container image using the Dockerfile.

docker build -t lex-twiliovoice .

Next, we create the container registry using the AWS CLI by passing in the value for the repository name. Record the “repositoryUri” from the output.

aws ecr create-repository --repository-name <repository name>

In order to push the container image to the registry, we must authenticate. Run the following command:

aws ecr get-login --region us-west-2 --no-include-email

Execute the output of the above command to complete the authentication process.

Next, we tag and push the container image to ECR.

docker tag lex-twiliovoice <repositoryUri>/lex-twiliovoice:latest
docker push <repositoryUri>/lex-twiliovoice:latest

We now deploy the rest of the infrastructure using a CloudFormation template. As part of this stack, we deploy components such as ECS Service, ALB Target groups, HTTP/HTTPS Listener rules, and Fargate Task. The environment variables are injected into the container using the task definition properties.

Since we are working with WebSocket connections in our service, we enable stickiness with our load balancer using the target group attribute to allow for persistent connection with the same instance.

TargetGroup:
    Type: AWS::ElasticLoadBalancingV2::TargetGroup
    Properties:
      ….
      ….
      TargetGroupAttributes:
        - Key: stickiness.enabled
          Value: true
        …

Clicking on the “Launch Stack” button below takes you to the AWS CloudFormation Stack creation page. Click “Next” and fill in the correct values for the following parameters that are collected from the previous steps – IAMAccessKeyId, IAMSecretAccessKey, ImageUrl, LexBotName, LexBotAlias, and TwilioAuthToken. You can use default values for all the other parameters. Make sure to use the same “EnvironmentName” from the previous stack deployment since we are referring to the outputs of that deployment.

Once the deployment is complete, we can test the service. However, before we do that, make sure to point your custom DNS to the Application Load Balancer URL.

To do that, we create an “A Record” under Route 53, Hosted Zones to point your custom DNS to the ALB Url that was part of the core infrastructure stack deployment (“ExternalUrl” key from output). In the “Create Record Set” screen, in the name field use your DNS name, for type select “A – IPv4 address”, select “Yes” for Alias field, select the Alias target as the ALB Url, and click “Create”.

Step 4: Test the deployed service

You can verify the deployment by navigating to the Amazon ECS Console and clicking on the cluster name. You can see the AWS Fargate service under the “services” tab and the running task under the “tasks” tab.

To test the service, we will first update the Webhook url field under the “Voice & Fax” section in the Twilio console with the URL of the service that is running in AWS (http://<url>/twiml). You can now call the Twilio phone number to reach the Lex Bot. Make sure that the number you are calling from is verified using the Twilio console. Once connected, you will hear the prompt “You will be interacting with Lex bot in 3, 2, 1. Go.” that is configured in the templates/streams.xml file. You can now interact with the Amazon Lex Bot.

You can monitor the service using the “CloudWatch Log Groups” and troubleshoot any issues that may arise while the service is running.

Step 5(Optional): Build and test the service locally

Now that the service is deployed and tested, you may be interested in building and testing the code locally. For this, navigate to the cloned GitHub repository on your local machine and install all the dependencies using the following command:

pip install -r requirements.txt

You can test the service locally by installing “ngrok”. See https://ngrok.com/download for more details. This tool provides public URLs for exposing the local web server. Using this, you can test the Twilio webhook integration.

Start the ngrok process by using the following command in another terminal window. The ngrok.io url can be used to access the web service from external applications.

ngrok http 8080

Next, configure the “Stream” element inside the templates/streams.xml file with the correct ngrok url.

<Stream url="wss://<xxxxxxxx.ngrok.io>/"></Stream>

In addition, we also need to configure the environment variables used in the code. Run the following command after providing appropriate values for the environment variables:

export AWS_REGION=us-west-2
export ACCESS_KEY_ID=<Your IAM User Access key ID from Step 1>
export SECRET_ACCESS_KEY=<Your IAM User Secret Access key from Step 1>
export LEX_BOT_NAME=<Bot name for the Lex Bot you created in Step 1>
export LEX_BOT_ALIAS=<Bot Alias for the Lex Bot you created in Step 1>
export TWILIO_AUTH_TOKEN=<Twilio AUTH TOKEN from Step 2>
export CONTAINER_PORT=8080
export URL=<http://xxxxxxxx.ngrok.io> (update with the appropriate url from ngrok)

Once the variables are set, you can start the service using the following command:

python server.py

To test, configure the Webhook field under “Voice & Fax” in the Twilio console with the correct url (http://<url>/twiml) as shown below.

Initiate a call to the Twilio phone number from a verified phone. Once connected, you hear the prompt “You will be interacting with Lex bot in 3, 2, 1. Go.” that is configured in the templates/streams.xml file. You are now able to interact with the Amazon Lex bot that you created in Step 1.

In this blog post, we showed you how to use Amazon Lex to integrate your chatbot to your voice application. To learn how to build more with Amazon Lex, check out the developer resources.


About the Author

Praveen Veerath is a Senior AI Solutions Architect for AWS.


[Research] Real-time Event Detection on Social Data Streams

Social networks are quickly becoming the primary medium for discussing what is happening around real-world events. The information that is generated on social platforms like Twitter can produce rich data streams for immediate insights into ongoing matters and the conversations around them. To tackle the problem of event detection, we model events as a list of clusters of trending entities over time. We describe a real-time system for discovering events that is modular in design and novel in scale and speed: it applies clustering on a large stream with millions of entities per minute and produces a dynamically updated set of events. In order to assess clustering methodologies, we build an evaluation dataset derived from a snapshot of the full Twitter Firehose and propose novel metrics for measuring clustering quality. Through experiments and system profiling, we highlight key results from the offline and online pipelines. Finally, we visualize a high profile event on Twitter to show the importance of modeling the evolution of events, especially those detected from social data streams.

https://medium.com/ai%C2%B3-theory-practice-business/real-time-event-detection-on-social-data-streams-72f89f394fda

submitted by /u/cdossman
[link] [comments]

[P] Testing in Machine Learning & Biases

Hey all!

I’m looking to get some inputs from professional engineers in Machine Learning about how they test their models that *might* enter production.

I ran a survey in my own network before through a Twitter poll, and found out that over 70% of respondents were not fully confident in the abilities of their models, with 33% of all respondents saying that they are not confident in the abilities of their models at all.

Now I’d like to find out why and how to solve this. I prepared this survey and it would mean a lot if you could take 2 minutes to fill this one out.

I’m looking to write an article about ML testing methods based on those, and will be sure to share that here (and to anyone who requests it).

https://dominicmonn.typeform.com/to/n2AbR7

submitted by /u/Sig_Luna
[link] [comments]

[D] ANN – how to deal with features that can be identical from observation to observation?

Firstly to explain the situation I have to deal with in more depth:

I have a dataset for which part of the features (columns of data) are identical from observation to observation (rows) and another part of the features are variable. Roughly every 1-200 observations have some features that fall into the pattern described, whereas the dataset is very large.

Firstly, are there any specific reason why a neural network with above data would fail? Any papers/information/ideas that describe how to deal with this kind of situation?

Thanks

submitted by /u/Sinsst
[link] [comments]

[P] Encapsulating Capsule Networks: Everything You Need To Know

Recently, I made a tutorial on Capsule Networks! Capsule Networks were introduced by Geoffrey Hinton and have been shown to be more robust to adversarial attacks, achieve higher accuracy, all while requiring significantly fewer parameters.

The tutorial covers how CNNs and Capsule networks account for viewpoint variance (a massive problem in computer vision), an introduction to Capsule Networks, and two routing algorithms, Dynamic Routing Between Capsules, and Matrix Capsules with EM Routing.

The post was written from zero knowledge to a complete understanding of the intuition and algorithm details in an easy to understand way. I’m sharing the post since it would be helpful to others wanting to learn about the topic, enjoy!

https://gebob19.github.io/capsule-networks/

submitted by /u/gebob19
[link] [comments]