
Blog

Learn About Our Meetup

5000+ Members

MEETUPS

LEARN, CONNECT, SHARE

Join our meetup, learn, connect, share, and get to know your Toronto AI community. 

JOB POSTINGS

INDEED POSTINGS

Browse through the latest deep learning, ai, machine learning postings from Indeed for the GTA.

CONTACT

CONNECT WITH US

Are you looking to sponsor space, be a speaker, or volunteer, feel free to give us a shout.

Category: Global

Wasting Away: Winnow Slims Down Commercial Food Waste

Food is too valuable to waste.

But nearly $100 billion of it is thrown away in the hospitality sector every year.

When you’re catering for an unknown number of guests, you can’t afford to be underprepared. In many cases, this can lead kitchen staff to the other extreme — preparing too many meals. All of the extra, unused ingredients ultimately end up in the bin.

Winnow, a U.K.-based company, is using AI to take a bite out of food waste by empowering commercial kitchens to reduce the amount of food they dump.

AI for Reducing Food Waste

Around one-third of the food produced globally for human consumption is wasted every year. That amounts to a staggering 1.3 billion tonnes.

Winnow is helping professional chefs curb those numbers with its latest product, Winnow Vision, which automatically detects, identifies and measures food at the point it is thrown out.

The system involves a set of digital weighing scales on top of which sits a standard kitchen bin. Mounted above this is a camera and compute system containing an NVIDIA Jetson TX2 supercomputer on a module.

The module takes the images captured by the camera, as well as the weight recorded by the scales, and determines what is being thrown out and in what quantity. The neural networks used by the Jetson TX2 are trained using AWS instances with NVIDIA V100 GPUs on TensorFlow. To identify the wide variety of food the system may encounter, a huge amount of training data is needed — up to 1,000 images per food item.

The collected data is sent to the cloud for processing and regular reports are then created and shared with kitchen staff. The reports detail quantities and types of food being tossed, as well as recommendations as to how the kitchen can reduce waste.

Winnow co-founder and CEO Marc Zornes explains why the real-time deep learning results the Jetson TX2 delivers onsite — what’s known as “inference at the edge” — are key.

“It’s really important to us that the customer receives immediate results, in an environment that cannot guarantee a reliable and fast internet connection,” said Zornes. “Using the Jetson TX2 devices in the field enables us to provide, in real time, a ‘better than human’ understanding of what is being thrown into the bin on the edge, live, in the kitchen.”

The Jetson TX2 module can run multiple processes. Having a complete system on the edge means the Winnow team can reuse knowledge gained from working in the cloud and apply it to an edge paradigm. The Jetson platform is powerful enough to encompass current and future workloads, and flexible enough for Winnow to experiment and design new solutions.

Business Sense

Winnow Vision has already surpassed human levels with an accuracy rate of over 80 percent when identifying food that has ended up in the trash. This will increase with time as more and more data is collected.

The system is already installed in over 75 kitchens and Winnow plans to roll out the technology to thousands more in the coming years. IKEA and Emaar are among the companies that have implemented Winnow Vision in their kitchens.

Reducing the amount of food waste isn’t the only benefit for businesses. Automating the process increases efficiency in the kitchen, too. Staff require less training on food management and need to spend less time adjusting their menus.

Winnow has shown that by arming teams with analytics, food waste can be cut in half. The company estimates it has already helped commercial kitchens save more than $30 million in annualized food costs. That equates to preventing over 23 million meals from going in the trash.

With the advent of its new technology, Winnow has announced that it aims to save kitchens $1 billion by 2025.

The post Wasting Away: Winnow Slims Down Commercial Food Waste appeared first on The Official NVIDIA Blog.

Extending Amazon SageMaker factorization machines algorithm to predict top x recommendations

Amazon SageMaker gives you the flexibility that you need to address sophisticated business problems with your machine learning workloads. Built-in algorithms help you get started quickly.  In this blog post we’ll outline how you can extend the built-in factorization machines algorithm to predict top x recommendations.

This approach is ideal when you want to generate a set number of recommendations for users in a batch fashion. For example, you can use this approach to generate the top 20 products that a user is likely to buy from a large set of users and product purchase information. You can then store the recommendations in a database for further use, such as dashboard display or personalized email marketing. You can also automate the steps outlined in this blog for periodic retraining and prediction using AWS Batch or AWS Step Functions.

A factorization machine is a general-purpose supervised learning algorithm that you can use for both classification and regression tasks. This algorithm was designed as an engine for recommendation systems. It extends the collaborative filtering approach by learning a quadratic function over the features while restricting second order coefficients to a low rank structure. This restriction is well-suited for large and sparse data because it avoids overfitting and is highly scalable, so that a typical recommendation problem with millions of input features will have millions of parameters rather than trillions

The model equation for factorization machines is defined as:

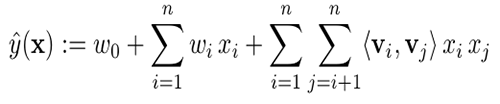
Model parameters to be estimated are:

where, n is the input size and k is the size of the latent space. These estimated model parameters are used to extend the model.

Model extension

The Amazon SageMaker factorization machines algorithm allows you to predict a score for a pair, such as user, item, based on how well the pair matches. When you apply a recommendation model, you often want to provide a user as input and receive a list of the top x items that best match the user’s preferences. When the number of items is moderate, you can do this by querying the model for user, item for all possible items. However, this approach doesn’t scale well when the number of items is large. In this scenario, you can use the Amazon SageMaker k-nearest neighbors (k-NN) algorithm to speed up top x prediction tasks.

The following diagram provides a high-level overview of the steps covered in this blog post, which include building a factorization machines model, repackaging model data, fitting a k-NN model, and producing top x predictions.

You can also download a companion Jupyter notebook to follow along. Each of the following sections corresponds to a section in the notebook so that you can run the code for each step as you read.

Step 1: Building a factorization machines model

See Part 1 of the companion Jupyter notebook for steps to build a factorization machines model. To learn more about building factorization machines models, see the Factorization Machines documentation.

Step 2: Repackaging model data

The Amazon SageMaker factorization machines algorithm leverages Apache MXNet deep learning framework. In this section, we’ll cover how to repackage the model data using MXNet. 

Extract the factorization machines model

First, you’ll download the factorization model, and then you’ll decompress it for constructing an MXNet object. The main purpose of the MXNet object is to extract the model data.

#Download FM model 
os.system('aws s3 cp '+{Model location} + './')

#Extract files from the model. Note: the companion notebook outlines the extraction steps.

Extract model data

The input to a factorization machines model is a list of vectors xu + xi representing user u and item i coupled with a label, such as a user rating for a movie. The resulting input matrix will include sparse one-hot encoded values for users, items, and any additional features you may want to add.

The factorization machines model output consists of three N-dimensional arrays (ndarrays):

  • V – a (N x k) matrix, where:
    • k is the dimension of the latent space
    • N is the total count of users and items
  • w – an N-dimensional vector
  • b – a single number: the bias term

Complete the steps below to extract the model output from the MXNet object.

#Extract model data
m = mx.module.Module.load('./model', 0, False, label_names=['out_label'])
V = m._arg_params['v'].asnumpy()
w = m._arg_params['w1_weight'].asnumpy()
b = m._arg_params['w0_weight'].asnumpy()

Prepare data to build a k-NN model

Now you can repackage the model data extracted from the factorization machines model to build a k-NN model. This process will create two datasets:

  • Item latent matrix – for building the k-NN model
  • User latent matrix – for inference
nb_users = <num users>
nb_movies = <num items>

# item latent matrix - concat(V[i], w[i]).  
knn_item_matrix = np.concatenate((V[nb_users:], w[nb_users:]), axis=1)
knn_train_label = np.arange(1,nb_movies+1)

#user latent matrix - concat (V[u], 1) 
ones = np.ones(nb_users).reshape((nb_users, 1))
knn_user_matrix = np.concatenate((V[:nb_users], ones), axis=1)

Step 3: Fitting a k-NN model

Now you can upload the k-NN model input data to Amazon S3, create a k-NN model, and save it so that it can be used in Amazon SageMaker. The model will also come in handy for calling batch transforms, as described in the following steps.

The k-NN model uses the default index_type (faiss.Flat). This model is precise, but it can be slow for large datasets. In such cases, you may want to use a different index_type parameter for an approximate but faster answer. For more information about index types, see either the k-NN documentation or this Amazon Sagemaker Examples notebook.

#upload data
knn_train_data_path = writeDatasetToProtobuf(knn_item_matrix, bucket, knn_prefix, train_key, "dense", knn_train_label)

# set up the estimator
nb_recommendations = 100
knn = sagemaker.estimator.Estimator(get_image_uri(boto3.Session().region_name, "knn"),
    get_execution_role(),
    train_instance_count=1,
    train_instance_type=instance_type,
    output_path=knn_output_prefix,
    sagemaker_session=sagemaker.Session())

#set up hyperparameters
knn.set_hyperparameters(feature_dim=knn_item_matrix.shape[1], k=nb_recommendations, index_metric="INNER_PRODUCT", predictor_type='classifier', sample_size=nb_movies)
fit_input = {'train': knn_train_data_path}
knn.fit(fit_input)
knn_model_name =  knn.latest_training_job.job_name
print "created model: ", knn_model_name

# save the model so that you can reference it in the next step during batch inference
sm = boto3.client(service_name='sagemaker')
primary_container = {
    'Image': knn.image_name,
    'ModelDataUrl': knn.model_data,
}
knn_model = sm.create_model(
        ModelName = knn.latest_training_job.job_name,
        ExecutionRoleArn = knn.role,
        PrimaryContainer = primary_container)

Step 4: Predicting Top x recommendations for all users

The Amazon SageMaker batch transform feature lets you generate batch predictions at scale. For this example, you’ll start by uploading user inference input to Amazon S3, and then you’ll trigger a batch transform.

#upload inference data to S3
knn_batch_data_path = writeDatasetToProtobuf(knn_user_matrix, bucket, knn_prefix, train_key, "dense")
print "Batch inference data path: ",knn_batch_data_path

# Initialize the transformer object
transformer =sagemaker.transformer.Transformer(
    base_transform_job_name="knn",
    model_name=knn_model_name,
    instance_count=1,
    instance_type=instance_type,
    output_path=knn_output_prefix,
    accept="application/jsonlines; verbose=true"
)

# Start a transform job:
transformer.transform(knn_batch_data_path, content_type='application/x-recordio-protobuf')
transformer.wait()

# Download output file from s3
s3_client.download_file(bucket, inference_output_file, results_file_name)

The resulting output file will contain predictions for all users. Each line item in the output file is a JSON line containing item IDs and distances for a specific user.

Here’s a sample output for a user. You can store the recommended movie IDs to your database for further use.

Recommended movie IDs for user #1 : [509, 1007, 96, 210, 208, 505, 268, 429, 182, 189, 57, 132, 482, 165, 615, 527, 196, 269, 528, 83, 176, 166, 194, 520, 661, 246, 180, 659, 496, 173, 9, 435, 474, 192, 493, 48, 211, 656, 489, 181, 251, 124, 89, 510, 22, 183, 316, 185, 197, 23, 170, 168, 963, 190, 1039, 56, 79, 136, 519, 651, 484, 275, 654, 641, 523, 478, 302, 223, 313, 187, 1142, 134, 100, 498, 272, 285, 191, 515, 408, 178, 199, 114, 480, 603, 172, 169, 174, 427, 513, 657, 318, 357, 511, 12, 50, 127, 479, 98, 64, 483]

Movie distances for user #1 : [1.8703, 1.8852, 1.8933, 1.905, 1.9166, 1.9185, 1.9206, 1.9239, 1.928, 1.9304, 1.9411, 1.9452, 1.947, 1.9528, 1.963, 1.975, 1.9985, 2.0117, 2.0205, 2.0211, 2.0227, 2.0583, 2.0959, 2.0986, 2.1064, 2.1126, 2.1157, 2.119, 2.1208, 2.124, 2.1349, 2.1356, 2.1413, 2.1423, 2.1521, 2.1577, 2.1618, 2.176, 2.1819, 2.1879, 2.1925, 2.2463, 2.2565, 2.2654, 2.2979, 2.3289, 2.3366, 2.3398, 2.3617, 2.3654, 2.3855, 2.386, 2.3867, 2.4198, 2.4431, 2.46, 2.462, 2.4643, 2.4729, 2.4959, 2.5334, 2.5359, 2.5362, 2.542, 2.5428, 2.5934, 2.5953, 2.598, 2.6575, 2.6735, 2.6879, 2.7038, 2.7259, 2.7432, 2.8112, 2.8707, 2.871, 2.9378, 2.9728, 3.0175, 3.0231, 3.0254, 3.0259, 3.0325, 3.0414, 3.1033, 3.2729, 3.3406, 3.392, 3.3982, 3.4196, 3.4452, 3.4684, 3.4743, 3.6265, 3.7013, 3.7711, 3.7736, 3.8898, 4.0698]

Multiple features and categories scenario

The framework in this blog applies to a scenario with user and item IDs. However, your data may include additional information, such as user and item features. For example, you might know the user’s age, zip code, or gender. For the item, you might have a category, a movie genre, or important keywords from a text description. In these multiple-feature and category scenarios, you can use the following to extract user and item vectors:

  • encode xi with both the users and user features:
    ai =concat(VT · xi , wT · xi)
  • encode xu with items and item features:
    au =concat(VT · xu, 1)

Then use ai to build the k-NN model and au for inference.

Conclusion

Amazon SageMaker gives developers and data scientists the flexibility to build, train, and deploy machine learning models quickly. Using the framework outlined above, you can build a recommendation system for predicting the top x recommendations for users in a batch fashion and cache the output in a database. In some cases you may need to apply further filtering on predictions or filter out some of the predictions based on user responses over the time. This framework is flexible enough to modify for such use cases.


About the Authors

Zohar Karnin is a Principal Scientist in Amazon AI. His research interests are in the areas of large scale and online machine learning algorithms. He develops infinitely scalable machine learning algorithms for Amazon SageMaker.


Rama Thamman is a Sr. Solution Architect with the Strategic Accounts team. He works with customers to build scalable cloud and machine learning solutions on AWS.


SETI Phone Home: Harnessing AI in Search of Aliens

We’ve all read the science fiction, we’ve wondered about  suspicious objects in the sky, and we’ve even speculated over mysterious crop circles. But we still don’t know what’s out there.

Gerry Zhang, a graduate researcher at the Berkeley SETI Research Center, at the University of California, Berkeley, is working to detect signs of extraterrestrials through radio frequencies using AI.

“The idea is that if there are advanced civilizations out there, they could be sending us signals, either intentionally or unintentionally. And we could try to detect them,” said Zhang in a conversation with AI Podcast host Noah Kravitz.

The Berkeley SETI team collaborates with the Breakthrough Listen Initiative, a Breakthrough Initiatives program dedicated to searching for evidence of intelligent life across over 1 million stars and 100 galaxies. SETI stands for the search for extraterrestrial intelligence.

Taking data from radio telescopes, Zhang and his team create spectrograms, which are visual representations of a spectrum of frequencies in a sound or signal as it varies with time. According to Zhang, radio frequency data is ideal for interstellar communication as it’s transparent with a range of frequencies.

“[SETI] is an idea that other civilizations might have developed similar technology as ours. But in reality, we obviously don’t know for sure, right? So, one idea is to search for anomalous signals that looks different from anything on Earth. AI can certainly help with that.”

AI helps sort through the data collected from radio frequency transmissions, separating signals from the noise.

“On Earth, we make a lot of transmissions in radio frequency and …  [we can’t] immediately identify [the signals] to an unknown source,” said Zhang. “Part of the job that AI can do is help us sort through the signals and try to characterize them.”

Zhang also held a session at the 2019 GPU Technology Conference in San Jose, Calif., discussing Berkeley SETI and Breakthrough Listen’s work with AI. A recording of the talk will be available here starting May 1.

When asked about his career journey, Zhang credits “the universality of artificial intelligence” as the driving force behind his passion and work ethic.

“The same [AI] technique can be applied from camera images to generating voice to writing music to finding aliens.”

How to Tune in to the AI Podcast

Our AI Podcast is available through iTunesCastbox, DoggCatcher, Google Play MusicOvercastPlayerFMPodbayPodBean, Pocket Casts, PodCruncher, PodKicker, Stitcher, Soundcloud, and TuneIn.

If your favorite isn’t listed here, email us at aipodcast [at] nvidia [dot] com.

Featured image credit: NASA

The post SETI Phone Home: Harnessing AI in Search of Aliens appeared first on The Official NVIDIA Blog.

Amazon Comprehend now supports resource tagging for custom models

Amazon Comprehend customers are solving a variety of use cases with custom classification and entity type models. For example, customers are building classifiers to organize their daily customer feedback into categories like “loyalty,” “sales,” or “product defect.” Custom entity models enable customers to analyze text for their own terms and phrases, such as product IDs from their inventory system. Amazon Comprehend removed the complexity from creating these models. All that’s required is a CSV file with labels and example text.

Because of this big step forward in ease of use, more employees across more teams are creating custom models for their projects. With this proliferation of more models across more teams, you need to be able to itemize usage and costs associated with each model for internal billing and usage management.

With this release, you can now assign resource tags to Amazon Comprehend custom classifier and custom entity models. Tagging these resources helps identify, track, and itemize their usage and costs. For example, there might be one model for sales text analysis and another model for marketing text analysis. With the resource tagging feature, you can provide the tab label on the custom model resource when you create your new models using either the SDK or with no code in the AWS Management Console. When usage and billing gets generated against the model, you can see usage and costs itemized using these resource tags.

You can add resource tags during custom model creation. The following example shows how to add tags to a custom model while you’re preparing to train the model.

To learn more about tagging custom classifiers and custom entity types, read Custom Comprehend.


About the author

Nino Bice is a Sr. Product Manager leading product for Amazon Comprehend, AWS’s natural language processing service.


Amazon SageMaker automatic model tuning now supports random search and hyperparameter scaling

We are excited to introduce two highly requested features to automatic model tuning in Amazon SageMaker: random search and hyperparameter scaling. This post describes these features, explains when and how to enable them, and shows how they can improve your search for hyperparameters that perform well. If you are in a hurry, you’ll be happy to know that the defaults perform very well in most cases. But if you’re curious to know more and want more manual control, keep reading.

If you’re new to Amazon SageMaker automatic model tuning, see the Amazon SageMaker Developer Guide.

For a working example of how to use random search and logarithmic scaling of hyperparameters, see the example Jupyter notebook on GitHub.

Random search

Use random search to tell Amazon SageMaker to choose hyperparameter configurations from a random distribution.

The main advantage of random search is that all jobs can be run in parallel. In contrast, Bayesian optimization, the default tuning method, is a sequential algorithm that learns from past trainings as the tuning job progresses. This highly limits the level of parallelism. The disadvantage of random search is that it typically requires running considerably more training jobs to reach a comparable model quality.

In Amazon SageMaker, enabling random search is as simple as setting the Strategy field to Random when you create a tuning job, as follows:

{
    "ParameterRanges": {...}
    "Strategy": "Random",
    "HyperParameterTuningJobObjective": {...}
}

If you use the AWS SDK for Python (Boto), set strategy="Random" in the HyperparameterTuner class:

tuner = HyperparameterTuner(
    sagemaker_estimator,
    objective_metric_name,
    hyperparameter_ranges,
    max_jobs=20,
    max_parallel_jobs=20,
    strategy="Random"
)

The following plot compares the hyperparameters chosen by random search, on the left, with those chosen by Bayesian optimization, on the right. In this example, we tuned the XGBoost algorithm, using the bank marketing dataset as prepared in our model tuning example notebook. For easy visualization, we tuned just two hyperparameters, alpha and lambda. The color of the visualized points shows the quality of the corresponding models, where yellow corresponds to models with better area under the curve (AUC) scores, and violet indicates a worse AUC.

The plot clearly shows that Bayesian optimization focuses most of its trainings on the region of the search space that produces the best models. Only occasionally does the algorithm explore new, unexplored regions. Random search, on the other hand, chooses the hyperparameters uniformly at random.

The following graph compares the quality of random search and Bayesian optimization on the preceding example. The lines show the best model score so far (on the vertical axes, where lower is better) as more training jobs are performed (on the horizontal axis). Each experiment was replicated 50 times, and the average of these replications was plotted. This is necessary to get accurate results, because the random nature of model-tuning algorithms can have a big effect on tuning performance.

You can see that Bayesian optimization requires one-fourth as many training jobs to reach the same level of performance as random search. You can expect similar results for most tuning jobs.

To see why it’s important to average multiple replications to get reliable results in any comparison, look at the following graphs of single replications. Each run has identical settings, and all variation is due to the internal use of different random seeds. The five samples are taken from the curves averaged in the preceding discussion.

As you can see, hyperparameter tuning curves look very different from other common learning curves seen in machine learning. In particular, they show much greater variance. From just these five samples, you can’t conclude much. If you’re ever in a situation where you’re comparing hyperparameter tuning methods, keep this in mind.

What about grid search? Grid search is similar to random search in that it chooses hyperparameter configurations blindly. But it’s usually less effective because it leads to almost duplicate training jobs if some of the hyperparameters don’t influence the results much.

Hyperparameter scaling

In practice, you often have hyperparameters whose value can meaningfully span multiple orders of magnitude. If I asked you to manually try a few different step sizes for a deep learning algorithm to explore the effect of varying this hyperparameter, you would likely choose powers of 10 (such as 1.0, 0.1, 0.01, …) rather than equidistant values (such as 0.1, 0.2, 0.3, …). We know from experience that the latter is unlikely to change the behavior of the algorithm much. For many hyperparameters, changing the order of magnitude yields much more interesting variation.

To try values that vary in order of magnitude, set a hyperparameter’s scaling type to Logarithmic.

The following graph shows the results of applying log scaling to the hyperparameters used in the preceding example. The left plot shows the results of using random search. The right plot shows the results of using Bayesian optimization.

To manually specify a scaling type, set the ScalingType of hyperparameter ranges to Logarithmic or ReverseLogarithmic (more about this type later). The range definitions for your tuning job configuration will look similar to the following:

"ContinuousParameterRanges": [
    {
      "Name": "learning_rate",
      "MinValue": "0.00001",
      "MaxValue" : "1.0",
      "ScalingType": "Logarithmic"
    },
    ...
]

For the AWS SDK for Python (Boto), the equivalent is:

ContinuousParameter(0.00001, 1.0, scaling_type="Logarithmic")

Reverse log

The momentum hyperparameter, which is common in deep learning, isn’t well served by linear scaling or by plain log scaling. Commonly, you’d want to explore values such as 0.9, 0.99, 0.999, …. In other words, you are interested in values increasingly close to 1.0. In this case, we recommend that you set the ScalingType  to ReverseLogarithmic. This tells Amazon SageMaker to internally apply the transformation log(1.0 - value) to all values.

Automatic scaling

When selecting automatic scaling (the Auto setting), Amazon SageMaker uses log scaling or reverse logarithmic scaling whenever the appropriate choice is clear from the hyperparameter ranges. If not, it falls back to linear scaling.

When using automatic scaling, if you specify 0 as the minimum hyperparameter value, Amazon SageMaker will never choose to use logarithmic scaling. Instead, it is recommended to select log scaling explicitly, and use a minimum value greater than 0. For example, don’t use 0 as the minimum regularization value. Instead, use a value like 1e-8, which is nearly equivalent and allows you to use log scaling.

Warping

The Amazon SageMaker Bayesian optimization engine has an additional internal feature, called warping. Warping is closely related to the configurable scaling options described in this post. Amazon SageMaker applies the internal warping function to each hyperparameter along with any specified scaling types. The warping function is learned as the tuning job progresses depending on what best describes the data. This means that this warping function improves as the tuning job progresses, while hyperparameter scaling is applied from the start.

Internal warping can learn a much larger family of transformations compared with the three transformations supported by hyperparameter scaling, as shown in the following figure. The image on the left shows the three transformations that you can specify by setting the scaling type. The image on the right shows a few examples of transformations that can be learned internally through warping, and which are learned in addition to any scaling type you choose.

Choosing the correct scaling type is particularly important when using random search, because Amazon SageMaker doesn’t apply internal warping when you use random search.

Summary

If you require a higher degree of parallelism than is supported by Bayesian optimization, you can use random search. But keep in mind that, in most cases, it’s more cost effective to use the default Bayesian optimization strategy.

If you are unsure which hyperparameter scaling type to use, stick to automatic scaling. If the hyperparameters can meaningfully vary by multiple orders of magnitude, use logarithmic scaling. If you are interested in values that are increasingly close to 1.0, use reverse logarithmic scaling. Using the correct scaling type can significantly speed up your search for well-performing hyperparameters.


About the Author

Fela Winkelmolen works as an applied scientists for Amazon AI and was part of the team that launched Automatic Model Tuning in Amazon SageMaker.