In this blog post, we’ll introduce Inference Pipelines, a new feature in Amazon SageMaker that enables you to specify a sequence of steps that are executed in order for each inference request. Using this feature, you can reuse the data processing steps applied in training during inference without the need to maintain two separate copies of the same code. This ensures accuracy of your predictions and reduces development overhead. In our example, we’ll pre-process input data for training and inference using transformers in Apache Spark MLlib and train a machine learning model to predict the condition of a car using Amazon SageMaker’s XGBoost algorithm.
Introduction
Data scientists and developers spend a large portion of their time cleaning and preparing data before training machine learning (ML) models. This is because the real-world data cannot be used directly. There may be missing values, duplicate information, or multiple variations of the same information that need to be standardized. Additionally, data often needs to be transformed from one format to another so it can be used by machine learning algorithms. For example, the XGBoost algorithm can only accept numerical data, so if input data in strings or categorical format, it needs to be converted to numerical format before it can be used. In other cases, combining multiple input features into a single feature can result in more accurate machine learning models. For example, using a combination of temperature and humidity to predict flight delays produces more accurate models.
When you deploy machine learning models into production to make predictions on new data (a process called inference), you need to ensure that the same data processing steps that were used in training are also applied to each inference request. Otherwise, you can get incorrect prediction results. Until now, you had to maintain two copies of the same data processing steps for use in training and inference and ensure that they were always in sync. Also, the data processing steps had to be coupled either with the application code making requests to the machine learning models or baked into the inference logic. As a result, development overhead and complexity was higher than it needed to be, and your ability to iterate quickly was limited.
Now, you can reuse the same data processing steps from training during inference by creating an inference pipeline in Amazon SageMaker. You can use an inference pipeline to specify up to five data processing and inference steps. These steps are executed for every prediction request. You can reuse the data processing steps from training, so you only manage one copy of the data processing code, and you can independently update the data processing steps without the need to update your client application or inference logic.
Amazon SageMaker provides flexibility in how you compose your inference pipelines. For data processing steps, you can use built-in data transformers available in Scikit-Learn and Apache SparkMLlib to process and convert data from one format to another for common use cases, or you can write your custom transformers. For inference, you can use the built-in machine learning algorithms and frameworks available in Amazon SageMaker, or use your custom trained models. The same inference pipeline can be used for real-time and batch inferences. All steps in the inference pipelines execute on the same instance, so there is minimal latency impact.
Example
In this example, we’ll use Apache Spark MLLib for data processing using AWS Glue and reuse the data processing code during inference. We’ll use the Car Evaluation Data Set from UCI’s Machine Learning Repository. Our goal is to predict the acceptability of a specific car, amongst the values of unacc, acc, good, and vgood. At the core, it is a classification problem, and we will train a machine learning model using Amazon SageMaker’s built-in XGBoost algorithm. However, the dataset only contains six categorical string features – buying, maint, doors, persons, lug_boot, and safety and XGBoost can only process data that is in numerical format. Therefore we will pre-process the input data using SparkML StringIndexer followed by OneHotEncoder to convert it to a numerical format. We will also apply a post-processing step on the prediction result using IndexToString to convert our inference output back to their original labels that correspond to the predicted condition of the car.
We’ll write our pre-processing and post-processing scripts once, and apply them for processing training data using AWS Glue. Then, we will serialize and capture these artifacts produced by AWS Glue to Amazon S3 using MLeap, a common serialization format and execution engine for machine learning pipelines. This is so the pre-processing steps can be reused during inference for real-time requests using the SparkML Serving container that Amazon SageMaker provides. Finally, we will deploy the pre-processing, inference, and post-processing steps in an inference pipeline and will execute these steps for each real-time inference request.
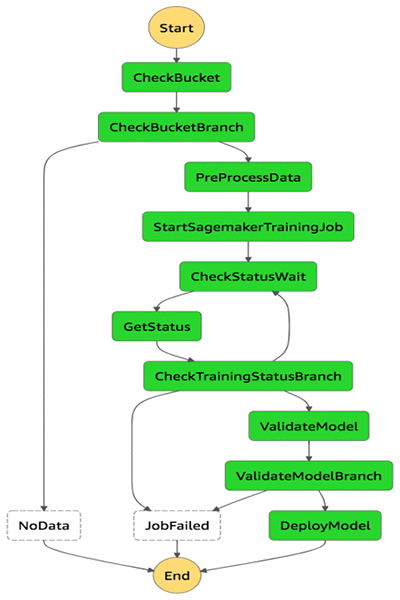
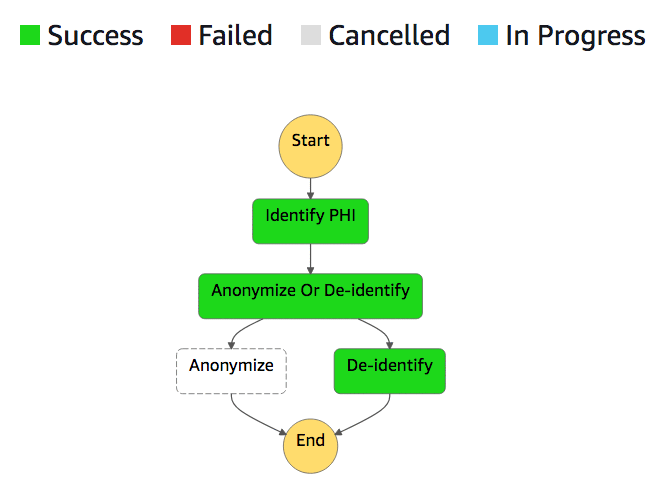
The following figure summarizes the steps we will follow:

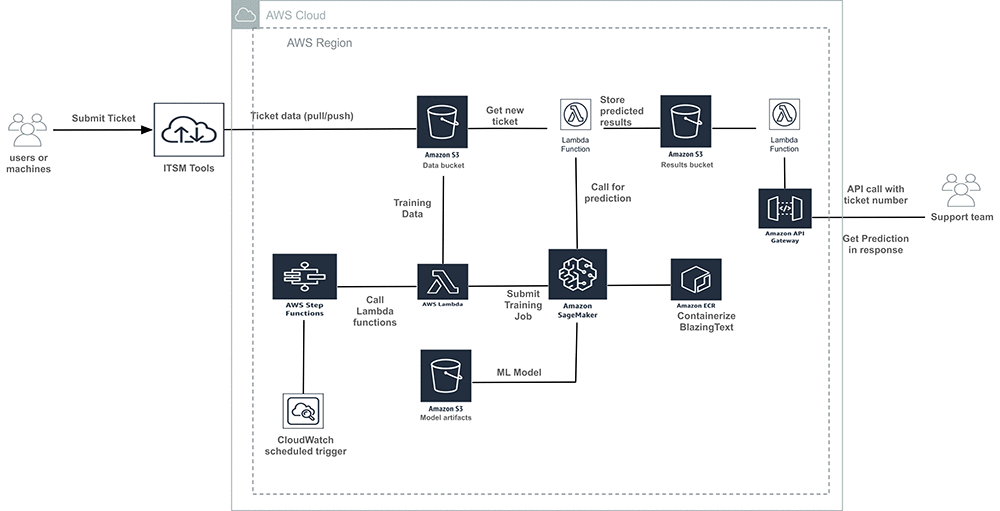
The following figure shows how the inference pipeline will be deployed on an endpoint for real-time inferences. The same inference pipeline can also be used in batch transform jobs for processing batch requests.

Start a notebook Instance and download the notebook
For this example, we will show two complementary workflows within the AWS ecosystem: The first uses the AWS Management Console, and the second uses Boto3 and a Jupyter notebook in an Amazon SageMaker notebook instance. Both workflows will start within Jupyter notebooks to help speed up some of the setup. This will help us place the necessary files in your account’s Amazon S3 bucket and set up the necessary AWS Identity and Access Management (IAM) roles so that Amazon SageMaker and AWS Glue have the necessary access to the data. You can also use the high-level Python SDK for deploying inference pipelines and can refer to this example. If you want to use Scikit-Learn instead of SparkML, you can refer to this example.
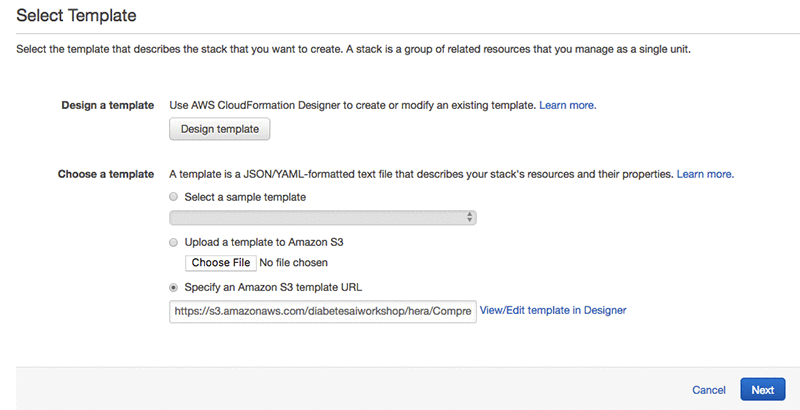
Start by going to Amazon SageMaker in the console by selecting Services, and Amazon SageMaker under Machine Learning. While this feature is available in any Region with Amazon SageMaker, for this example, make sure that your Region is set to Oregon in the upper right. We need to make sure that both our Amazon S3 bucket and the services we are using are in the same Region. In the Amazon SageMaker console, under Notebook, choose Notebook instances. Now choose Create notebook instance.

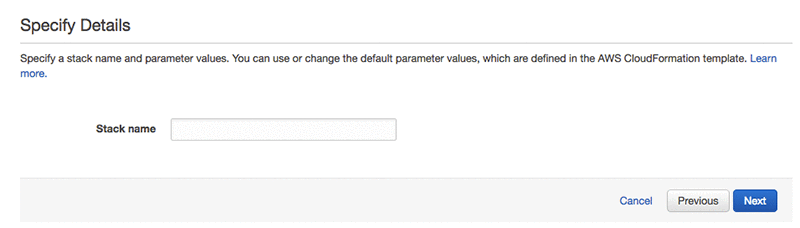
We need to give our new notebook instance a name. Let’s name it processing example. The default instance size will be sufficient for this exercise, as will most of the other settings. However, we still need to create an IAM role for Amazon SageMaker to execute its functions under. Under IAM role, choose Create a new role.
When creating a new IAM role, we can specify None for the S3 buckets you specify. This is because we are going to create an S3 bucket during this example with the name sagemaker as part of the name, and the default role will have access to this bucket. Select Create role.

Your notebook instance settings should now look like this:

Choose Create notebook instance.
After a few minutes, your Notebook instance will be ready. After its status is set to InService, select the Open Jupyter link.

Once the notebook has been loaded, open the tab labeled SageMaker examples and select the Advanced Functionality header. Choose the folder titled inference_pipeline_sparkml_xgboost_car_evaluation and choose Use option next to the .ipynb notebook. This will create a copy of the notebook and open it in the Jupyter notebook interface.
Preparing files and roles
Whether you are going to follow our example in the notebook or on the console, there is some initial setup. This is done more conveniently within the notebook. After your AWS environment is properly set up, feel free to follow along either in the notebook or on the console.
First, we need to set up an S3 bucket within your account and upload the necessary files to this bucket. To set up the bucket, we will run the first code block, labeled Setup S3 bucket. To run the cell while the code cell is selected, you can either press Shift and Return at the same time or choose the Run button at the top of the Jupyter notebook.
Make a note of the S3 bucket name that was created here. If you are planning to follow along in the console, you will need this name later.
Now we need to upload the raw data and the AWS Glue processing script to Amazon S3. We can do that by running the code blocks in the notebook labeled Upload files to S3. The first downloads the files to your notebook instance, while the second uploads them to the relevant bucket in S3.
Your S3 bucket is now set up for our example.
Pre-processing using Apache Spark in AWS Glue
If you take a look at the data we downloaded, you’ll notice all of the fields are categorical data in string format, which XGBoost can’t natively handle. To utilize the Amazon SageMaker XGBoost, we need to pre-process our data into a series of one hot encoded columns. Apache Spark provides pre-processing pipeline capabilities that we will utilize.
Furthermore, to make our endpoint particularly useful, we also generate a post-processor in this script, which can convert our label indexes back to their original labels. All of these processor artifacts will be saved to S3 for use in Amazon SageMaker later.
In this example, you download our pre-processor.py script, and we recommend that you take the time to explore how Spark pipelines are handled. Let’s take a look at the relevant part of the code where we define and fit our Spark pipeline:
    # Target label
    catIndexer = StringIndexer(inputCol="cat", outputCol="label")

    labelIndexModel = catIndexer.fit(train)
    train = labelIndexModel.transform(train)

    converter = IndexToString(inputCol="label", outputCol="cat")

    # Index labels, adding metadata to the label column.
    # Fit on whole dataset to include all labels in index.
    buyingIndexer = StringIndexer(inputCol="buying", outputCol="indexedBuying")
    maintIndexer = StringIndexer(inputCol="maint", outputCol="indexedMaint")
    doorsIndexer = StringIndexer(inputCol="doors", outputCol="indexedDoors")
    personsIndexer = StringIndexer(inputCol="persons", outputCol="indexedPersons")
    lug_bootIndexer = StringIndexer(inputCol="lug_boot", outputCol="indexedLug_boot")
    safetyIndexer = StringIndexer(inputCol="safety", outputCol="indexedSafety")


    # One Hot Encoder on indexed features
    buyingEncoder = OneHotEncoder(inputCol="indexedBuying", outputCol="buyingVec")
    maintEncoder = OneHotEncoder(inputCol="indexedMaint", outputCol="maintVec")
    doorsEncoder = OneHotEncoder(inputCol="indexedDoors", outputCol="doorsVec")
    personsEncoder = OneHotEncoder(inputCol="indexedPersons", outputCol="personsVec")
    lug_bootEncoder = OneHotEncoder(inputCol="indexedLug_boot", outputCol="lug_bootVec")
    safetyEncoder = OneHotEncoder(inputCol="indexedSafety", outputCol="safetyVec")

    # Create the vector structured data (label,features(vector))
    assembler = VectorAssembler(inputCols=["buyingVec", "maintVec", "doorsVec", "personsVec", "lug_bootVec", "safetyVec"], outputCol="features")

    # Chain featurizers in a Pipeline
    pipeline = Pipeline(stages=[buyingIndexer, maintIndexer, doorsIndexer, personsIndexer, lug_bootIndexer, safetyIndexer, buyingEncoder, maintEncoder, doorsEncoder, personsEncoder, lug_bootEncoder, safetyEncoder, assembler])

    # Train model.  This also runs the indexers.
    model = pipeline.fit(train)
This snippet defines both our pre-processor and post-processor. The pre-processor converts all the training columns from categorical labels into a vector of one hot encoded columns, while the post-processor converts our label index back to a human-readable string.
Also, it may be helpful to examine the code that allows us to serialize and store our Spark pipeline artifacts in the MLeap format. Because the Spark framework was designed around batch use cases, we need to use MLeap here. MLeap serializes Spark ML Pipelines and provides a run time for deploying for real-time, low latency use cases. Amazon SageMaker has launched a SparkML Serving container that uses MLEAP to make it easy to use for inference. Let’s look at the following code:
    # Serialize and store via MLeap
    SimpleSparkSerializer().serializeToBundle(model, "jar:file:/tmp/model.zip", predictions)

    # Unzipping as SageMaker expects a .tar.gz file but MLeap produces a .zip file.
    import zipfile
    with zipfile.ZipFile("/tmp/model.zip") as zf:
        zf.extractall("/tmp/model")

    # Writing back the content as a .tar.gz file
    import tarfile
    with tarfile.open("/tmp/model.tar.gz", "w:gz") as tar:
        tar.add("/tmp/model/bundle.json", arcname='bundle.json')
        tar.add("/tmp/model/root", arcname='root')

    s3 = boto3.resource('s3')
    file_name = args['s3_model_bucket_prefix'] + '/' + 'model.tar.gz'
    s3.Bucket(args['s3_model_bucket']).upload_file('/tmp/model.tar.gz', file_name)

    os.remove('/tmp/model.zip')
    os.remove('/tmp/model.tar.gz')
    shutil.rmtree('/tmp/model')

    # Save postprocessor
    SimpleSparkSerializer().serializeToBundle(converter, "jar:file:/tmp/postprocess.zip", predictions)

    with zipfile.ZipFile("/tmp/postprocess.zip") as zf:
        zf.extractall("/tmp/postprocess")

    # Writing back the content as a .tar.gz file
    import tarfile
    with tarfile.open("/tmp/postprocess.tar.gz", "w:gz") as tar:
        tar.add("/tmp/postprocess/bundle.json", arcname='bundle.json')
        tar.add("/tmp/postprocess/root", arcname='root')

    file_name = args['s3_model_bucket_prefix'] + '/' + 'postprocess.tar.gz'
    s3.Bucket(args['s3_model_bucket']).upload_file('/tmp/postprocess.tar.gz', file_name)

    os.remove('/tmp/postprocess.zip')
    os.remove('/tmp/postprocess.tar.gz')
    shutil.rmtree('/tmp/postprocess')
You’ll notice that we unzip this archive and re-archive it into a tar.gz file that Amazon SageMaker recognizes.
To run our Spark pipelines in Amazon SageMaker, we are going to utilize our notebook instance. In the Amazon SageMaker notebook, you can run the cell labeled Create and run AWS Glue Preprocessing Job, which looks like this:
### Create and run AWS Glue Preprocessing Job

# Define the Job in AWS Glue
glue = boto3.client('glue')

try:
    glue.get_job(JobName='preprocessing-cars')
    print("Job already exists, continuing...")
except glue.exceptions.EntityNotFoundException:
    response = glue.create_job(
        Name='preprocessing-cars',
        Role=role,
        Command={
            'Name': 'glueetl',
            'ScriptLocation': 's3://{}/scripts/preprocessor.py'.format(bucket_name)
        },
        DefaultArguments={
            '--s3_input_data_location': 's3://{}/data/car.data'.format(bucket_name),
            '--s3_model_bucket_prefix': 'model',
            '--s3_model_bucket': bucket_name,
            '--s3_output_bucket': bucket_name,
            '--s3_output_bucket_prefix': 'output',
            '--extra-py-files': 's3://{}/scripts/python.zip'.format(bucket_name),
            '--extra-jars': 's3://{}/scripts/mleap_spark_assembly.jar'.format(bucket_name)
        }
    )

    print('{}n'.format(response))

# Run the job in AWS Glue
try:
    job_name='preprocessing-cars'
    response = glue.start_job_run(JobName=job_name)
    job_run_id = response['JobRunId']
    print('{}n'.format(response))
except glue.exceptions.ConcurrentRunsExceededException:
    print("Job run already in progress, continuing...")


# Check on the job status
import time

job_run_status = glue.get_job_run(JobName=job_name,RunId=job_run_id)['JobRun']['JobRunState']
while job_run_status not in ('FAILED', 'SUCCEEDED', 'STOPPED'):
    job_run_status = glue.get_job_run(JobName=job_name,RunId=job_run_id)['JobRun']['JobRunState']
    print (job_run_status)
    time.sleep(30)
This cell will define the job in AWS Glue, run the job, and monitor the status until the job has completed.
In summary, we have now pre-processed our data into a training and validation set, with one hot encoding for all of the string values. We have also serialized a pre-processor and post-processor into the MLeap format so that we can reuse these pipelines in our endpoint later. The next step is to train a machine learning model. We will be using the Amazon SageMaker built-in XGBoost for this.
Training an Amazon SageMaker XGBoost model
Now that we have our data pre-processed in a format that XGBoost recognizes, we can run a simple training job to train a classifier model on our data. We can do this from the console with the following settings: Set the Job name to xgboost-cars (you may need to append unique characters to this if you’ve run an identical job name previously). Select the IAM role you created above for your Notebook instance. For Algorithm source, choose Amazon SageMaker built-in algorithm, and under Algorithm choose XGBoost.


Under Hyperparameters set early_stopping_rounds to 5, num_rounds to 10, change the objective to multi:softmax, num_class to 4, and eval_metric to mlogloss. This will configure XGBoost to run a classification model that works with the data was pre-processed in AWS Glue.


For the Input data configuration, leave the Channel name as train, for Content type put csv, Compression type as None, Record wrapper as None, S3 data type as S3Prefix, and S3 data distribution type as FullyReplicated. Finally, your S3 location should be s3://<your-bucket-name>/output/train .

Select Add channel, and repeat this input for the validation set. Set the Channel name as validation, for Content type put csv, Compression type as None, Record wrapper as None, S3 data type as S3Prefix, and S3 data distribution type as FullyReplicated. Finally, your S3 location should be s3://<your-bucket-name>/output/validation .

Finally, for the Output data configuration, set the S3 output path to s3://<your-bucket-name>/xgb.

Choose Create training job.
Alternatively, we can run this entire process in our Jupyter notebook. Run the following cell, labeled Run Amazon SageMaker XGBoost Training Job:
### Run Amazon SageMaker XGBoost Training Job

from sagemaker.amazon.amazon_estimator import get_image_uri

import random
import string

# Get XGBoost container image for current region
training_image = get_image_uri(region, 'xgboost', repo_version="latest")

# Create a unique training job name
training_job_name = 'xgboost-cars-'+''.join(random.choice(string.ascii_lowercase + string.digits) for _ in range(8))

# Create the training job in Amazon SageMaker
sagemaker = boto3.client('sagemaker')
response = sagemaker.create_training_job(
    TrainingJobName=training_job_name,
    HyperParameters={
        'early_stopping_rounds ': '5',
        'num_round': '10',
        'objective': 'multi:softmax',
        'num_class': '4',
        'eval_metric': 'mlogloss'

    },
    AlgorithmSpecification={
        'TrainingImage': training_image,
        'TrainingInputMode': 'File',
    },
    RoleArn=role,
    InputDataConfig=[
        {
            'ChannelName': 'train',
            'DataSource': {
                'S3DataSource': {
                    'S3DataType': 'S3Prefix',
                    'S3Uri': 's3://{}/output/train'.format(bucket_name),
                    'S3DataDistributionType': 'FullyReplicated'
                }
            },
            'ContentType': 'text/csv',
            'CompressionType': 'None',
            'RecordWrapperType': 'None',
            'InputMode': 'File'
        },
        {
            'ChannelName': 'validation',
            'DataSource': {
                'S3DataSource': {
                    'S3DataType': 'S3Prefix',
                    'S3Uri': 's3://{}/output/validation'.format(bucket_name),
                    'S3DataDistributionType': 'FullyReplicated'
                }
            },
            'ContentType': 'text/csv',
            'CompressionType': 'None',
            'RecordWrapperType': 'None',
            'InputMode': 'File'
        },
    ],
    OutputDataConfig={
        'S3OutputPath': 's3://{}/xgb'.format(bucket_name)
    },
    ResourceConfig={
        'InstanceType': 'ml.m4.xlarge',
        'InstanceCount': 1,
        'VolumeSizeInGB': 1
    },
    StoppingCondition={
        'MaxRuntimeInSeconds': 3600
    },)

print('{}n'.format(response))

# Monitor the status until completed
job_run_status = sagemaker.describe_training_job(TrainingJobName=training_job_name)['TrainingJobStatus']
while job_run_status not in ('Failed', 'Completed', 'Stopped'):
    job_run_status = sagemaker.describe_training_job(TrainingJobName=training_job_name)['TrainingJobStatus']
    print (job_run_status)
    time.sleep(30)
This will run our XGBoost training job in Amazon SageMaker, and monitor the progress of the job. Once the job status is ‘Completed,’ you can move on to the next cell.
This will train the model on the preprocessed data we created earlier. After a few minutes, usually less than 5, the job should be completed successfully, and it should output our model artifacts to the S3 location we specified. After this is done, we can deploy an inference pipeline that consists of pre-processing, inference, and post-processing steps.
Deploying an Amazon SageMaker endpoint using your pre-processing artifacts
Now that we have a set of model artifacts, we can set up an inference pipeline that executes sequentially in Amazon SageMaker. We start by setting up a model, which will point to all of our model artifacts, then we setup an endpoint configuration to specify our hardware, and finally we can stand up an endpoint. With this endpoint, we will pass the raw data and no longer need to write pre-processing logic in our application code. The same pre-processing steps that ran for training can be applied to inference input data for better consistency and ease of management.
From the Amazon SageMaker console, select Models choose Inference options on the left. Choose Create model. This will bring you to the model settings. For the Model name, put pipeline-xgboost. For the IAM role, select the SageMaker execution role you created earlier for your Notebook instance. It should look like this:

For Container definition 1, under Container input options, choose Provide model artifacts and inference image location. Under Location of inference image enter 246618743249.dkr.ecr.us-west-2.amazonaws.com/sagemaker-sparkml-serving:2.2. This is the SparkML serving image provided by Amazon SageMaker. The full list of SparkML images provided for every region is available here. Under Location of model artifacts, enter s3://<your-bucket-name>/model/model.tar.gz. These are the pre-processor artifacts created when running the AWS Glue job we ran earlier.
Next, we need to define a schema for our SparkML serving container via an Environment variable. For the Key enter SAGEMAKER_SPARKML_SCHEMA, and for Value enter:
{"input":[{"type":"string","name":"buying"},{"type":"string","name":"maint"},{"type":"string","name":"doors"},{"type":"string","name":"persons"},{"type":"string","name":"lug_boot"},{"type":"string","name":"safety"}],"output":{"type":"double","name":"features","struct":"vector"}}

Select Add container.
For Container definition 2, under Container input options, select Provide model artifacts and inference image location.
Under Location of inference image enter 433757028032.dkr.ecr.us-west-2.amazonaws.com/xgboost:latest. This is the XGBoost serving container provided by Amazon SageMaker. Under Location of model artifacts, enter s3://<your-bucket-name>/xgb/xgb/output/model.tar.gz. This archive contains the serialized XGBoost model artifacts from our earlier training job.
No Environment variables are needed for Container definition 2.

Choose Add container.
Finally, for Container definition 3, under Container input options, select Provide model artifacts and inference image location. Under Location of inference image enter 246618743249.dkr.ecr.us-west-2.amazonaws.com/sagemaker-sparkml-serving:2.2. This is the same SparkML serving image provided by Amazon SageMaker that we used for Container definition 1. Under Location of model artifacts, enter s3://<your-bucket-name>/model/postprocess.tar.gz. This is the reverse indexer that allows us to go from the indexed value output by XGBoost back to the original label.
Next we need to define a schema for our SparkML serving container using an Environment variable. For the Key enter SAGEMAKER_SPARKML_SCHEMA, and for Value enter:
{"input": [{"type": "double", "name": "label"}], "output": {"type": "string", "name": "cat"}}

After all three container definitions are in place, choose Create model.
You can now find your models underneath Inference, Models in the Amazon SageMaker console. Select the pipeline-xgboost model from the list to bring up the model details. Now choose the Create endpoint button.

Under Endpoint, Endpoint name, input pipeline-xgboost.

Under New endpoint configuration provide the Endpoint configuration name of pipeline-xgboost. Choose Create endpoint configuration.

Finally, choose Create endpoint at the bottom.
Alternatively, all of these steps can be run in the notebook by running the cell labeled Create SageMaker endpoint with pipeline:
### Create SageMaker endpoint with pipeline
from botocore.exceptions import ClientError

# Image locations are published at: https://github.com/aws/sagemaker-sparkml-serving-container
sparkml_images = {
    'us-west-1': '746614075791.dkr.ecr.us-west-1.amazonaws.com/sagemaker-sparkml-serving:2.2',
    'us-west-2': '246618743249.dkr.ecr.us-west-2.amazonaws.com/sagemaker-sparkml-serving:2.2',
    'us-east-1': '683313688378.dkr.ecr.us-east-1.amazonaws.com/sagemaker-sparkml-serving:2.2',
    'us-east-2': '257758044811.dkr.ecr.us-east-2.amazonaws.com/sagemaker-sparkml-serving:2.2',
    'ap-northeast-1': '354813040037.dkr.ecr.ap-northeast-1.amazonaws.com/sagemaker-sparkml-serving:2.2',
    'ap-northeast-2': '366743142698.dkr.ecr.ap-northeast-2.amazonaws.com/sagemaker-sparkml-serving:2.2',
    'ap-southeast-1': '121021644041.dkr.ecr.ap-southeast-1.amazonaws.com/sagemaker-sparkml-serving:2.2',
    'ap-southeast-2': '783357654285.dkr.ecr.ap-southeast-2.amazonaws.com/sagemaker-sparkml-serving:2.2',
    'ap-south-1': '720646828776.dkr.ecr.ap-south-1.amazonaws.com/sagemaker-sparkml-serving:2.2',
    'eu-west-1': '141502667606.dkr.ecr.eu-west-1.amazonaws.com/sagemaker-sparkml-serving:2.2',
    'eu-west-2': '764974769150.dkr.ecr.eu-west-2.amazonaws.com/sagemaker-sparkml-serving:2.2',
    'eu-central-1': '492215442770.dkr.ecr.eu-central-1.amazonaws.com/sagemaker-sparkml-serving:2.2',
    'ca-central-1': '341280168497.dkr.ecr.ca-central-1.amazonaws.com/sagemaker-sparkml-serving:2.2',
    'us-gov-west-1': '414596584902.dkr.ecr.us-gov-west-1.amazonaws.com/sagemaker-sparkml-serving:2.2'
}


try:
    sparkml_image = sparkml_images[region]

    response = sagemaker.create_model(
        ModelName='pipeline-xgboost',
        Containers=[
            {
                'Image': sparkml_image,
                'ModelDataUrl': 's3://{}/model/model.tar.gz'.format(bucket_name),
                'Environment': {
                    'SAGEMAKER_SPARKML_SCHEMA': '{"input":[{"type":"string","name":"buying"},{"type":"string","name":"maint"},{"type":"string","name":"doors"},{"type":"string","name":"persons"},{"type":"string","name":"lug_boot"},{"type":"string","name":"safety"}],"output":{"type":"double","name":"features","struct":"vector"}}'
                }
            },
            {
                'Image': training_image,
                'ModelDataUrl': 's3://{}/xgb/{}/output/model.tar.gz'.format(bucket_name, training_job_name)
            },
            {
                'Image': sparkml_image,
                'ModelDataUrl': 's3://{}/model/postprocess.tar.gz'.format(bucket_name),
                'Environment': {
                    'SAGEMAKER_SPARKML_SCHEMA': '{"input": [{"type": "double", "name": "label"}], "output": {"type": "string", "name": "cat"}}'
                }

            },
        ],
        ExecutionRoleArn=role
    )

    print('{}n'.format(response))

except ClientError:
    print('Model already exists, continuing...')


try:
    response = sagemaker.create_endpoint_config(
        EndpointConfigName='pipeline-xgboost',
        ProductionVariants=[
            {
                'VariantName': 'DefaultVariant',
                'ModelName': 'pipeline-xgboost',
                'InitialInstanceCount': 1,
                'InstanceType': 'ml.m4.xlarge',
            },
        ],
    )
    print('{}n'.format(response))

except ClientError:
    print('Endpoint config already exists, continuing...')


try:
    response = sagemaker.create_endpoint(
        EndpointName='pipeline-xgboost',
        EndpointConfigName='pipeline-xgboost',
    )
    print('{}n'.format(response))

except ClientError:
    print("Endpoint already exists, continuing...")


# Monitor the status until completed
endpoint_status = sagemaker.describe_endpoint(EndpointName='pipeline-xgboost')['EndpointStatus']
while endpoint_status not in ('OutOfService','InService','Failed'):
    endpoint_status = sagemaker.describe_endpoint(EndpointName='pipeline-xgboost')['EndpointStatus']
    print(endpoint_status)
    time.sleep(30)
After a few minutes, Amazon SageMaker creates an endpoint using all three of the provided containers on a single instance. When the endpoint is invoked with a payload, the output of the earlier containers is passed as the input to the later containers, until the payload reaches its final output.
In this example, the raw string categories are sent to our preprocessing MLeap container and run through a Spark pipeline to one hot encode the features. Then the one hot encoded data is sent to our XGBoost container, where our model makes a prediction to an index. The index is then fed to our post-processing MLeap container, with a Spark model artifact, which converts the index back to its original label string, which is returned to the client. These are the same steps you used for preprocessing training data, and it was only necessary to write the code once.
Testing the endpoint, monitoring, and metrics
After the Amazon SageMaker endpoint is InService, we can test it by calling the invoke-endpoint command from the AWS CLI. For example, we can use the following command:
aws sagemaker-runtime invoke-endpoint --point-name pipeline-xgboost --content-type text/csv --body low,low,5more,more,big,high out
If successful, you should see a message like this:
{
    "ContentType": "text/csv",
    "InvokedProductionVariant": "default-variant-name"
}
The output of the invocation appears in the file out, and you can see it with the following command:
If successful, this should return one of the following values: unacc, acc, good, vgood.
Alternatively, this can be done in the notebook by running the cell labeled Invoke the Endpoint:
### Invoke the Endpoint
client = boto3.client('sagemaker-runtime')

sample_payload=b'low,low,5more,more,big,high'

response = client.invoke_endpoint(
    EndpointName='pipeline-xgboost',
    Body=sample_payload,
    ContentType='text/csv'
)

print('Our result for this payload is: {}'.format(response['Body'].read().decode('ascii')))
Metrics for your inference pipelines
When building your deployments, you may find you need to monitor or debug your endpoint, and the new inference pipelines change how the logs appear in Amazon CloudWatch. You can now see logs and metrics for each of your containers within a single endpoint. To see these logs, return to the AWS Management Console, and go to Services, Amazon SageMaker, Inference, and then Endpoints. Locate your pipeline-xgboost endpoint in the list, and select it by the name to see the endpoint details.
Locate the Monitor section, and you will find a View logs link. Select it, and you will be taken to a CloudWatch Logs interface. For our example endpoint, there are three sets of log streams, one for each container. It should look like this:

If an invocation gives an error, the relevant output will appear in the relevant log stream. Whatever is output to stdout for each container will end up at this location.
Cleaning up your AWS environment
When you are done with this experiment, make sure to delete your Amazon SageMaker endpoint to avoid incurring unexpected costs. You can do this from the console by going to Services, Amazon SageMaker, Inference, and Endpoints. Choose pipeline-xgboost under Endpoints. In the upper-right, choose Delete. This will remove the endpoint from your AWS account. You will also want to make sure to stop your Notebook instance.
A more extensive cleanup can be done from your Notebook instance by running the code cell labeled Environment cleanup, as follows:
### Environment cleanup

print('Deleting SageMaker endpoint...')
result = sagemaker.delete_endpoint(
    EndpointName='pipeline-xgboost'
)
print(result)

print('Deleting SageMaker endpoint config...')
result = sagemaker.delete_endpoint_config(
    EndpointConfigName='pipeline-xgboost'
)
print(result)

print('Deleting SageMaker model...')
result = sagemaker.delete_model(
    ModelName='pipeline-xgboost'
)
print(result)

print('Deleting Glue job...')
result = glue.delete_job(
    JobName='preprocessing-cars'
)
print(result)
Conclusion
Congratulations! You have now learned how to do pre-processing and post-processing using Apache Spark in AWS Glue as part of your Amazon SageMaker ML workflow. You can now deploy a sequence of five data processing and inference steps that are executed on each inference request in Amazon SageMaker. With this new feature, you can write your pre-processing code once, and use it for both training and inference (real-time or batch). This will improve consistency between your training and deployment of your ML models. Furthermore, with the new SparkML Serving container provided by Amazon SageMaker, you can make use of Spark pipelines for real-time data. Feel free to adapt this process to different data sets or different models.
Citations
Dua, D. and Karra Taniskidou, E. (2017). UCI Machine Learning Repository. Irvine, CA: University of California, School of Information and Computer Science.
About the Authors
 Thomas Hughes is a Data Scientist with AWS Professional Services. He has a PhD from UC Santa Barbara and has tackled problems in the social sciences, education, and advertising fields. He is currently working to solve some of the trickiest problems that arise when machine learning meets big data.
 Urvashi Chowdhary is a Senior Product Manager for Amazon SageMaker. She is passionate about working with customers and making machine learning more accessible. In her spare time, she loves sailing, paddle boarding, and kayaking.


 Sofian Hamiti is a data scientist at Amazon ML Solutions Lab. He helps AWS customers across different industries accelerate their AI and cloud adoption.


 Priya Ponnapalli is a principal data scientist at Amazon ML Solutions Lab, where she helps AWS customers across different industries accelerate their AI and cloud adoption.
 Dominic Divakaruni is the Product Manager for Amazon Elastic Inference. He builds services that help customers scale production machine learning applications. In this spare time he enjoys drumming with his son and working on cars.
 Sukwon Kim is a Senior Product Manager for AWS Deep Learning. He works on products that make it easier for customers to use deep learning engines. In his spare time, he enjoys hiking and traveling.
 Vin Sharma is a Engineering Leader for AWS Deep Learning. He leads the team building Neo, which helps ML models train once and run anywhere in the cloud and at the edge.

 Dr. Aaron Friedman is a Healthcare and Life Sciences Partner Solutions Architect at Amazon Web Services. He works with ISVs and SIs to architect healthcare solutions on AWS, and bring the best possible experience to their customers. His passion is working at the intersection of science, big data, and software. In his spare time, he’s exploring the outdoors, learning a new thing to cook, or spending time with his wife, son, and his dog, Macaroon.
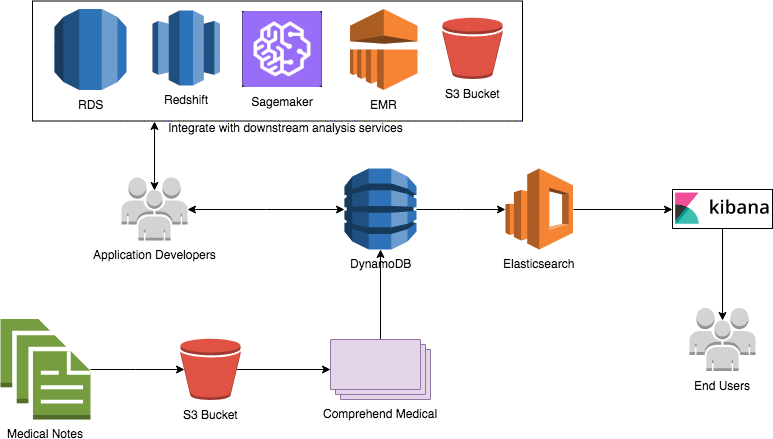


 Ujjwal Is a Principal Machine Learning Specialist Solution Architect in the Global Healthcare and Lifesciences team at Amazon Web Services. He works on the application of machine learning and deep learning to real world industry problems like medical imaging, unstructured clinical text, genomics, precision medicine, clinical trials and quality of care improvement. He has expertise in scaling machine learning/deep learning algorithms on the AWS cloud for accelerated training and inference. In his free time, he enjoys listening to (and playing) music and taking unplanned road trips with his family.


 Hans-Christian Pahlig is Head of IT at simpleshow. He leads the development and the IT infrastructure teams. He is an internationally experienced IT expert in the media industry. As a math graduate, Hans-Christian comes from the school of thought where neural networks were conceived. If not on the job, he is inspired by the art and zen of landscape photography.


 John Calhoun is a machine learning specialist for AWS Public Sector. He works with our customers and partners to provide leadership on machine learning, helping them shorten their time to value when using AWS.