Author: torontoai
Injecting AI into Healthcare: Medical Innovators Harness NVIDIA Tools for AI-Powered Future
More than 1,500 healthcare experts will converge next week in Boston for the World Medical Innovation Forum to discuss the impact of AI in clinical care, and hear talks by top names in biotech and pharma, U.S. cabinet secretaries and federal agency leaders — and NVIDIA founder and CEO Jensen Huang.
Huang will have a fireside chat with Keith Dreyer, vice chairman of radiology at Massachusetts General Hospital. They’ll be introduced by Cathy Minehan, chairman of the hospital’s board of trustees.
At last year’s event, Huang spoke about the potential of AI to change healthcare, calling data the vital “source code” for companies in the future. This time, he’ll share the latest results of NVIDIA’s innovation in healthcare with partners like Massachusetts General Hospital.
Worldwide, NVIDIA GPUs are powering AI applications to discover potential drug molecules, improve the consistency of mammogram assessments, and detect rare congenital heart defects. And this is just the start.
Across the healthcare industry, AI researchers and innovators rely on NVIDIA’s deep learning and accelerated computing for medicine.
Leading minds in medicine gathered for our GPU Technology Conference in San Jose last month, including attendees from five of the top seven radiology departments in the United States and four of the top five academic medical centers in the country.
Eric Topol, founder and director of the Scripps Research Translational Institute, spoke to a packed audience on the potential for deep learning to help healthcare institutions provide better, faster and cheaper care. NVIDIA and Scripps established in 2018 a center of excellence for AI in genomics and digital sensors.
Through more than 40 healthcare sessions and several booth exhibits, panels and lightning talks, the conference highlighted how AI and GPUs are used in every pillar of healthcare, from medical imaging and genomics to drug discovery and patient care.
And NVIDIA showcased Clara AI, a software toolkit built for radiologists. Containing more than a dozen state-of-the-art classification and segmentation models, Clara AI provides experts with time-saving AI-assisted annotation tools and transfer learning capabilities.
Radiologists, data scientists and developers can now gain access to two software development kits — the Clara Train SDK and Clara Deploy SDK, enabling AI-assisted workflows for medical imaging.
Attendees of WMIF can learn more about the Clara AI toolkit in a demo at the MGH & BWH Center for Clinical Data Science booth.
The post Injecting AI into Healthcare: Medical Innovators Harness NVIDIA Tools for AI-Powered Future appeared first on The Official NVIDIA Blog.
AWS DeepRacer League hits the road for more fun and excitement for developers!
From developer to machine learning developer
The AWS DeepRacer League is the world’s first autonomous racing league open to developers of all skill levels and it kicked off last week in Santa Clara, California. Chris Miller was crowned our first champion of the 2019 season. Chris is the founder of Cloud Brigade, based in Santa Cruz, California, and he came to the AWS Summit specifically to learn more about machine learning.
At AWS, we are committed to putting machine learning in the hands of all developers of all skill levels, making their experiences with machine learning fun and easy. At Santa Clara, our top three finishers all built a model in one of the onsite workshops and had a lot of fun doing it.
Chris Miller achieved a winning lap time of 10.43 seconds, and will now be advancing the finals at re:Invent 2019 where he will race to win the AWS DeepRacer Championship Cup. Before he arrived at the AWS Summit, he had no experience with machine learning.
Chris says, “When I got here today, I had no experience with machine learning, but that’s exactly what I came here to learn and what a great way to learn machine learning.”
Rahul Shah from Fremont, California came in second place. He was pleasantly surprised by how successful his model was and had a lot of fun with AWS DeepRacer. Rahul has been working with machine learning for the past few years, but this was his first time working with reinforcement learning.
“Working on this was easy, and any developer would be able to have success. The DeepRacer event is a really fun and exciting thing to do at the AWS Summit,” Rahul said.
The third-place finisher was Adrian Sarno from San Mateo, California. Adrian is a data scientist and has been actively involved with machine learning for most of his career. Attending the workshop and participating in the league was his first experience with reinforcement learning and he was curious to learn this advanced ML technique. Adrian’s first attempt at building his model was not as successful as he wanted it to be. When he realized what was at stake, he took to his keyboard and retrained his model for 2 hours. Then he returned with a model that scored him a podium finish.
Adrian says, “It’s straightforward to work with the applications that have been put together.”
All of our participants are excited to experiment more and use the coming months to get more advanced models ready to compete at re:Invent 2019. There, they can use their new found skills to help them win the AWS DeepRacer Championship Cup.
Heading to Paris to reach developers globally
And it doesn’t end there. The AWS DeepRacer League made its first international stop at the AWS Summit in Paris, France yesterday. Paris is fast becoming a hub for learning and research on artificial intelligence. The French government has plans to invest in Paris to help enable the AI ecosystem in France and the rest of Europe. Such an investment can encourage a large community of developers to learn with easy access to the tools they need to become machine learning developers just like Chris, Rahul, and Adrian.
Today, at the AWS Summit in Paris, the AWS DeepRacer League welcomed more developers to learn, build, and train models to compete. The podium was filled with developers who came to the Summit to participate in the league and each of them had spent time on their models at home before arriving. Positions changed throughout the afternoon as they learned more. In a tense final 60 minutes of racing, Arthur Pace from Paris, took home the Paris Summit Champion cup with a lap time of 13.87 seconds. Second place went to “JO” (Wajdi Fathallah), who attended a DeepRacer meet up before the AWS Summit and secured a 15.5 second lap. The third place finisher was Matthieu Rousseau (16.00 seconds). Matthieu worked on his model with fellow engineering student (and Paris Champion) Arthur Pace for the last 2 weeks in order to land on the podium!
Félicitations aux gagnants de l’#AWSDeepRacer de l’#AWSSummit Paris !
@jorjarthur
@WajdiFathallah
@rousseau_matt
pic.twitter.com/PETPJnMwRC
— AWSonAir (@AWSonAir) April 2, 2019


The 2019 developer journey continues
On April 10, the AWS DeepRacer League will be at the AWS Summit in Singapore. The Summit there offers an opportunity to get hands-on with AWS DeepRacer. There will be multiple workshops and hours of live racing. You can follow the action live on at www.deepracerleague.com. Coming soon is the AWS DeepRacer Virtual League. Get ready today by taking the digital training course for reinforcement learning and AWS DeepRacer.
Developers, start your engines! Your journey to becoming a machine learning developer begins with the AWS DeepRacer League.
About the Author
 Alexandra Bush is a Senior Product Marketing Manager for AWS AI. She is passionate about how technology impacts the world around us and enjoys being able to help make it accessible to all. Out of the office she loves to run, travel and stay active in the outdoors with family and friends.
Create high-quality instructions for Amazon SageMaker Ground Truth labeling jobs
Amazon SageMaker Ground Truth helps you quickly build highly accurate training datasets for machine learning (ML). You can use your own workers, a choice of vendor-managed workforces that specialize in data labeling, or a public workforce powered by Amazon Mechanical Turk to provide the human-generated labels. To get high-quality labels, you must provide simple, concise, and clear instructions, especially when using a public workforce. Writing good instructions is the single most important action you can take to improve annotation quality. It’s worth investing the time to do it right.
This blog post shares best practices for creating highly effective instructions for a public workforce. There are two key points: reduce the cognitive load for the workers as much as possible, and experiment early in the process to fine-tune your instructions and save yourself trouble later on. You can experiment by labeling some of your data yourself and by submitting small jobs to the public workforce throughout the process.
The following screenshot shows an example of a Ground Truth bounding box labeling task with good instructions from the worker’s perspective. In this example task, we ask workers to draw boxes around flowers in images taken from the Google Open Images Dataset. The left side of image shows the short instructions that are constantly visible in a sidebar while the worker is annotating. They are clear, to the point, specialized to the task, and focused on example images.

The following figure shows an example of the full instructions that a worker can see by choosing View full instructions in the sidebar. They clarify ambiguities that could confuse the worker. By the end of this post, you’ll be able to create high-quality instructions for your own labeling job.

Our recommended workflow
The quickest way to create good instructions is use the tools provided by Ground Truth to annotate some of your own data. You can then use the results as examples in your instructions. To do this, you should take the following steps:
- Select a small number of examples from your data.
- Run a private job on Ground Truth to label your chosen examples.
- Create the short instructions using your results. Focus on example images and small amounts of text.
- Create the full instructions to clarify ambiguities in the task.
- Run a small public job to test the instructions. Iterate on the results until you are satisfied.
- Consider simplifying your task, and set a reasonable price.
Note: Running the private labeling jobs will cost $0.08 per example. For pricing details, see the Amazon SageMaker Ground Truth pricing page.
After you have produced high-quality instructions, you can send your full labeling job out to the public workforce. Let’s go over each step in the checklist.
Select a small number of examples from your data
Browse your dataset and select examples that capture the variety in your data. Choosing examples from the items you want to label (as opposed to generic examples) ensures the instructions will help annotators understand your specific task.

Here, we select images with different numbers of flowers of various shapes and sizes. The flowers in some of these images are hidden behind others or touch the edge of the frame. Choosing a variety of cases makes it easier to find good examples for creating the instructions. It also gives you insight into the difficulty of the task from the worker’s point of view.
Run a private job on Ground Truth to label your chosen examples
A previous blog post described how to run a labeling job using the AWS Management Console. You should follow the method described there to label the examples you chose from the previous section. You need to add the images you have selected to a manifest file, create a private work team with your own email address, and select one annotator per example. There’s no reason for you to label the same example multiple times.
Running this private job gives you perspective on what you want to accomplish with your labeling job, the difficulty of the task, and the tools the annotators will be using. Make a record of the examples that were difficult or ambiguous as you work. You will need these later to write the full instructions. In addition, you should consider timing yourself to gauge how much to pay the workers for your task.

The left figure shows a preview of the bounding box tool at work. Notice that the instructions on the left side of the image have not yet been created. The right figure demonstrates the results from the private labeling job.
Create the short instructions using your results
After you finish the private labeling job, you can find the results in the Amazon SageMaker console by going to Labeling jobs and selecting the name you gave the job. The annotated examples are at the bottom of the page. For image labeling tasks, the simplest way to extract the results is to zoom in on these annotated images and take screenshots.
Ideally, narrow your results to one or two exemplary “good” instances, then create one or two images with various bad annotations illustrating what you expect to be the most common sources of failure. You can do this by re-running the private labeling job and skipping all the other examples. Alternatively, you can combine examples of good and bad annotations in a single example image to help the workers quickly understand the task. One particularly inventive strategy is to use an animated GIF that alternates between good and bad examples. For the flower labeling instructions, we use the following images for the good and bad examples, respectively:

After you have selected the example instances and extracted the results, use your favorite image editing software (such as Google Drawings, GIMP, Keynote, or PowerPoint) to put the finishing touches on the figures for your instructions. For example, you might consider placing Xs over images representing incorrect annotations.
Upload your images to an Amazon S3 bucket
Upload the images to an Amazon S3 bucket and set the object permissions so that the images are publicly available. If your S3 bucket has the default permissions, you’ll have to first change the public access settings for the bucket to allow the images to be publicly available. We strongly recommend against making the entire bucket publicly accessible. To make it possible for the images to be public, go to the Amazon S3 console, select your bucket, and choose the Permissions tab. You should see something similar to the following image:

Choose Edit, then uncheck the first two boxes. Choose Save.

A confirmation dialog box appears. Type “confirm” in the appropriate field and choose Confirm to update the public access settings.

To finish uploading the image, return to your S3 bucket overview by choosing Overview. Then choose Upload, drag and drop the file into the dialog box, and then choose Upload in the dialog box. Finally, select the image name from the S3 bucket overview and choose Make public to make the image publically accessible from the internet.

If your bucket permissions have been set correctly, a message saying Success appears.

Finally, we recommend returning to the bucket permissons tab and re-checking the first box, Block new public ACLs and uploading public objects. This prevents you from accidentally making a different object public in the future.
Use the instruction-making tool to finish creating the instructions
Finally, go to the instruction-making tool in the job creation section of the Amazon SageMaker console, create your instructions, and link to the images you gathered in your S3 bucket. You can place your images in the short instructions by choosing the image icon in the instructions tool and entering the object URL, which you can find in the S3 bucket overview by selecting the image name.

After you have added the image, you’ll see a thumbnail in the instruction-making tool.

If you instead see a broken image link icon like the one on the right in the preceding figure, double-check that you have correctly set the bucket and object permissions by following the steps in the previous section.

Many workers will only read the short instructions, so make them count. Focus on your example images, with a small amount of explanatory text in simple English. Use short sentences. Remember, the annotators are not always fluent in English, and ambiguous instructions lead to ambiguous results. Your goal is to be as explicit as possible while keeping things simple.
Create the full instructions to clarify ambiguities in the task
After you have finished writing the short instructions, choose Additional instructions in the instruction-making tool to begin working on the full instructions. Here are some points to keep in mind:
- The full instructions should clarify ambiguities in your task. Often, annotators will only consult these if they are confused. Use your experience from the private job to anticipate sources of confusion.
- Try not to repeat the short instructions.
- Catching every edge case at the expense of having pages and pages of instructions is usually a mistake. In our experience, two or three additional good/bad example pairs should suffice, and further instructions yield diminishing returns.
The following figure shows the final instructions for the flower example.

Run a small public labeling job to test the instructions
After you complete the first draft of the instructions, you can create and submit a small public labeling job. Inspect the results, and look for common mistakes that aren’t addressed in the current version of the instructions. Workers often make mistakes that are different from the ones that you anticipate. It’s better to catch these early in the process than to run a large and expensive labeling job twice. You can continue to repeat this process until the results are satisfactory.
Consider simplifying your task and set a reasonable price
If your instructions are still too long, too complex, or are missing difficult examples from your data, think about how to split your task into several simpler ones. You might have noticed this image in our selection of examples:

Asking workers to label images like this for the same price as the other examples is a recipe for failure. In this case, you might first perform an image classification job to estimate the number of flowers in each image. Then, you can go back and subdivide the images with many flowers so no single image is too challenging.
As another example, consider a job that asks workers to label flowers, people, and dogs in each image. In this case you might get better results by launching three jobs, each focused on a single category. You can run these jobs in parallel or one after another and then combine the results.
As the final step in the process of creating the instructions, use your newly gained experience labeling the examples yourself to set a reasonable price for your tasks. The job creation section of the Amazon SageMaker console allows you to choose a payment for each labeled example using a drop-down menu:

You can use your records of the amount of time it took to complete the labeling jobs for the instructions together with the suggestions in the menu to select an appropriate reward.
Conclusion
Instructions specific to your data will always be superior to generic ones. Creating them might be time-consuming, but the workers will appreciate your effort. They want to complete your task as quickly as possible, and making their lives easier will improve your results.
Here are some resources if you would like to learn more about Ground Truth and making instructions for a public workforce:
- Amazon SageMaker Ground Truth – Build Highly Accurate Datasets and Reduce Labeling Costs by up to 70%
- Annotate data for less with Amazon SageMaker Ground Truth and automated data labeling
- Confusing the Crowd: Task Instruction Quality on Amazon Mechanical Turk
- Amazon Mechanical Turk Requester’s Best Practices Guide
- Mechanical Turk 101: How to use MTurk for tagging training data
- AWS Developer Forums: Amazon SageMaker
Disclosure regarding the Open Images Dataset V4
Open Images Dataset V4 is created by Google Inc. In some cases we have modified the images or the accompanying annotations. You can obtain the original images and annotations here. The annotations are licensed by Google Inc. under CC BY 4.0 license. The images are listed as having a CC BY 2.0 license. The following paper describes Open Images V4 in depth: from the data collection and annotation to detailed statistics about the data and evaluation of models trained on it.
A. Kuznetsova, H. Rom, N. Alldrin, J. Uijlings, I. Krasin, J. Pont-Tuset, S. Kamali, S. Popov, M. Malloci, T. Duerig, and V. Ferrari. The Open Images Dataset V4: Unified image classification, object detection, and visual relationship detection at scale. arXiv:1811.00982, 2018. (link to PDF)
About the Authors
 Tristan McKinney is an applied scientist in the Amazon ML Solutions Lab. He recently completed his PhD in theoretical physics at Caltech where he studied effective field theory and its application to high-T_c superconductors. As his father was in the US Army, he lived all over the place when growing up, including Germany and Albania. In his spare time, Tristan loves to ski and play soccer.
 Krzysztof Chalupka is an applied scientist in the Amazon ML Solutions Lab. He has a PhD in causal inference and computer vision from Caltech. At Amazon, he figures out ways in which computer vision and deep learning can augment human intelligence. His free time is filled with family. He also loves forests, woodworking, and books (trees in all forms).
 Fedor Zhdanov is a Machine Learning Scientist at Amazon. He works on developing Machine Learning algorithms and tools for our internal and external customers.
Senior Product Designer – Looka (formerly Logojoy) – Toronto, ON
From Looka (formerly Logojoy) – Tue, 02 Apr 2019 17:16:11 GMT – View all Toronto, ON jobs
Using Deep Learning to Improve Usability on Mobile Devices
Tapping is the most commonly used gesture on mobile interfaces, and is used to trigger all kinds of actions ranging from launching an app to entering text. While the style of clickable elements (e.g., buttons) in traditional desktop graphical user interfaces is often conventionally defined, on mobile interfaces it can still be difficult for people to distinguish tappable versus non-tappable elements due to the diversity of styles. This confusion can lead to false affordances (e.g., a feature that could be mistaken for a button) and a lack of discoverability that can lead to user frustration, uncertainty, and errors. To avoid this, interface designers can conduct a study or a visual affordance test to help clarify the tappability of items in their interfaces. However, such studies are time-consuming and their findings are often limited to a specific app or interface design.
In our CHI’19 paper, “Modeling Mobile Interface Tappability Using Crowdsourcing and Deep Learning“, we introduced an approach for modeling the usability of mobile interfaces at scale. We crowdsourced a task to study UI elements across a range of mobile apps to measure the perceived tappability by a user. Our model predictions were consistent with the user group at the ~90% level, demonstrating that a machine learning model can be effectively used to estimate the perceived tappability of interface elements in their design without the need for expensive and time consuming user testing.

Predicting Tappability with Deep Learning
Designers often use visual properties such as the color or depth of an element to signify its availability for interaction on interfaces, e.g., the blue color and underline of a link. While these common signifiers are useful, it is not always clear when to apply them in each specific design setting. Furthermore, with design trends evolving, traditional signifiers are constantly being altered and challenged, potentially causing user uncertainty and mistakes.
To understand how users perceive this changing landscape, we analyzed the potential signifiers affecting tappability in real mobile apps—element type (e.g., check boxes, text boxes, etc.), location, size, color, and words. We started by crowdsourcing volunteers to label the perceived clickability of ~20,000 unique interface elements from ~3,500 apps. With the exception of text boxes, type signifiers yielded low uncertainty in user perceived tappability. The location signifier refers to the position of a feature on the screen and is informed by the common layout design in mobile apps, as demonstrated in the figure below.
 |
| Heatmaps displaying the accuracy of tappable and non-tappable elements by location, where warmer colors represent areas of higher accuracy. Users labeled non-tappable elements more accurately towards the upper center of the interface, and tappable elements towards the bottom center of the interface. |
The impact of element size was relatively weak, but did indicate confusion in the case of large non-tappable elements. Users showed a tendency to bright colors and short word counts for tappable elements, though word semantics also played a significant role.
We used these labels to train a simple deep neural network that predicts the likelihood that a user will perceive an interface element as tappable versus non-tappable. For a given element of the interface, the model uses a range of features, including the spatial context of the element on the screen (location), the semantics and functionality of the element (words and type), and the visual appearance (size as well as raw pixels). The neural network model applies a convolutional neural network (CNN) to extract features from raw pixels, and uses learned semantic embeddings to represent text content and element properties. The concatenation of all these features are then fed to a fully-connected network layer, the output of which produces a binary classification of an element’s tappability.
Evaluation of the Model
The model allowed us to automatically diagnose mismatches between the tappability of each interface element as perceived by a user—predicted by our model—and the intended or actual tappable state of the element specified by the developer or designer. In the example below, our model predicts that there is a 73% chance that a user would think the labels such as “Followers” or “Following” are tappable, while these interface elements are in fact not programmed to be tappable.

To understand how our model behaves compared to human users, particularly when there is ambiguity in human perception, we generated a second, independent dataset by crowdsourcing an effort among 290 volunteers to label each of 2,000 unique interface elements with respect to their perceived tappability. Each element was labeled independently by five different users. We found that more than 40% of the elements in our sample were labeled inconsistently by volunteers. Our model matches this uncertainty in human perception quite well, as demonstrated in the figure below.
 |
| The scatterplot of the tappability probability predicted by the model (the Y axis) versus the consistency in the human user labels (the X axis) for each element in the consistency dataset. |
When users agree an element’s tappability, our model tends to give a more definite answer—a probability close to 1 for tappable and close to 0 for not tappable. When workers are less consistent on an element (towards the middle of the X axis), our model is also less certain about the decision. Overall, our model achieved reasonable accuracy of matching human perception in identifying tappable UI elements with a mean precision of 90.2% and recall of 87.0%.
Predicting tappability is merely one example of what we can do with machine learning to solve usability issues in user interfaces. There are many other challenges in interaction design and user experience research where deep learning models can offer a vehicle to distill large, diverse user experience datasets and advance scientific understandings about interaction behaviors.
Acknowledgements
This research was a joint work of Amanda Swangson, summer intern at Google, and Yang Li, a Research Scientist in Deep Learning and Human Computer Interaction.


Le premier colloque de recherche et salon de l’emploi de l’Institut Vecteur réunit à Toronto des chercheurs et des professionnels d’un océan à l’autre
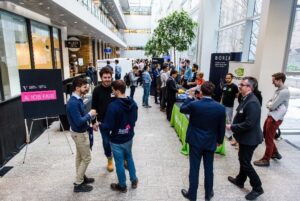

Le vendredi 22 février 2019, l’Institut Vecteur organisait son tout premier colloque de recherche et salon de l’emploi, l’un des plus grands rassemblements d’experts du domaine de l’intelligence artificielle au Canada. Cette journée a donné l’occasion aux chercheurs de Vecteur de présenter leurs meilleurs projets de recherche menés au cours de la dernière année. L’événement offrait en outre aux étudiants à la maîtrise, aux doctorants et aux stagiaires postdoctoraux dans les domaines de l’apprentissage automatique et de l’intelligence artificielle la chance de rencontrer les partenaires de Vecteur dans les secteurs de la technologie et de la santé, et de découvrir un large éventail de possibilités de stages et de carrières. Des représentants de 20 commanditaires et partenaires de Vecteur et plus de 300 participants s’étaient donné rendez-vous pour l’événement.
Lors du colloque, David Duvenaud, professeur à l’Institut Vecteur, a présenté son travail sur les équations différentielles ordinaires neurales, qui lui a valu le Prix de la meilleure communication lors de NeurIPS 2018, l’un des congrès phares consacrés à l’apprentissage automatique dans le monde. Hassan Ashtiani, ancien stagiaire postdoctoral au sein de Vecteur, a quant à lui présenté son travail visant à réduire la complexité de l’échantillonnage des modèles de mélanges gaussiens à l’aide de schémas de compression.
L’événement en chiffres :
- Plus de 300 participants, dont des étudiants à la maîtrise, des doctorants, des stagiaires postdoctoraux, des enseignants et des professionnels de l’industrie
- 100 étudiants inscrits à des programmes reconnus par Vecteur et 31 titulaires d’une bourse Vecteur en IA
- 56 affiches de recherche
- 20 commanditaires et partenaires de Vecteur issus des secteurs des technologies et de la santé, en quête de talents locaux dans le domaine de l’IA
Les participants étaient issus de la communauté étudiante et du corps professoral d’établissements canadiens et étrangers, dont les suivants :
- Université Carleton
- Institut de recherche Krembil
- Institut des politiques, de la gestion et de l’évaluation de la santé de l’Université Harvard
- Université McGill
- Université McMaster
- Mila
- Université Munzur
- Institut ontarien de recherche sur le cancer
- Smith School of Business de l’Université Queen
- Université Ryerson
- SickKids
- Université Simon Fraser
- Université de technologie de Chine méridionale
- Hôpital St. Michael’s
- Centre Sunnybrook des sciences de la santé
- Institut de réadaptation de Toronto
- Université de Montréal
- Universidad del Norte
- Réseau universitaire de santé
- Université de la Colombie-Britannique
- Université du New Hampshire
- Institut universitaire de technologie de l’Ontario
- Université d’Ottawa
- Université de Sao Paulo
- Université de Toronto
- Université de Waterloo
- UPC Barcelona
- Université Western (UWO)
- Schulich School of Business de l’Université York
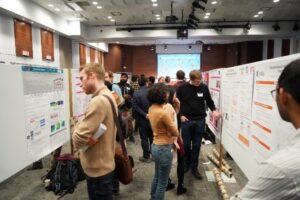
Outre les communications, 56 affiches de recherche présentaient le travail publié par des chercheurs de Vecteur et des membres de la communauté de l’IA en 2018. Bon nombre d’affiches illustraient des recherches relayées par des congrès et des revues de renommée mondiale et portant sur des sujets comme le classement des types de cancer, l’identification des animaux ou la trajectographie haute précision.
Au cours de la journée, les étudiants ont également pu rencontrer des représentants d’entreprises et de jeunes pousses établies au Canada, qui cherchaient à recruter des talents locaux en apprentissage automatique et en IA. Il s’agissait d’une occasion en or pour les commanditaires sectoriels de Vecteur, qui proposent des perspectives de carrière dans une foule de domaines allant de la science des données à l’analytique, en passant par l’ingénierie et la gestion de projet.
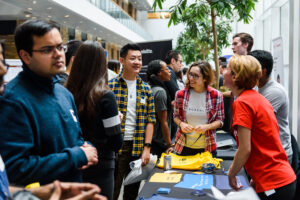
De nombreux commanditaires et partenaires de Vecteur issus des secteurs des technologies et de la santé étaient présents, dont :
- Accenture
- Air Canada
- Baycrest
- Borealis AI
- BMO Groupe financier
- CIBC
- Deloitte
- EY
- Intact Assurance
- Layer 6 AI
- Les Compagnies Loblaw limitée
- Manuvie
- NVIDIA
- ROSS Intelligence
- Banque Scotia
- Shopify Inc
- Stradigi AI
- Financière Sun Life
- Groupe Thales
- Thomson Reuters
Pour clôturer la journée, Craig Boutilier (Prix de la meilleure communication NeurIPS 2018, Google), Sheila McIlraith (Université de Toronto et professeure associée à l’Institut Vecteur), Brendan Frey (cofondateur de Vecteur, Deep Genomics) et Jamie Kiros (Google Brain) se sont prêtés à une vive discussion de groupe animée par le directeur de recherche de Vecteur, Richard Zemel.
Ces experts ont abordé les principaux obstacles auxquels se heurte l’apprentissage automatique et ont tenté de déterminer d’où viendront les prochaines grandes percées, évoquant les approches hybrides en matière de recherche sur l’apprentissage profond, l’interprétabilité et l’IA éthique.
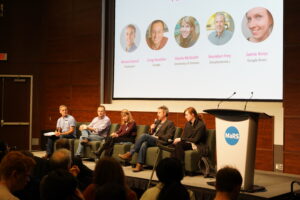
Faits saillants de la discussion
Principaux obstacles de l’apprentissage automatique
Le thème principal de la discussion était le retard de l’éthique sur les plus récentes avancées technologiques. Pour expliquer ce retard, les participants ont évoqué le fait que les travaux en apprentissage automatique sont cloisonnés par rapport aux autres domaines d’étude impliquant l’IA, ce qui pose de nombreux obstacles à la recherche. Les interactions modélisées étant peu intelligentes, les chercheurs ont encore du mal à comprendre comment ils peuvent en arriver à des interactions naturelles.
Approches de recherche hybrides sur l’apprentissage automatique (p. ex., modèles probabilistes et IA logique)
D’après les panélistes, bon nombre de techniques d’apprentissage automatique tirent parti d’approches hybrides fondées notamment sur les réseaux neuronaux. Les participants déplorent en outre le fait que certaines questions sont souvent négligées par la communauté scientifique, comme le recours aux algorithmes dans la prise de décisions influant sur le monde réel ou les avancées révolutionnaires en traduction automatique.
Interprétabilité
Les experts ont discuté de la transparence et du contrôle, qui expliquent à leurs yeux le besoin d’interprétabilité, mais aussi de la manière dont nous, humains, rationalisons généralement nos décisions après coup. Ils se sont interrogés sur la capacité d’un chercheur à comprendre précisément le fonctionnement d’un modèle. L’un des participants a en outre indiqué qu’un chercheur doit être en mesure d’expliquer les décisions prises au nom de l’utilisateur lors de la création d’un modèle. Vers la fin de la discussion, les participants ont rappelé la nécessité, pour les chercheurs, de tenir compte de l’utilisateur final dans leurs réflexions sur l’interprétabilité, car celle-ci peut varier selon le contexte.
IA éthique
Les experts ont fait valoir l’importance, pour les chercheurs, d’avoir des convictions solides susceptibles de les guider dans la conception d’algorithmes.
Ils ont également observé que les considérations éthiques ne se limitent pas à l’IA et qu’elles constituent un enjeu majeur dans d’autres domaines, dont l’informatique au sens large. À cet égard, les participants ont insisté sur la responsabilité des chercheurs, qui doivent former les étudiants et bâtir un avenir meilleur pour l’humanité. Ils ont ensuite soutenu que, devant le choix difficile des recherches à mener et les questions liées aux applications négatives d’un modèle, la frontière entre curiosité et danger reste très floue.
Concluant sur une note encourageante, les participants se sont réjouis des outils plus performants que jamais dont ils disposent pour s’attaquer aux défis évoqués au cours de la discussion. En réponse à la question d’un membre du public, l’un d’eux a rappelé que si les chercheurs doivent assumer le rôle de conseillers dans les discussions entourant les politiques publiques, la communauté scientifique ne doit pas être la seule à surveiller l’utilisation de modèles dans la prise de décisions.
Customer Facing Data Scientist – DataRobot – Toronto, ON
From DataRobot – Mon, 01 Apr 2019 14:45:40 GMT – View all Toronto, ON jobs
Build a serverless anomaly detection tool using Java and the Amazon SageMaker Random Cut Forest algorithm
One of the problems that business owners commonly face is detecting when something unusual is happening in their business. Detecting unusual user activity or changes in daily traffic patterns are just some of the challenges. With an ever-increasing amount of data and metrics, detecting anomalies with the help of machine learning is a great way to proactively identify problems.
In this blog post we’ll explain how to build a serverless anomaly detection tool using Amazon SageMaker with Java. Amazon SageMaker makes it easy to train and host machine learning models, and the available built-in algorithms solve common business problems. To solve this particular business problem, we’ll use the Random Cut Forest (RCF) anomaly detection algorithm. Amazon Web Services offers a broad set of global cloud-based products to help organizations move faster, lower IT costs, and scale. We’ll demonstrate how these can be used to build a serverless anomaly detection tool. While Python is one of the most popular programming languages for tackling machine learning problems, many users build micro-services and serverless applications using Java and other JVM-based languages. By the end of this blog post you’ll be able to enable machine learning in your Java applications using Amazon SageMaker.
Throughout the blog post we will use Java code snippets to focus on particular aspects of the tool. You can find the code used to build and deploy this solution into your own AWS account here.
Problem overview
In our example, Alice is a Java developer who owns a video streaming platform that runs on top of multiple AWS services and serves thousands of customers. Alice sets up dashboards to track metrics that show how well her platform is performing. One of the most important metrics she looks at is the total number of active users of the platform, as shown in the following diagram.
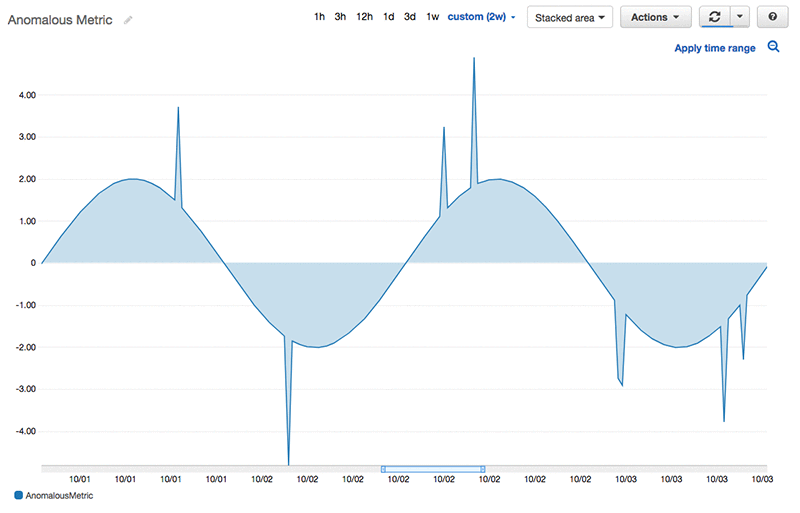
This metric shows a general daily pattern of usage, but it also changes seasonally. A low number of active users, a high number of active users, and breaks of daily pattern are all considered anomalies. Alice is mostly interested in understanding the root cause for those anomalous datapoints. Currently, she doesn’t rely on automated tools for finding anomalies in the data. Instead, she goes through a manual process and spend a lot of time identifying spikes, dips, and breaks in periodicity. Fixed thresholds or threshold windows don’t work for her due to changing patterns and seasonality. She needs a better solution!
What can we do to make Alice’s life easier?
Solution architecture
To help Alice solve her anomaly detection problem we first need to identify all the building blocks for an anomaly detection tool:
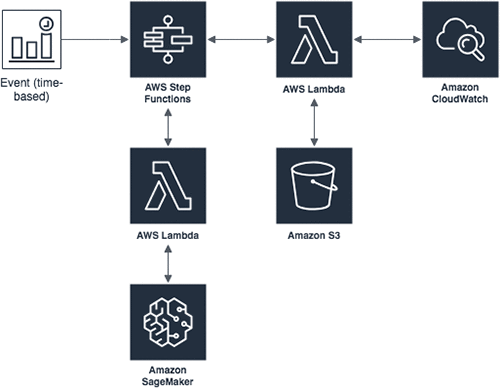
- Amazon SageMaker– We’ll need Amazon SageMaker to easily build a model based on the historical metric data. Then, we’ll use it to find anomalous data points in current data (from the previous week). The Amazon SageMaker Random Cut Forest algorithm learns the trends in your data and after training can identify anomalies. For using your trained model to find anomalies, we can choose between two options: (1) We can host a model on an endpoint and run inference requests against that endpoint using HTTP requests. (2) We can use a batch transform job to bulk transform new metric data. We need to get results once a week, so the batch transform job seems like a better option. Hosting a model and then hitting an endpoint once a week would be a waste of resources.
- Amazon CloudWatch Events – We’ll use Amazon CloudWatch Events to schedule a recurring weekly event that triggers our weekly transformation job. The patterns in the underlying data will change over time, so it’s important to occasionally refresh the model we’re using. We will use another CloudWatch Events rule to run a training job once per month.
- Amazon CloudWatch Metrics– Alice stores all of her metrics in CloudWatch, which we’ll use as our data source. We’ll also publish our anomalous metric scores to CloudWatch from the batch transform job so Alice can easily view when anomalies occur.
- Amazon S3 –Amazon SageMaker uses Amazon S3 as an input data source for training and batch transform jobs. After we retrieve and preprocess CloudWatch data we will store it in S3 for our Amazon SageMaker jobs.
- AWS Step Functions– Getting data from CloudWatch, uploading it to S3, starting the training and batch transform jobs, and publishing the results back to CloudWatch are all steps that we need so that our anomaly detection tool works as expected. Instead of writing a new service to orchestrate this workflow, we’ll use serverless technologies to simplify the process, and we’ll automate the process using AWS Step Functions. We’ll use two state machines, one for training and one for batch inference, which will ensure that all of the described steps are being executed in the correct order and that any failures are handled gracefully.
- AWS Lambda– All the previously described actions will be executed as AWS Lambda functions, which will be triggered by the AWS Step Functions state machine. All of our Lambda functions use Java 8 and the AWS SDK. Note: Some of the Lambda functions could potentially be replaced following recent release of Amazon SageMaker support for Amazon States Language. However, in this blog post we want to focus on the perspective of Java development to provide unified view on the subject.
The following diagram illustrates our architecture:
Training job state machine
The following diagram illustrates the training state machine:

- The first Lambda function (“Store CloudWatch Metric Data in S3”) gets one-month worth of metric data from CloudWatch with a resolution of 5 minutes. The Lambda function creates a CSV file containing the timestamp and a value for each of the 5-minute data points, and uploads the file to the S3 bucket.
- The second Lambda function (“Start SageMaker Training Job”) uses the S3 dataset created in the previous step to start an Amazon SageMaker training job. The creation of the job is executed in asynchronous fashion and the execution of the state machine continues.
- Wait until the Amazon SageMaker training job is finished. If the job failed, we report the job failure and finish the execution. If the job has completed successfully we move to the next state.
- The final Lambda function (“Create SageMaker Model”) creates an Amazon SageMaker model based on model output created in training job.
Transform job state machine
The following diagram illustrates the transform job state machine:
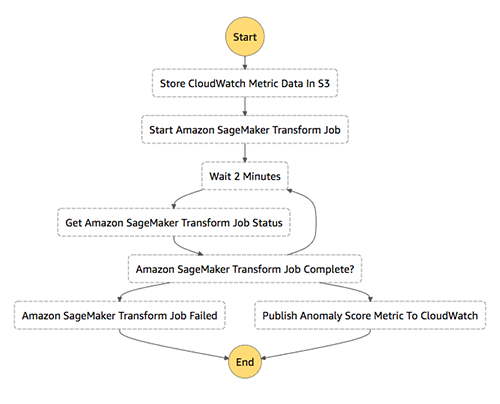
The following steps are executed as part of transform job state machine:
- We reuse same Lambda function as in the training step (“Store CloudWatch Metric Data in S3”), but we configure it to get only one week of data from CloudWatch.
- The second Lambda function (“Start SageMaker Transform Job”) finds the models we have trained (created by training state machine), picks the latest one, and asynchronously starts the Amazon SageMaker batch transform job.
- Wait until the batch transform job finishes successfully.
- The final Lambda function (“Publish Anomaly Score Metric to CloudWatch”) gets output scores from the batch transform job. It uses a simple, standard technique for classifying anomalies in which all anomaly scores outside three standard deviations from the mean score are considered anomalous. Finally, all the data points that have been labeled as anomalous are published to CloudWatch with a value of 1, and all the data points that haven’t been marked as anomalous are published with a value of 0. To know for which timestamp to publish the anomalous score metric, we use the input dataset.
After both state machines have run, a new metric is available in the Amazon CloudWatch console. We can graph this new metric over the original metric to understand when anomalies happen. Now Alice can use the new metric to zoom in on specific points of interest in her original metric, and navigate to the Amazon CloudWatch Logs console for those data points.
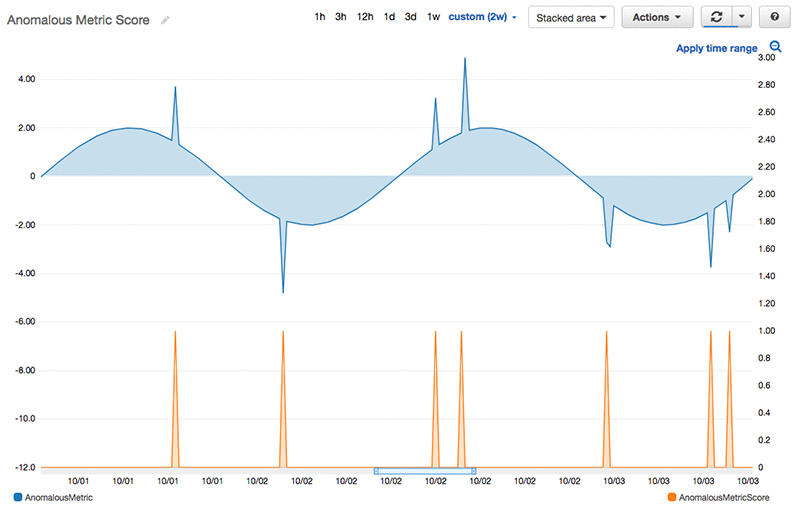
Since Alice is storing anomalies in CloudWatch, she can use all of the rich alerting and monitoring functionality that is available so she can be notified automatically when something strange happens. Similarly, because she is using Amazon SageMaker s she can take the model and use it for online inference in the future if she wants to (for example, she can evaluate anomalies in near real time by making HTTP calls to a hosted endpoint).
Conclusion
In this blog post we showed you how to build an automated anomaly detection tool using Amazon SageMaker. We explained what services help us remove the undifferentiated heavy lifting to build the tool and how they all fit together to form a meaningful workflow. We also showcased one of the latest Amazon SageMaker releases, batch transform jobs, which is ideal for use cases that don’t require hosting a model for near real-time inference. All the Lambda functions were written using Java 8. It is our hope that this blog post, in combination with code examples, will help Java developers integrate Amazon SageMaker into their services and applications.
About the authors
 Luka Krajcar is a Software Development Engineer on the AWS AI Labs team. He received his M.S. in Computer Science at the Faculty of Electrical Engineering and Computing at the University of Zagreb. Outside of work, Luka enjoys reading fiction, running, and video gaming.
 Julio Delgado Mangas is a Software Development Engineer on the AWS AI Labs team. He has contributed to AWS services like Amazon CloudWatch and the Amazon QuickSight SPICE engine. Before joining Amazon, he was a research engineer on the Human Brain Project.
 Laurence Rouesnel is the Algorithms & Platforms Group Manager in Amazon AI Labs. He leads a team of engineers and scientists working on deep learning and machine learning research and products. In his spare time, he is an avid traveler, and loves the outdoors whether it’s hiking, skiing, or windsurfing.
 Chris Swierczewski is an Applied Scientist on the AWS AI Labs team, where he has contributed to the Amazon SageMaker Latent Dirichlet Allocation and the Amazon SageMaker Random Cut Forest algorithms. Before Amazon, Chris was a Ph.D. student in Applied Mathematics at the University of Washington. He likes to go hiking, backpacking, and camping with his wife and their dog, River.
 Madhav Jha is an Applied Scientist on the AWS AI Labs team where he uses his background in sublinear algorithms to develop scalable machine learning algorithms. He is a theoretical computer scientist who enjoys coding. He is always up for coffee conversations on startups and technology.