You’ve collected your datasets, designed your deep neural network architecture, and coded your training routines. You are now ready to run training on a large dataset for multiple epochs on a powerful GPU instance. You learn that the Amazon EC2 P3 instances with NVIDIA Tesla V100 GPUs are ideal for compute-intensive deep learning training jobs, but you have a tight budget and want to lower your cost-to-train.
Spot-instance pricing makes high-performance GPUs much more affordable for deep learning researchers and developers who run training jobs that span several hours or days. Spot instances allow you to access spare Amazon EC2 compute capacity at a steep discount compared to on-demand rates. For an up-to-date list of prices by instance and Region, visit the Spot Instance Advisor. To learn more about the key differences between spot instances and on-demand instances, I recommend going through this Amazon EC2 user-guide.
Spot instances are great for deep learning workflows, but there are a few challenges associated using spot instances versus on-demand instances. First, spot instances can be preempted and can be terminated with just 2 minutes notice. This means you can’t count on your instance to run a training job to completion. Therefore, it’s not recommended for time-sensitive workloads. Second, instance termination can cause data loss if the training progress is not saved properly. Third, if you decide your application should not be interrupted after launching the spot instance, your only option is to stop the spot instance and re-launch as an on-demand or reserved instance.
To address these challenges, here is a step-by-step tutorial on how to set up spot instances for deep learning training workflows while minimizing training progress loss if a spot interruption occurs. My goal is to implement a setup with the following characteristics:
- Decouple compute, storage and code artifacts, and keep the compute instance stateless. This enables easy recovery and training state restore when an instance is terminated and replaced
- Use a dedicated volume for datasets, training progress (checkpoints) and logs. This volume should be persistent and not be affected by instance termination
- Use a version control system (e.g. Git) for training code. This repo should be cloned to commence/resume training. this enables traceability and prevents loss of code changes when instance is terminated
- Minimize code changes to the training script. This ensures that the training script can be developed independently and backup and snapshot operations are performed outside of the training code
- Automate, automate, automate. Automate replacement instance creation after termination, attaching of dataset and checkpoints EBS volume at launch, moving volumes across Availability Zones, performing instance state restore, resuming training, and terminating instance once training is finished
Deep learning with Spot Instances using TensorFlow and the AWS Deep Learning AMI
In this example, I use spot instances and the AWS Deep Learning AMI to train a ResNet50 model on the CIFAR10 dataset. I use TensorFlow 1.12 configured with CUDA 9 available on the AWS Deep Learning AMI version 21. AWS Deep Learning AMIs are updated frequently, check the AWS Marketplace first to make sure you’re using the latest version compatible with your training code. For TensorFlow 1.13 and CUDA 10 use this AWS Deep Learning AMI instead.
I show you how to set up a spot fleet request for deep learning training jobs, which and you use as a starting point for your specific dataset and models.
To follow along, I assume you’ve met the following pre-requisites:
- You have an AWS account, and AWS CLI tool installed on your host
- You are familiar with Python and at least one deep learning framework
As you go through the implementation details, you learn everything else required. All the code, configuration files and AWS CLI commands are available on GitHub.
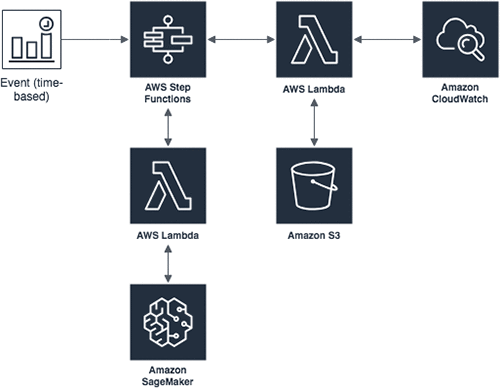
I use the following AWS and open-source services and concepts. Figure 1 shows how all of these fit together in our example.
- AWS CLI: I use the CLI to interact with AWS services. Everything you can do with the CLI can also be done through the AWS console. The CLI will let you automate, which is one of my goals for this example.
- Amazon EC2 spot instance and spot instance requests: Spot requests ensure that the specified number of spot instances are running. Spot fleet places spot requests to meet the target capacity and automatically replenish any interrupted instances.
- AWS Deep Learning AMI: An Amazon machine image with pre-installed deep learning frameworks. In this example, I use the GPU-accelerated TensorFlow framework for training
- Amazon Elastic Block Storage (EBS): A persistent volume to store datasets, checkpoints and logs, that can be attached to a currently running instance
- Amazon EBS snapshots: Snapshots let you back up data on your Amazon EBS volumes to Amazon S3. A snapshot contains all of the information needed to restore your data to a new EBS volume and can be used to migrate volumes to a new Availability Zone.
- Amazon EC2 user data and instance metadata: At instance launch, user data shell script can be executed to perform actions such as attaching volumes, initiating training and clean up. Instance metadata allows an instance to query information about itself such as instance-id for use with use data shell scripts
- Amazon IAM role and policy: Grants EC2 instance permissions to use AWS services on your behalf. Essential to automate everything.
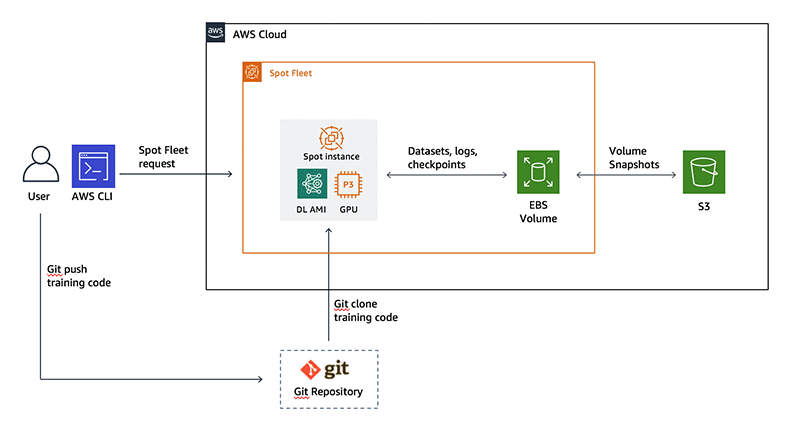
Figure 1: Reference architecture for using spot instances in deep learning workflows
Step 1: Set up a dedicated EBS volume for datasets and checkpoints using a general-purpose instance
The first step is to set up our dedicated EBS volume for storing datasets, checkpoints and other information that needs to persist such as logs and other metadata. This step is only done once so I start by launching an on-demand m4.xlarge instance. If your dataset is small and you’re not going to be performing any pre-processing steps during preparation, then you could launch an instance with lesser memory and processing power that may cost less. If you’re going to be transcoding images or running other multi-threaded pre-processing routines then pick a GPU-backed or compute-optimized CPU instance.
Run the following command on your terminal using the AWS CLI. All the commands listed here were tested on a MacOS.
aws ec2 run-instances
    --image-id ami-0027dfad6168539c7
    --security-group-ids <SECURITY_GROUP_ID>
    --count 1
    --instance-type m4.xlarge
    --key-name <KEYPAIR_NAME>
    --subnet-id <SUBNET_ID>
    --query "Instances[0].InstanceId"
image-id refers to the Deep Learning AMI Ubuntu instance. Be sure to update the security group, key ID and subnet ID to allow SSH connections into the instance. See this documentation page for more details.
Important: Create a subnet in a specific Availability Zone and remember your choice. EBS volumes can only be attached to instances in the same subnet. See Figure 1 for illustration. In this example I use us-west-2b as my Availability Zone for setup. In step 3 I show you how to automate migration of EBS volumes between Availability Zones using EBS snapshots.
Throughout this example, everything in italics needs to be replaced with values specific to your setup, the rest can just be copied.
Next, create an EBS volume for your datasets and checkpoints. Here I request 100 GiB. You should choose a value that suits your dataset needs. The EBS volume should be in the same Availability Zone as your instance. After you create the volume, attach it to your instance. Specify the ID details from the output of the run-instances and create-volume commands.
aws ec2 create-volume
    --size 100
    --region <AWS_REGION>
    --availability-zone <INSTANCE_AZ>
    --volume-type gp2
    --tag-specifications 'ResourceType=volume,Tags=[{Key=Name,Value=DL-datasets-checkpoints}]'

aws ec2 attach-volume
    --volume-id vol-<your_volume_id>
    --instance-id i-<your_instance_id>
    --device /dev/sdf
Follow the steps in the documentation to connect by using SSH into your instance and then format and mount the attached volume. In this example, I use a mount point directory at root named /dltraining
Do this step only once. Later in step 3 you can see how each new spot instance will automatically self-mount the volume at launch so the datasets and checkpoints are available for training.
In this example I use the following paths:
- Datasets:
/dltraining/datasets
- Training progress checkpoints:
/dltraining/checkpoints
sudo mkdir /dltraining
sudo mkfs -t xfs /dev/xvdf
sudo mount /dev/xvdf /dltraining
sudo chown -R ubuntu: /dltraining/
cd /dltraining
mkdir datasets
mkdir checkpoints
#
# Optional: Run commands to move your custom datasets into the Datasets directory.
#
To follow along with this example, you can create and then leave these directories empty. The training script ec2_spot_keras_training.py will download the CIFAR10 dataset using Keras, the first-time training is initiated.
You can terminate this instance using the command below. Volume setup is now complete and will persist in the Availability Zone it was created in.
aws ec2 terminate-instances
    --instance-ids i-<your_instance_id>
    --output text
Step 2: Create IAM role and policy to grant instance permissions
If you’re new to the cloud, AWS Identity and Access Management (IAM) concepts may be new to you. IAM roles and policies are used to grant instances specific permissions that allow access other AWS services on your behalf.
During training, I want the spot instance to have access to my datasets and checkpoints in the EBS volume I created in step 1. However, only volumes in the same Availability Zone as the instances can be attached to it. If the volume and the instance are in different Availability Zones, a new volume needs to be created using a snapshot of the volume stored in Amazon S3.
All these steps can be performed at instance launch using the AWS CLI and user data bash script, and you can see how in step 3. Here are all the AWS CLI commands you need to run at instance launch:
- Query for volumes with the name tag: DL-datasets-checkpoints (there should be only one)
- Create a snapshot of this volume with tag: DL-datasets-checkpoints-snapshot
- If the instance and volume are in the same Availability Zone, attach volume to the instance
- If the instance and volume are in different Availability Zones, create a new volume from the snapshot in the instance’s Availability Zone with name: DL-datasets-checkpoints, and attach it to the instance. Delete the volume in the different Availability Zone to ensure there is only one copy.
- Once training is complete, cancel the spot fleet request and terminate all training instances
In order for the instance to be able to perform these actions, I will need to grant the instance the permissions to do so on my behalf. This way I don’t grant the instance all the same permissions that I as a user have and risk potential abuse.
I start by first creating a role for my Amazon EC2 instance, called the IAM role. After that I grant specific permissions to this role by creating what is called a policy. Execute the following command to create a new IAM role. I’ve named my role DL-Training feel free to choose another name.
aws iam create-role
    --role-name DL-Training
    --assume-role-policy-document '{"Version":"2012-10-17","Statement":[{"Sid":"","Effect":"Allow","Principal":{"Service":"ec2.amazonaws.com"},"Action":"sts:AssumeRole"}]}'
Next, I will create and attach a policy that grants the instance the following permissions:
- Describe, create, attach and delete volumes
- Create snapshots from volumes
- Describe spot instances
- Cancel spot fleet requests and terminate instances
You can grant permissions to access other AWS services if you’re going to be using them in your application. In general, the more specific you are about the actions the instance takes the better. The permissions are in a file called ec2-permissions-dl-training.json on the example GitHub repository.
{
    "Version": "2012-10-17",
    "Statement": [
        {
            "Effect": "Allow",
            "Action": [
                "ec2:AttachVolume",
                "ec2:DeleteVolume",
                "ec2:DescribeVolumeStatus",
                "ec2:CancelSpotFleetRequests",
                "ec2:CreateTags",
                "ec2:DescribeVolumes",
                "ec2:CreateSnapshot",
                "ec2:DescribeSpotInstanceRequests",
                "ec2:DescribeSnapshots",
                "ec2:CreateVolume"
            ],
            "Resource": "*"
        }
    ]
}
And run the following to create a policy and attach it to our IAM role:
aws iam create-policy
    --policy-name ec2-permissions-dl-training
    --policy-document file://ec2-permissions-dl-training.json

aws iam attach-role-policy
    --policy-arn arn:aws:iam::<account_id>:policy/ec2-permissions-dl-training
    --role-name DL-Training
Be sure to substitute <account_id> with your AWS account ID in the attach-role-policy command.
Step 3: Create EC2 user data bash script
Next, I create a launch specification file with details about the instance you want to run your training on. In this example I’m going to be using a p3.2xlarge. If you’re running a multi-GPU training job then you can request for an instance with more GPUs. Note, by multi-GPU jobs, I’m referring to multiple GPUs on the same instance. Currently, the maximum number of GPUs you can get on a single instance are 8 GPUs with a p3.16xlarge or p3dn.24xlarge. I cover distributed/multi-node training use-cases in a future blog post.
As discussed in step 2, Amazon EC2 allows you to pass user data shell scripts to an instance that gets executed at launch. Let’s take a look at our user data shell script. The full script (user_data_script.sh) is available on GitHub.
There are 4 key sections in the file:
Get instance ID and query volume
In this section the script queries the instance metadata API to access to the ID instance on which this script is running. It then uses this information to search for the datasets and checkpoints volume with the tag: DL-datasets-checkpoints
#!/bin/bash

# Get instance ID
INSTANCE_ID=$(curl -s http://169.254.169.254/latest/meta-data/instance-id)
INSTANCE_AZ=$(curl -s http://169.254.169.254/latest/meta-data/placement/availability-zone)
AWS_REGION=us-west-2

# Get Volume Id and availability zone
VOLUME_ID=$(aws ec2 describe-volumes --region $AWS_REGION --filter "Name=tag:Name,Values=DL-datasets-checkpoints" --query "Volumes[].VolumeId" --output text)
VOLUME_AZ=$(aws ec2 describe-volumes --region $AWS_REGION --filter "Name=tag:Name,Values=DL-datasets-checkpoints" --query "Volumes[].AvailabilityZone" --output text)
Check if the volume and instance are in the same availability zone
In this section the script checks with the volume and the instance are in the same Availability Zone. If they are in different Availability Zones, it first creates a point-in-time snapshot of the volume in Amazon S3. Once the snapshot is created, it deletes the volume and creates a new volume from the snapshot in the instance’s Availability Zone. Figure 2 illustrates the two patterns.
The aws ec2 wait command ensures that snapshot and volume creation are complete before proceeding to the next command.
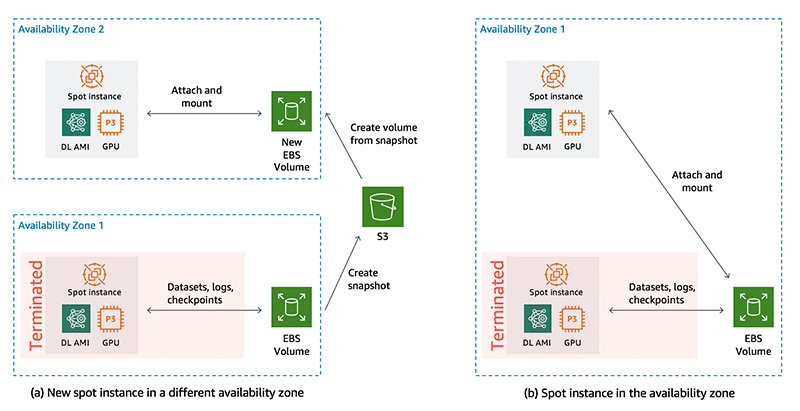
Figure 2: On spot instance termination, if a new spot instance is launched in a different availability zone (a), EBS volume snapshots are saved to S3 and a new volume is created from the snapshot in the instance’s availability zone. If the new spot instance is launched in the same availability zone as the volume (b), the same EBS volume is attached to the new instance
if [ $VOLUME_AZ != $INSTANCE_AZ ]; then
		SNAPSHOT_ID=$(aws ec2 create-snapshot
				--region $AWS_REGION
				--volume-id $VOLUME_ID
				--description "`date +"%D %T"`"
				--tag-specifications 'ResourceType=snapshot,Tags=[{Key=Name,Value=DL-datasets-checkpoints-snapshot}]'
				--query SnapshotId --output text)
		aws ec2 wait --region $AWS_REGION snapshot-completed --snapshot-ids $SNAPSHOT_ID
		aws ec2 --region $AWS_REGION  delete-volume --volume-id $VOLUME_ID
		VOLUME_ID=$(aws ec2 create-volume
				--region $AWS_REGION
				--availability-zone $INSTANCE_AZ
				--snapshot-id $SNAPSHOT_ID
				--volume-type gp2
				--tag-specifications 'ResourceType=volume,Tags=[{Key=Name,Value=DL-datasets-checkpoints}]'
				--query VolumeId --output text)
		aws ec2 wait volume-available --region $AWS_REGION --volume-id $VOLUME_ID
fi
Attach and mount volume: In this section the script first attaches the volume that is in the same Availability Zone as the instance. It then mounts the attached volume to the mount point directory at /dltraining. And then updates the ownership to the Ubuntu user since the user data script is run as root.
aws ec2 attach-volume
    --region $AWS_REGION --volume-id $VOLUME_ID
    --instance-id $INSTANCE_ID --device /dev/sdf
sleep 10

# Mount volume and change ownership, since this script is run as root
mkdir /dltraining
mount /dev/xvdf /dltraining
chown -R ubuntu: /dltraining/
cd /home/ubuntu/
Get training scripts: In this section, the script clones the training code git repository
# Get training code
git clone https://github.com/awslabs/ec2-spot-labs.git
chown -R ubuntu: ec2-spot-labs
cd ec2-spot-labs/ec2-spot-deep-learning-training/
Initiate/resume training: The script activates the tensorflow_p36 Conda environment and runs the training script as the Ubuntu user. The training script takes care of loading the dataset from the Amazon EBS volume and resuming training from checkpoints. Step 4 will go into the modification needed for your training script.
# Initiate training using the tensorflow_36 conda environment
sudo -H -u ubuntu bash -c "source /home/ubuntu/anaconda3/bin/activate tensorflow_p36; python ec2_spot_keras_training.py "
Clean up: Once training is complete, the script cleans up by canceling spot fleet requests associated with the current instance. cancel-spot-fleet-requests can also terminate instances managed by the fleet.
# After training, clean up by cancelling spot fleet requests
SPOT_FLEET_REQUEST_ID=$(aws ec2 describe-spot-instance-requests --region $AWS_REGION --filter "Name=instance-id,Values='$INSTANCE_ID'" --query "SpotInstanceRequests[].Tags[?Key=='aws:ec2spot:fleet-request-id'].Value[]" --output text)

aws ec2 cancel-spot-fleet-requests --region $AWS_REGION --spot-fleet-request-ids $SPOT_FLEET_REQUEST_ID --terminate-instances
Step 4: Create a spot fleet request configuration file
Next, I will create a spot fleet configuration file that includes target capacity (1 instance in our example), launch specifications for the instance, and the maximum price that you are willing to pay. Spot fleet places requests to meet the target capacity and automatically replenish any interrupted instances.
Under LaunchSpecifications section, I have two different specifications.
- A p3.2xlarge instance type that may be placed in any Availability Zone within the us-west-2 Region
- A p2.xlarge instance type that may be placed in any Availability Zone within the us-west-2 Region
The spot fleet configuration is in a file called spot_fleet_config.json in the example GitHub repository. Spot fleet configuration file gives you the flexibility to mix and match instance types and Availability Zones. If your training script takes advantage of NVIDIA Tesla V100’s mixed-precision Tensor Cores, you may want to restrict instance types to only p3.2xlarge. The p2.xlarge with NVIDIA Tesla K80 only supports single (FP32) and double precision (FP64), and are cheaper but slower than V100 for deep learning training. Choose a combination that suits your needs.
{
  "TargetCapacity": 1,
  "AllocationStrategy": "lowestPrice",
  "IamFleetRole": "arn:aws:iam::<ACCOUNT_NUMBER>:role/DL-Training-Spot-Fleet-Role",
  "LaunchSpecifications": [
      {
          "ImageId": "ami-0027dfad6168539c7",
          "KeyName": "<KEYPAIR_NAME>",
          "SecurityGroups": [
              {
                  "GroupId": <SECURITY_GROUP_ID>
              }
          ],
          "InstanceType": "p3.2xlarge",
          "Placement": {
              "AvailabilityZone": "us-west-2a, us-west-2b, us-west-2c, us-west-2d"
          },
                  "UserData": "base64_encoded_bash_script",
          "IamInstanceProfile": {
              "Arn": "arn:aws:iam::<ACCOUNT_NUMBER>:instance-profile/DL-Training"
          }
      },
        {
          "ImageId": "ami-0027dfad6168539c7",
          "KeyName": "<KEYPAIR_NAME>",
          "SecurityGroups": [
              {
                  "GroupId": <SECURITY_GROUP_ID>
              }
          ],
          "InstanceType": "p2.xlarge",
          "Placement": {
              "AvailabilityZone": "us-west-2a, us-west-2b, us-west-2c, us-west-2d"
          },
                  "UserData": "base64_encoded_bash_script",
          "IamInstanceProfile": {
              "Arn": "arn:aws:iam::<ACCOUNT_NUMBER>:instance-profile/DL-Training"
          }
      }
Be sure to use a security group that allows you to SSH into the instance for debugging and checking progress manually and use your Key pair name for authentication. Under IAM instance profile, update the IAM role you created in step 2, that grants the instance necessary permissions.
To use the spot fleet Request, create an IAM fleet role by running the following commands:
aws iam create-role
     --role-name DL-Training-Spot-Fleet-Role
     --assume-role-policy-document '{"Version":"2012-10-17","Statement":[{"Sid":"","Effect":"Allow","Principal":{"Service":"spotfleet.amazonaws.com"},"Action":"sts:AssumeRole"}]}'

aws iam attach-role-policy
     --policy-arn arn:aws:iam::aws:policy/service-role/AmazonEC2SpotFleetTaggingRole --role-name DL-Training-Spot-Fleet-Role
In the configuration snippet above, under user data you have to replace the text base64_encoded_bash_script with base64-encoded user data shell script. To do this you can use the base64 utility available on Mac and linux based OS. The following works on a Mac; for Linux flavors, replace -b with -w to remove line breaks. The sed command replaces all occurrences of the string base64_encoded_bash_script with the base64-encoded bash script.
USER_DATA=`base64 user_data_script.sh -b0`
sed -i '' "s|base64_encoded_bash_script|$USER_DATA|g" spot_fleet_config.json
Step 5: Update deep learning training script
The final step is to update your deep learning training script to ensure datasets are loaded from and checkpoints are saved to the attached Amazon EBS volume. In this example I’m training a ResNet50 model on the CIFAR10 dataset. A typical deep learning training script may have the following steps. In pseudo-code below, are changes you’ll need to make to your training script to use with our setup.
# Prepare datasets / setup dataset loaders
dataset = load_data(ebs_mount_point_dataset)

# Define model
if exists(ebs_mount_point_checkpoints)
    checkpoint, checkpoint_epoch = get_latest_checkpoint(ebs_mount_point_checkpoints)
    model = load_model(checkpoint)
else
    model = define_model()
    checkpoint_epoch = 0

# Define training parameters

# Execute training loop
for i = checkpoint_epoch to max_epoch
    ...
    ...
    ...
    # Avoid corrupted checkpoints due to termination
    status = get_spot_termination_status()
    if status == “Terminating”
        pause_training()
    # Save checkpoints and progress
    save_model_checkpoint(model, ebs_mount_point_checkpoints)
    save_progress_logs(ebs_mount_point)
end
To summarize,
- Load data from the mounted Amazon EBS volume, in our example that would be
/dltraining
- Check if a checkpoint exists, then load the checkpoint and update epoch number to resume training. If not, define the model architecture and start training from scratch.
- In the training loop, check if termination notice has been issued. If yes, then pause training to avoid termination during checkpointing to avoid corrupt or incomplete checkpoints.
- If termination notice hasn’t been issued, save the model checkpoints to
/dltraining/checkpoints/
The training script for this example is called ec2_spot_keras_training.py and is available in the example repository. Below is a code snippet from our training script. The function load_checkpoint_model() loads the latest checkpoint to resume training.
def load_checkpoint_model(checkpoint_path, checkpoint_names):
    list_of_checkpoint_files = glob.glob(os.path.join(checkpoint_path, '*'))
    checkpoint_epoch_number = max([int(file.split(".")[1]) for file in list_of_checkpoint_files])
    checkpoint_epoch_path = os.path.join(checkpoint_path,
                                         checkpoint_names.format(epoch=checkpoint_epoch_number))
    resume_model = load_model(checkpoint_epoch_path)
    return resume_model, checkpoint_epoch_number
Since I’m using Keras with a TensorFlow backend, I didn’t have to explicitly write the training loop. Keras provides convenient callback functions for saving checkpoints and logging progress after each epoch.
Note: if you’re implementing your own training loop with TensorFlow’s low-level API, PyTorch or other framework, you are responsible for checkpointing progress. This can be very tricky if you don’t know what you’re doing. To resume training properly, you’ll need to make sure that you’re saving (1) model architecture to re-define the model (2) completed epoch number and weights of the model at the end of the current epoch (3) training hyper-parameters such as loss function, optimizer, learning rate schedule etc. (4) optimizer state at the end of the epoch
Keras callbacks I’m using to checkpoint progress and check for termination status are below:
def define_callbacks(volume_mount_dir, checkpoint_path, checkpoint_names, today_date):

    # Model checkpoint callback
    if not os.path.isdir(checkpoint_path):
        os.makedirs(checkpoint_path)
    filepath = os.path.join(checkpoint_path, checkpoint_names)
    checkpoint_callback = ModelCheckpoint(filepath=filepath,
                                          save_weights_only=False,
                                          monitor='val_loss')

    # Loss history callback
    epoch_results_callback = CSVLogger(os.path.join(volume_mount_dir,
                           'training_log_{}.csv'.format(today_date)),
                           append=True)

    class SpotTermination(keras.callbacks.Callback):
        def on_batch_begin(self, batch, logs={}):
            status_code = requests.get("http://169.254.169.254/latest/meta-data/spot/instance-action").status_code
            if status_code != 404:
                time.sleep(150)
spot_termination_callback = SpotTermination()
    callbacks = [checkpoint_callback, epoch_results_callback]
    return callbacks
Step 6: Initiate spot request to start the training
I’m now ready to submit our spot fleet request using the spot_fleet_config.json configuration file I created in Step 4.
aws ec2 request-spot-fleet --spot-fleet-request-config file://spot_fleet_config.json
How it all comes together
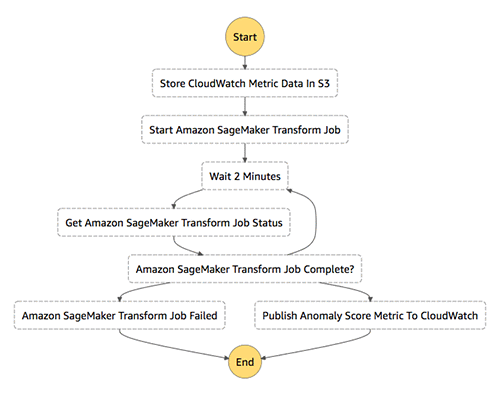
So far I’ve introduced lot of code, configuration files and AWS CLI commands. Figure 3 shows how all these code and configuration artifacts fit together. Let’s walk through the process so you can get a better sense of how they are all connected.
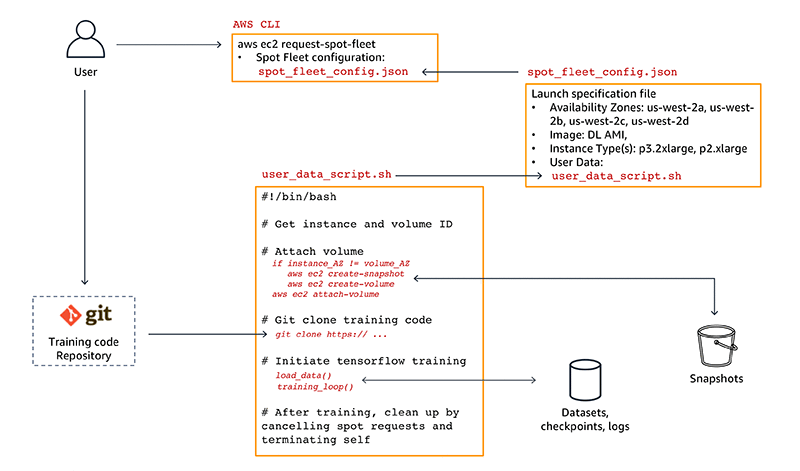
Figure 3: Data, code and configuration artifacts dependency chart
Let’s start with you, the user.
As a deep learning researcher or developer, first prototype and develop your models locally or on an inexpensive CPU-only Amazon EC2 on-demand instance with the AWS Deep Learning AMI. When you’re ready to run a training job on GPUs, you then push your training scripts to a Git repository.
Next, submit a spot request using the aws ec2 request-spot-fleet command shown in step 6. This sets everything into motion.
The spot request uses the spot fleet configuration file spot_fleet_config.json to launch the desired spot instance type. In this example, you run a training job on a p3.2xlarge instance in any of the us-west-2 Region’s Availability Zones. The training script will run on an instance imaged using the AWS Deep Learning AMI, which includes GPU optimized TensorFlow framework.
The spot fleet configuration file also includes the user_data_script.sh bash script file. The user data bash script is executed on the spot instance at launch. This script is responsible for mounting the dataset and checkpoint volume, cloning the training scripts, and initiating the training as we saw in step 3.
In the event of a spot interruption due to higher spot instance price or lack of capacity, the instance will be terminated and the dataset and checkpoints Amazon EBS volume will be detached. Spot fleet then places another request to automatically replenish the interrupted instance.
When the request is fulfilled again, a new spot instance will be launched and it will execute the user_data_script.sh at launch. The script queries for the dataset and checkpoint volume. If the volume and the instance are in different Availability Zones, it first creates a snapshot of the volume and then creates a new volume based on the snapshot in the current instance’s Availability Zone. The volume in the previous Availability Zone is deleted to ensure there is only one source of truth.
The script then attaches the volume to the instance and resumes training from the most recent checkpoint. Once training is complete the spot fleet request is cancelled and the current running instance is terminated.
If you want to specify a higher maximum spot instance price, or change instance types or Availability Zones, simply cancel the running spot fleet request by issuing aws ec2 cancel-spot-fleet-requests and initiating a new request with an updated spot fleet configuration file spot_fleet_config.json
Summary
That’s your overview about how spot instances can be used to run deep learning training experiments on GPU instances at a much lower cost than on-demand instances.
The setup in this blog post can be extended to cover more advanced deep learning workflows, and here are some ideas:
- Multi-GPU training. Update the training script to enable multi-GPU training
- Sub-epoch granularity checkpointing and resuming. In this example, checkpoints are saved only at the end of each epoch. For large datasets and complex models that take long time to finish an epoch, frequent checkpointing minimizes progress loss during interruption.
- Multiple parallel experiments. Increase spot fleet target capacity to run multiple independent training jobs with different hyperparameters.
I hope you enjoyed reading this post. If you have questions, comments or feedback please use the comments section below. Happy spot training!
About the Author
 Shashank Prasanna is an AI & Machine Learning Technical Evangelist at Amazon Web Services (AWS) where he focuses on helping engineers, developers and data scientists solve challenging problems with machine learning. Prior to joining AWS, he worked at NVIDIA, MathWorks (makers of MATLAB & Simulink) and Oracle in product marketing, product management, and software development roles.

 Luka Krajcar is a Software Development Engineer on the AWS AI Labs team. He received his M.S. in Computer Science at the Faculty of Electrical Engineering and Computing at the University of Zagreb. Outside of work, Luka enjoys reading fiction, running, and video gaming.
 Julio Delgado Mangas is a Software Development Engineer on the AWS AI Labs team. He has contributed to AWS services like Amazon CloudWatch and the Amazon QuickSight SPICE engine. Before joining Amazon, he was a research engineer on the Human Brain Project.
 Laurence Rouesnel is the Algorithms & Platforms Group Manager in Amazon AI Labs. He leads a team of engineers and scientists working on deep learning and machine learning research and products. In his spare time, he is an avid traveler, and loves the outdoors whether it’s hiking, skiing, or windsurfing.
 Chris Swierczewski is an Applied Scientist on the AWS AI Labs team, where he has contributed to the Amazon SageMaker Latent Dirichlet Allocation and the Amazon SageMaker Random Cut Forest algorithms. Before Amazon, Chris was a Ph.D. student in Applied Mathematics at the University of Washington. He likes to go hiking, backpacking, and camping with his wife and their dog, River.
 Madhav Jha is an Applied Scientist on the AWS AI Labs team where he uses his background in sublinear algorithms to develop scalable machine learning algorithms. He is a theoretical computer scientist who enjoys coding. He is always up for coffee conversations on startups and technology.
 Eftiquar Shaikh is Senior Software engineer with AWS AI. He works on building AWS services in AI space. When he is not programming, he likes to read, run and travel.
 Satadal Bhattacharjee is Principal Product Manager with AWS AI. He leads the Machine Learning Engine PM team working on projects such as SageMaker Neo, AWS Deep Learning AMIs, and AWS Elastic Inference. For fun outside work, Satadal loves to hike, coach robotics teams, and spend time with his family and friends.
 Alexandra Bush is a Senior Product Marketing Manager for AWS AI. She is passionate about how technology impacts the world around us and enjoys being able to help make it accessible to all. Out of the office she loves to run, travel and stay active in the outdoors with family and friends.