Author: torontoai

[P] This Story Does Not Exist
I took GPT-2-small, fine-tuned it with r/WritingPrompts data, and put it online.
Try it out here: https://www.thisstorydoesnotexist.com/
Shameless Self-Promotion:
Please follow me on my twitter for updates, and donate to me on Patreon to help keep stuff online.
Technical Details:
Training was done with: https://github.com/nshepperd/gpt-2 with some minor modifications
Training was done with batch size of 512 (batch 2 accumulated 256 times) for 1500 iterations using Adam with lr=1e-5.
Samples are generated with top_k=50, temperature=0.95.
The webservice is two n1 instances on GCP, an n1 instance with a K80 (preemptible), and a desktop computer with a 1080Ti in my basement.
If you have any questions about this project, please ask! 🙂
submitted by /u/eukaryote31
[link] [comments]
![[R] Uncertainty Autoencoders: Learning Compressed Representations via Variational Information Maximization](https://b.thumbs.redditmedia.com/9eKoMQP64VmgJxzC3_EJjL5Rba6qCVrISKvVyovpAiE.jpg "[R] Uncertainty Autoencoders: Learning Compressed Representations via Variational Information Maximization")
[D] Any tips and tricks to crack the DeepMind quiz interview?
Hi all!
I’m interviewing for a PhD internship at DeepMind, which is similar to a Research Scientist position. The process involves 1) a discussion with recruiters, 2) a 2 hours long technical test (the DeepMind quiz), 3) discussions with research scientists, 4) a final interview with the People and Culture team.
I’m wondering if any of you have tips for the technical test. What is the best way to prepare for it?
I heard it’s only a sort of “fact checking” interview involving computer science, maths, stats and ML: questions where you either know the answer, or you don’t, no thinking involved. Anyone can confirm this?
Also, they provided me with some resources, but these are thick books I would like to avoid. I’m looking for the most efficient way to prepare for it, since it mostly involves some BS knowledge I will forget 5 minutes after the interview.
Thanks in advance! 🙂
submitted by /u/DependentSky6
[link] [comments]
Natural Language Processing Intern – 4Five Labs Inc – Toronto, ON
From Indeed – Fri, 19 Apr 2019 16:33:26 GMT – View all Toronto, ON jobs
Analyze content with Amazon Comprehend and Amazon SageMaker notebooks
In today’s connected world, it’s important for companies to monitor social media channels to protect their brand and customer relationships. Companies try to learn about their customers, products, and services through social media, emails, and other communications. Machine learning (ML) models can help address some of these needs. However, the process to build and train your own model can be complicated and slow. The Amazon machine learning platform provides pre-trained models that can be accessed within Amazon SageMaker using a Jupyter Notebook. Amazon SageMaker is a fully managed end to end ML platform with modular design, but we will use only a hosted notebook instance for this example. Amazon Comprehend is a natural language processing (NLP) service that uses machine learning to find insights and relationships in text.
In this blog post, we are going to show you how you can use Amazon Comprehend to analyze Twitter sentiment within a notebook.
How does Amazon Comprehend work?
Amazon Comprehend takes your unstructured data such as social media posts, emails, webpages, documents, and transcriptions as input. Then it analyzes the input using the power of NLP algorithms to extract key phrases, entities, and sentiments automatically. It can also detect language of the input data and find relevant groupings of the data using topic modeling algorithms. The following diagram demonstrates the Amazon Comprehend workflow.
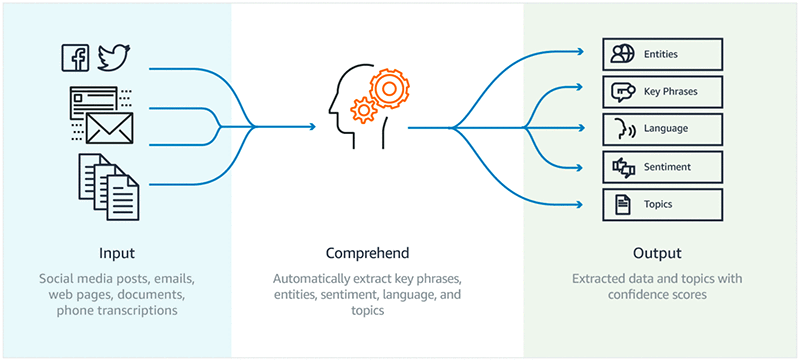
Using Amazon Comprehend Custom, you can identify new entity types that aren’t supported as a preset generic entity type, or you can analyze customer feedback for terms and phrases unique to your business. For example, you can learn when a customer is going to churn, or when they mention one of your unique product IDs.
Step 1: Set up your Amazon SageMaker notebook
From the AWS Management Console, choose Services and then Amazon SageMaker under Machine Learning. You can do this from any AWS Region, but you need to make sure that both our Amazon Comprehend API and Amazon SageMaker are in the same Region. Make a note of your AWS Region, you’ll need this information to connect to the Amazon Comprehend API. For the example in this blog post, I’ve set the Region to US East (N. Virginia).
In the Amazon SageMaker console, under Notebook, choose Notebook instances. Now choose the Create Notebook Instance.

You need to set a notebook instance name first. For this example, we’ll use ‘comprehend-nb’. Note that there are some naming constraints for your notebook instance name. These constraints include the following: maximum of 63 alphanumeric characters, hyphens can be used but not spaces, and the instance name must be unique within your account in an AWS Region. You can name the notebook anything you want.
The default instance size is sufficient for this exercise, as are the other default settings. However, you need to create an IAM role with AmazonSageMakerFullAccess, plus the IAM role needs access to any necessary Amazon Simple Storage Service (Amazon S3) buckets. In the console, under IAM role, choose Create a new role.
While creating a new IAM role, you can specify the Amazon S3 buckets you want the role to have access to by choosing Specific S3 buckets for the S3 buckets you specify. Select Create role.

Your notebook instance settings should now look like this:

Choose Create notebook instance.
After a few minutes, your notebook instance will be ready. To access Amazon Comprehend from the notebook instance, you need to attach the ComprehendFullAccess policy to your IAM role. To do so, choose the notebook instance name.

Your Notebook instance settings should now look like the following screenshot. Choose IAM role ARN to open the IAM role attached to the notebook instance.

From the IAM dashboard, choose Attach policies.

You can filter policies by typing the name of the policy. Type ComprehendFullAccess and check on the policy as it lists on the page. Choose Attach policy.

After the policy is attached successfully, you can safely close the IAM console and return to Amazon SageMaker console. After the notebook instance status is set to InService, choose the Open Jupyter link.

Step 2: Create a notebook
After you open the notebook instance that you provisioned, from the Jupyter console, choose New and then conda_python3.

This should open a new blank Jupyter Notebook, which would look like the following screenshot:

Give a name to your Jupyter Notebook by choosing Untitled and following the instructions to build and run the code blocks. Alternatively, you can access the sample code file here. You can upload the file to the notebook instance to run it through directly.
Step 3: Import the necessary packages
You can import necessary packages that are required for this example.
Step 4: Connect to Amazon Comprehend
You can use the AWS SDK for Python SDK (Boto3) to connect to Amazon Comprehend from your Python code base. Using the following command, you can import boto3 and connect to Amazon Comprehend in a specified AWS Region using the boto3 client. The AWS Region must be same Region as the notebook. For this example, I’ve used the us-east-1 Region because I created the notebook in that Region.
Step 5: Analyze a tweet using the Amazon Comprehend API
Using the Amazon Comprehend API, you can now analyze a single tweet. You will be able to extract key phrases, entities, and sentiments.
Step 6: Use the Twitter API to look for tweets that contain the hashtag #BePeculiar
“Be Peculiar” is one of the key traits of Amazon culture. Let’s extract the tweets that contain the hashtag #BePeculiar.
Twitter application information
For pulling data from Twitter, you will need your Twitter application information. This can be found in apps.twitter.com.
Visit apps.twitter.com, if you already have existing app, you can click on it or you can choose the Create New App button to create a new app.

Fill out the required information on the create an application form, agree to the developer agreement, and then select Create your Twitter application.

Choose the Keys and Access Tokens tab and record Consumer Key (API Key), Consumer Secret (API Secret).
Choose Create my access token. After it has been created, record Access Token and Access Token Secret under Your Access Token.
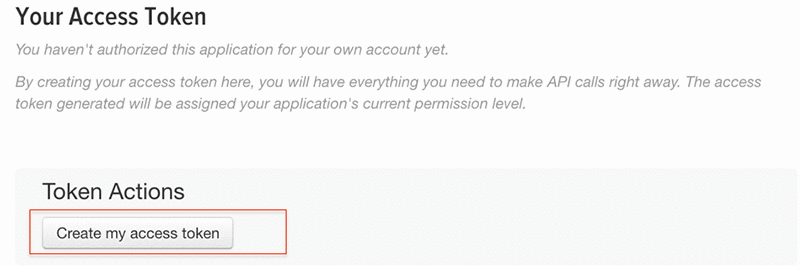
You can now return to your Amazon SageMaker notebook. Save the Twitter app API key and access token information in your code so that you can use the information to use the Twitter API.
Python wrapper for the Twitter API
Tweepy is a Python wrapper for Twitter API. It can be imported and used for connecting to the Twitter API by using the following code. You need to install tweepy before you can use it in the notebook.
You can now import tweepy and create a tweepy authorization handler object for extracting tweets.
You can now save the hashtag you want to a tag variable and use the tweepy authorization handler object to search for tweets containing the hashtag. In this example, I’m using the “#BePeculiar” hashtag and saving the extracted tweets to html object called “tweets” by using the following command:
Note: I’ve added count=50 to this code to limit the data pull.
Warning: Accessing data from Twitter can be expensive. Refer the pricing guidelines before you access its API.
Step 7: Analyze extracted tweet data using the Comprehend API
The individual tweet is a JSON object with lots of metadata on the user, their profile, and post attributes such as timestamp, likes, comments, and the original tweet.
Now you can extract some of this metadata along with the tweet content. The tweet content can further be analyzed using Amazon Comprehend API to understand the sentiment of the post.
For the purpose of this blog post, I’ve extracted the timestamp, location, and the tweet, and I extracted sentiment score for each of the tweets.
Step 8: Visualize the data
To visualize the data, it’s important to format the data properly. Combine the extracted information to build a DataFrame so that you can arrange the data in a tabular format.
Build a DataFrame
Using the Python Pandas library, you can build a DataFrame to arrange the extracted information in a tabular form for easy consumption.
Perform exploratory data analysis
You can perform exploratory data analysis on the result dataset to answer important business questions.
For example, to find out the location that generated more positive sentiments, you can run the following code block:
The following code block can help us find out which locations tweeted the most.
Similarly, you can also learn if there is a certain time of the day that generates more positive sentiments than other times by breaking the timestamp field further.
Save the data to Amazon S3
Finally, you can save the results in a comma separated file (CSV) to Amazon S3. This allows you to reuse the sentiment analysis results from the Amazon Comprehend API to build a business intelligence (BI) dashboard or to build other relevant machine learning models using Amazon SageMaker native algorithms.
Conclusion
In this blog post you learned how to extract tweets using the Twitter API to get relevant data from social media. You also learned how to use the Amazon Comprehend API to analyze the Twitter feed to extract useful information. Further, you can use the results from Amazon Comprehend as an input to relevant Amazon SageMaker algorithms and build inference. To learn more about Amazon Comprehend, refer to the AWS documentation.
You can also, refer to Build a social media dashboard using machine learning and BI services, a blog post where Ben Snively and Viral Desai illustrate how to build a social media dashboard using serverless technology. The social media dashboard reads tweets with a #AWS hashtag, uses machine learning services like Amazon Translate and Amazon Comprehend to do translation, and natural language processing (NLP) to extract topics, entities, and sentiment. At the end, it aggregates the information using Amazon Athena and builds an Amazon QuickSight dashboard to visualize the information captured from the tweets.
About the Author
 Pranati Sahu is a Data Scientist at AWS Professional Services and Amazon ML Solutions Lab team. She has an MS in Operations Research from Arizona State University, Tempe and has worked on machine learning problems across industries including social media, consumer hardware, and retail. In her current role, she is working with customers to solve some of the industry’s complex machine learning use cases on AWS.
[P] Python package to easily retrain OpenAI’s GPT-2 text-generating model on new texts + Colaboratory Notebook to use it w/ GPU for free
Hi all! I just open-sourced a Python package on GitHub that lets you retrain the smaller GPT-2 model on your own text with minimal code! (and without fussing around with the CLI like the original repo)
I have also made a Colaboratory Notebook which handles both training w/ a GPU for free and file I/O to the notebook (which with GPT-2 is a tad tricker).
Let me know if you have any questions! I plan on releasing more demos soon!
submitted by /u/minimaxir
[link] [comments]
[D] Term for keeping test and training data separate
So, I’ve been using the term “data hygiene” for the measures we take in (safety) ML to keep test and training data separate. Stuff like
- test data on access controlled network share
- acquiring the test set later and by different teams
- Thresholdout (when I finally get the chance to play around with it)
But apparently, I just read that term in some fringe paper once and actually data hygiene is a separate concept in data science?!
Does anyone got a good term for the methods/approaches?
submitted by /u/ipsLED87
[link] [comments]
[P] Rainbow-IQN, that reaches the perfect score (+21) on Atari Pong within 100 episodes!
- Project link: https://github.com/medipixel/rl_algorithms (Pytorch)
Hi, ML redditors all around the world! Recently, I have been studying Reinforcement Learning methods and implementing some of the ideas that could possibly improve my work. Not long ago I took a look at Implicit Quantile Networks for Distributional Reinforcement Learning (Dabney et al., 2018), and one sentence at the end caught my attention.
“Creating a Rainbow-IQN agent could yield even greater improvements on Atari-57.”
So I tried it. As the figure attached in the project readme, it learns Atari Pong incredibly faster than Rainbow as it reaches the perfect score (+21) within just 100 episodes. I am so happy to share this result, even though it is not so enough to evaluate the method’s performance objectively.
Plus, the repository contains other methods as well: A2C, PPO, DDPG, TD3, SAC, from Demonstration, Behaviour Cloning, and so on.
Any feedback will be so appreciated! Thanks 🙂
submitted by /u/Curt-Park
[link] [comments]